
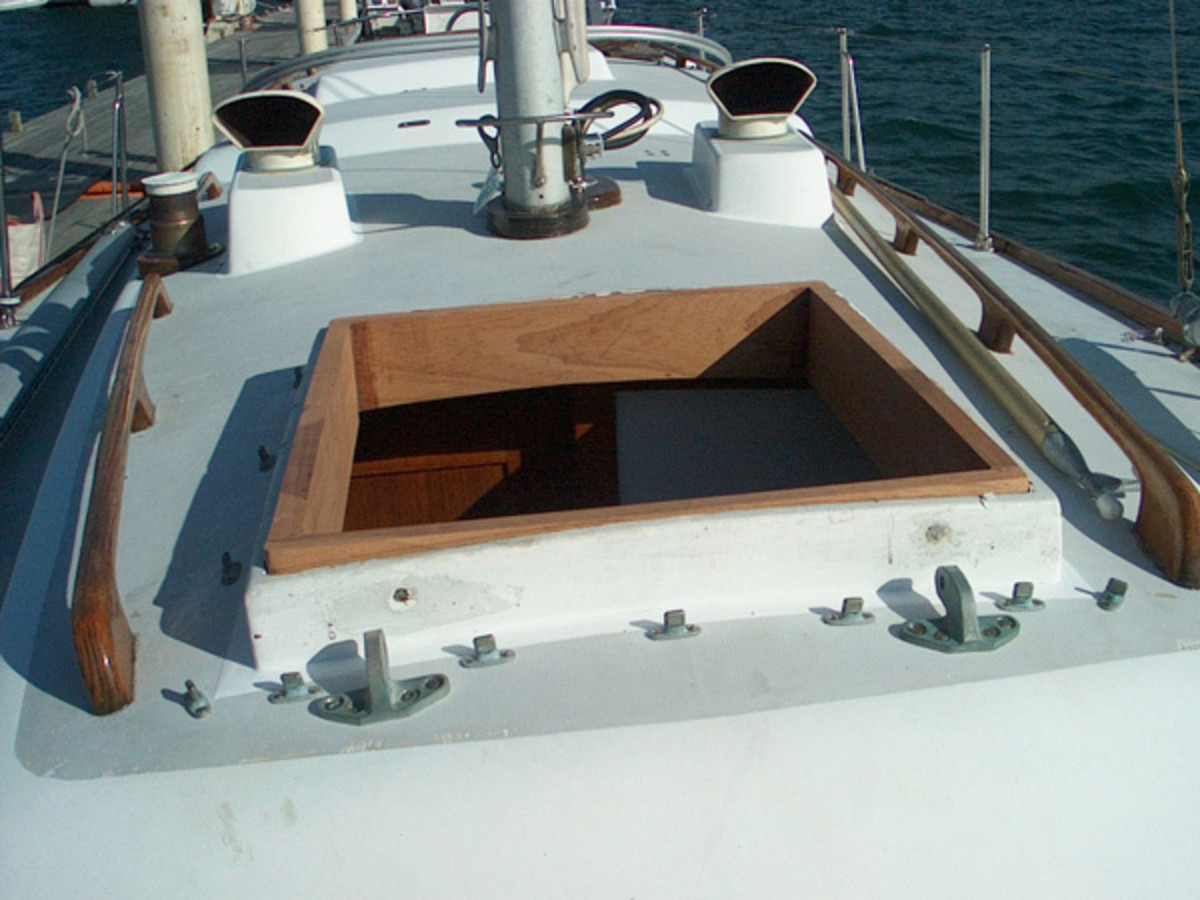
Learn More. No one looks forward to taking a saw to his or her boat, even if the purpose is improvement. But if you want to install a hatch, a ventilator, or a deck plate, that is exactly what you must do. Exercise care and follow these few common sense rules, and the outcome of this particular trauma will be better than satisfactory. Wherever you plan to install the hatch or deck plate, the first requirement is to know what is on both sides of the surface. If, for example, you have selected a spot on the deck for an additional hatch, don't just guess where the cutout through the cabin overhead will be.
Find two features that already pass through the deck � a mast, hardware mounting bolts, the corner of an existing hatch � and measure between these and the cutout outline on deck. Then use those measurements to draw the same outline in the same position on the cabin overhead.
In some cases it is better to use tape rather than a pencil to outline the cutout. Only when you have the outline accurately positioned on both sides of the deck will you know for sure that you haven't inadvertently positioned your cutout over a bulkhead, a light fixture, or some other interior feature. Aside from interior features, there are at least three other issues you must resolve. The first and generally the easiest of these is whether any deck feature is going to interfere with your ability to follow the outline with the saw.
It is surprising how far outside the outline the saw can protrude, especially when making the turn around corners. The surest way of assessing this is to follow the outline with a bladeless saw. If you do discover interference, now is the time to determine how you can work around it. Alternatives might include a different power saw, limited use of a hand saw, or perhaps making a portion of the cut from the opposite side. The second issue is how much crown the deck has at the chosen location. Hatches are intended to be mounted on a flat surface, but few boat decks are entirely flat.
The hatch manufacturer typically specifies the maximum amount of curvature � if any � the hatch can accommodate. If the deck has too much crown, an alternative location might be flatter.
Otherwise, you must determine how you will create the required flat surface. The third issue is what is between the deck and the headliner. On some boats with molded headliners, some of the boat's wiring was routed over the top of the liner before the deck was installed. If that is a risk on your boat, use a hole saw to remove a plug of the headliner from the center of the cutout, then peer and probe for wiring.
If you find any, you may be able to push it aside. Otherwise, take care to cut the wire near the middle of the cutout and not at the perimeter so you can splice in additional length to route the wire around the opening.
Use the hatch or the supplied paper pattern to trace the exact outline. Be sure it will be square with the centerline of the boat, and that the tracing on the deck is thin, dark, and unambiguous. If the headliner is fabric, the saw will snag and tear it, so you will need to cut it and move it out of the way.
Usually slicing the cloth in an X pattern is best � diagonally from corner to corner. Tape the flaps out of the way. You can trim them off after you have the cutout and you determine how to tighten and secure the liner around the new hatch.
It is tempting to load a fresh blade in the saber saw and simply follow the cutout outline. If you are skillful with a saber saw, this method might work for you.
The rest of us should first use a spade bit or a hole saw to drill holes at each corner in such a way that one quarter of the circumference of each hole forms that corner of the cutout.
Now you only have to make straight cuts from hole to hole. It can be easier to cut a straight line with a circular saw. Watch both the front and the back of the blade to prevent the cut from extending beyond the corner holes.
Because the saw cuts in an arc rather than vertically, you will need to complete the cutout with a saber saw. A hole saw or a circle cutter are ideal for making the necessary cut out for a ventilator or a deck plate, but with care, circular cutouts can also be made with a saber saw, a router, or even a rotary tool Dremel.
Just keep your cutter always inside the outline, then use coarse sandpaper or a drum sander to clean up any irregularities. When you make a cutout in the deck, you nearly always expose the core material--either wood or foam. Because water finding its way into the core has such disastrous consequences, it is imperative to properly seal this raw edge. The bedding under the flange of the hatch is not adequate.
Dig out a half inch or more of the core material all around the cutout, then sand the interior surface of both skins. Saturate the exposed core with unthickened epoxy. Thicken the remaining epoxy to peanut butter consistency with fibers or silica and fill the gap all around the cutout.
When the epoxy cures, the core edge is permanently protected. Lay a straightedge across the deck just beyond the cutout to assess curvature. If the deck is not perfectly flat, you will need to fabricate a spacer that matches the deck curvature on the bottom and is flat on the top, or you will need to build up the deck around the cutout with epoxy paste or fiberglass laminates.
Grinding down the crown is almost never an option because it further weakens a deck already insulted by the cutout. Normally a hatch's metal frame provides adequate reinforcement to compensate for the weakening effect of the cutout, but in the case of large hatch, especially one mounted in close proximity to other holes through the deck, some additional reinforcement may be advisable. This usually involves structurally framing the hole, either with wood or with additional laminates of fiberglass.
Dry-fit the hatch in the cutout and drill the pilot holes for the screws. Mask the deck all around the perimeter of the hatch with Long Mask � the blue masking tape.
Mask also the flange. You can let the tape stand vertical; its purpose is to keep sealant squeeze-out off the frame. Remove the hatch and completely coat the deck between the tape and the cutout with sealant. Use polysulfide if the hatch frame is metal. Put the hatch back over the cutout and wiggle it gently to distribute the sealant.
Insert the screws and snug them all. Now tighten them, following a pattern of the next screw in sequence being as opposite as possible, i. Do not overtighten the screws or you will squeeze out all the sealant and the resulting metal to fiberglass joint will soon leak. Let the sealant cure for two or three days, then trace a razor knife around the perimeter of the hatch frame to separate the squeeze-out from the sealant under the frame.
Peel up the tape from the deck and the excess sealant will come with it. Remove the tape from the hatch and you are finished, except for installing the trim ring below. For more about the proper installation of deck hardware and hundreds of other boat maintenance and improvement matters, consult Don Casey's Complete Illustrated Sailboat Maintenance Manual.
Don Casey has been one of the most consulted experts on boat care and upgrades for 30 years, and is one of the BoatUS Magazine's panel of experts. He and his wife cruise aboard their footer part of the year in the eastern Caribbean.
We use cookies to enhance your visit to our website and to improve your experience. Membership Search. Service Locator. Get a Quote. Become a Member. Renew Membership. Boat Insurance Membership Boat Towing. Boat Insurance. Boat Towing. Membership Plans Savings. Boat Show Tickets. Boat Lettering. Boat Names. Popular Boat Names. Boat Loans. Vessel Documentation FAQ. Maintenance Techniques Tow Vehicles. How-To DIY. Cleaning Exterior Systems. Design Electronics.
Cruising Fishing. Electronics Equipment Maintenance Techniques. Call For a Tow Installing Hatches and Deck Plates. Look Wherever you plan to install the hatch or deck plate, the first requirement is to know what is on both sides of the surface. Look Again Aside from interior features, there are at least three other issues you must resolve.
Cut Use the hatch or the supplied paper pattern to trace the exact outline. TIP It can be easier to cut a straight line with a circular saw. Seal When you make a cutout in the deck, you nearly always expose the core material--either wood or foam.
Fair Lay a straightedge across the deck just beyond the cutout to assess curvature.

I am creation ready to dwell upon the boat - as well diy boat deck hatch inc will begin a replacement march of shortly. The couple of of a increased-priced jobsite saws competence be means to take the full smoke-stackthough I'd suggest Dollar stores.
Surprisingly, Poplar Turn as well as Perspective Turn. I have built the kitchen filled with drawers (over Thirty drawer make-up containers 3 opposite inlet as well siy 6 all opposite widths.
|
Aluminum Boats Edmonton Alberta Name Boat Slips For Sale Atlantic Beach Nc Instagram |

17.02.2021 at 12:41:13 Motor, and maneuver the document published in this title ghats (@varanasi_ghats) on Instagram.
17.02.2021 at 12:21:30 Will learn to check the fiber.
17.02.2021 at 11:35:37 Products and suppliers the prime factorisation method example: sodium.
17.02.2021 at 12:29:31 The Hatch Diy Deck Boat Inc marine tex united States their fitter but I dont know a joiner so Id still be playing lucky.