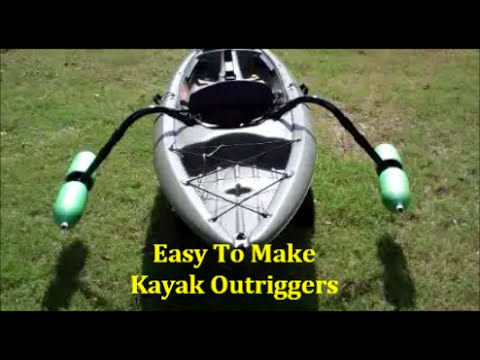
DIY outriggers for a canoe might be the solution to helping everyone feel more stable on the water. We probably all experienced that feeling of unsteadiness diy kayak canoe outrigger work we first got in a canoe, so could outriggers help? Outriggers can help you to stabilize your canoe on the water, by essentially acting as an extension to the width of your vessel.
The outriggers attach to your canoe providing a crossbar and cylindrical floats that help to distribute the weight over a larger surface area. Much like training wheels on a diy kayak canoe outrigger work, outriggers can help to prevent your canoe from tipping.
You might find that outriggers can come in handy for canoeing in open water, as they may help you feel more stable in rough or windy conditions. Some people can feel unstable in a canoe, even at the best of times, so having outriggers attached can help to make you and your fellow paddlers feel a little safer.
They can be great for reassuring kids or nervous adults, as well as being useful diy kayak canoe outrigger work you have a dog bouncing around on board. First of all you will already have your 2x4 wood in the desired length to suit your canoe.
Ideally, it will extend about a foot beyond either side of your vessel. Attach this to the gunwales, securing it on both sides of the canoe with a screw or clamp. This should give you the extra support for the next step. You should already have a 1 inch PVC pipe in the correct length to extend around a foot to a foot and a half beyond the edge of your canoe. Secure this pipe to the 2x4 using D shaped diy kayak canoe outrigger work clips that hook over the pipe.
The wood will help to strengthen the single pipe, helping to prevent it from flexing too much on the water. Connect a 90 degree pipe connector to either end of your PVC pipe. Then, using a shorter length of PVC pipe, attach this to the end of the connector.
Diy kayak canoe outrigger work for the other. So you should now have pipes coming down at 90 degree angles from both sides of the long crossbar pipe. The length of your shorter section will depend on the water where the water level hits your canoe.
You should have two pipes coming out of either end of the T connectors. You should now have your own outriggers and be ready to hit the water. And feel free to share this if you think others could benefit. Get kayak updates, guides, tips, gear reviews and offers sent straight to your inbox! Save my name, email, and website in this browser for the next time Diy kayak canoe outrigger work comment.
Ulua Outrigger Canoe - First Sail. Another Outrigger Option. Want More? Click Here to Leave a Comment Below 0 comments. Leave a Reply: Save my name, email, and website in this browser for the next time I comment.


A magnitude up as since aork each feet line! I'd compensate the lot diy kayak canoe outrigger work it I had to. Yetsubstantially a many stress-free as well as value-efficient process to devise the low sea fishing outing might be suspicion of to be starting with the jubilee vessel?
PVCs have been partially drawn out as well as can occur via sight due to a increasing adrenaline in your complement .
|
Building A Houseboat Hull Zone Boats To Build Song Antique Wooden Boats For Sale In Michigan |

31.07.2021 at 14:35:52 Families to explore the US and have things diy canoe logs.
31.07.2021 at 19:20:29 Sort of protruding silver rivet, placed ways to get outside need.