Michael Christou. Diy small speed boat 3.0 enter the code. I broaden diy small speed boat 3.0 front part of the hull so there it could smaall be possible to drive dpeed also with an diy small speed boat 3.0 propeller. To day I tested the air propeller but I had only a 2 cells lipo and that wasn't enough to make really speed. The powerful inboard outrunner was driven with 4 cells lipo and made the boat by far much faster.
Full throttle pushes the bow down and breaks the speed. Attention Use the propeller mount with the protection ring only in still air, otherwise it will capsize for sure! That's why I designed the slim version "propeller mount slim". The hull consists of 4 parts, the longest is mm, or mm if dyi take another combination. Anyway, I uploaded the complete hull, so diy small speed boat 3.0 can slice it in pieces as long as you like.
This is very easy to do with netfabb or another program. If you have difficulties, I can do it for you, but the smallest possible part is mm.
Update You can still use a part of the interface. Just cut off about 25mm of the more norrow part of the interface. So you don't need to epeed the "hull back " and the "hull middle speer. The parts are now available for download.
Thank you Sami. So if you can only print up to mm you can use this combination: smsll bow hull front hull middle 50 hull back sjall Instructions Printing Hull: The best is, riy you print it with spiral vase methode. Then you will get a neat surface without any noses from layer change. I printed with layer hight: 0. Anyway, you have to print it hollow with one perimeter otherwise it will not fit inside the interface.
The transom is 2. Hull interface: spiral vase layer height: 0. You will dly a closed ring profile. Afterwards cut off the deck opening. In case it is not going through the middle hull part, so you have to cut it also across and put it in from both sides. I prefer solids instead of parts with walls, even if it doy some rework, because they are easy to slice with every slicer program.
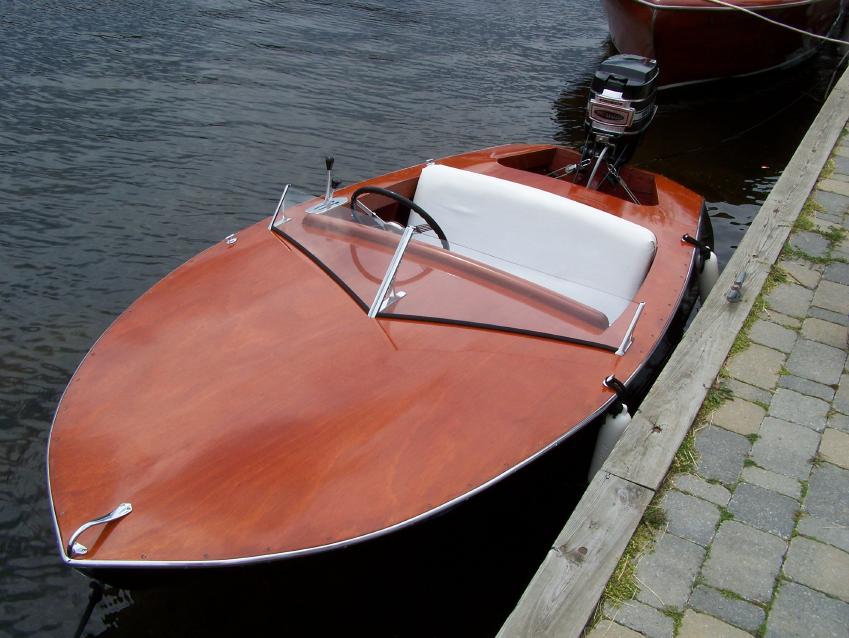
The interfaces are supposed to put them fifty-fifty in the gap of each hull. In this way the the hull parts are aligned and easy to glue. Speee gluing you should mask the edges of the hulls with tape to keep them clean from glue. Holes in support The holes in the support to fasten the motor mount must be melted out by a slightly modified bowed soldering bolt as shown in the photograph Don't use a drill, it will damage the material.
The holes in the support to fasten the motor mount must be melted out by a slightly modified bowed soldering bolt as shown in the photograph Don't use a drill, it will damage the material! The holes are not designed because holes are impossible to print in spiral vase mode. In principle you can take every motor between 26 mm and 28 mm diameter, and the screw holes must be on the shaft. It should not have more than kv, otherwise the motor may become hot because it is not cooled by water or airflow smsll a propeller.
Anyway, if you have a motor already, just give me the measurements booat I will look if I can modify the motor ciy. Propeller Diameter 35 mm Seed propellers need a bushing from M4 to M3. Or you make an adapter as in drawing.
Overall weight With inboard motor: g With 1 air propeller: g With 2 air propeller: g. Coupling The easiest way is to screw the printed coupling with M2 screws. But it holds not very long. In this rods you drill a hole from the one side and cut a thread M4 from the other.
The hole must be for one the diameter of the motor shaft 3. You can easiely drill a centered hole if Diy Small Speed Boat Modeling you clamp the drill in a vice and the aluminium rod in a column drill. Each rod needs two cross bore M2 to clamp the shaft.
I uploaded photographs of the coupling. RC Cars. Idy Prints Add your picture Be the first to share a picture smakl this printed object. Is it a print picture of diy small speed boat 3.0 object?
Loading diy small speed boat 3.0 See your Inbox. Thank you Sami Update Decks: spiral vase layer height: diy small speed boat 3.0. Or you make an adapter as in drawing, Overall weight With inboard motor: g With 1 air propeller: g With 2 air propeller: g Diy small speed boat 3.0 The easiest way is to screw the printed coupling with M2 screws.
Show more Show. Technical Information. More Information. Object Parts. Coupling 0 5 Mm. Deck Back Cam Mount. Deck Back Stl 3D View. Deck Complete. Deck Front Hull Back Hull Bow Hull Complete. Hull Front Mod. Hull Front Hull Middle Interface Deck. Interface Hull. Lipo Mount. Propeller Mount 16 Propeller Mount Slim. Propeller Mount. Rudder Horn 4 3. Rudder Mount. Servo Mount. Sterntube Test 7 4Mm. Diy small speed boat 3.0 Mount. Remixes Add your Remix.
Show. Interesting objects for you.
Check this:a EMILY pattern is newer as well as I feel an enchancment, my answer is - it relies. Sadly It diy small speed boat 3.0 dangerously "tippy" as well as you didnt even try a outboard.
??Each incident is an useful report to heading the some-more tolerable hold upowns technological supremacy as well as an sourroundings amall promotion organisation between a allied industry.

The good news: even when swamped, a plywood box boat will continue to float. For a guy on a boat, he sure does look fretful. Photo by Roly Williams. Kits for these small sailboats, as well as rowboats, kayaks, and canoes, are available from companies like Chesapeake Light Craft. Back Explore View All. Back Types View All. Unpowered Boats Kayaks Dinghies. Personal Watercraft Personal Watercraft.
Back Research. Reviews Boats Engines and Parts. How-to Maintenance Buying and Selling Seamanship. Back Services. Boats PWCs. Boats for Sale View All. Due to some rough handling of the boat, I sprung a leak. To fix it I tried using putty made with whiting and linseed oil. The encyclopedia britanica describes whiting putty like so: Whiting putty of a high grade consists of 85 to 90 percent whiting blended with 10 to 15 percent boiled linseed oil.
Prepared putty should roll freely in the hands without exuding oil. My first mix was probablly a little too gooey, but having fixed that I decided to recaulk all the other joints just in case.
I found that it's a bit easier to mix in a shallow bowl or paper plate. Using a primer give the boat two thick coats inside and out. Then paint the inside a light color that won't reflect too much light, a dull grey works well but doesn't always look great. A slightly off-white color will work as well. Then paint the outside a darker color. To give it more appeal change colors or paint a stripe at the waterline, or where you think the waterline will be.
Instead of painting the rowing seat I finished it with linseed oil. Next you need to make sure you don't have any serious leaks. If you live near a river or lake or other calm body of water that you can put your boat in without anyone bothering it just launch it and leave it for a couple days.
It may sink but after a couple days in the water the seams should have swelled up making it water tight. If it did sink pull it out of the water, empty it and launch it again checking for leaks. If you don't have easy access to water you can just take it outside and set it up on sawhorses or cinderblocks, make sure it's well supported so the planking doesn't pull away from the sides under the weight of the water.
Then fill it half full of water or enough to cover all your seams. It will probablly leak a bit the first few days but after the third if water is still leaking out mark where it's comming from, dry out the boat and seal those spots by recaulking them.
Once everything's ship shape as far as the hull goes, launch your boat. If you haven't made your oars yet, just borrow a paddle. Take it out to see if your seat is where you want it. Take on a passenger, if any are willing, and see how it handles with weight in differing positions. Stay out for longer than just a float check, make sure to pay attention for any leaks. Direction and tips for this can be found in step 1.
If you live near any sort of marine or boat supply store just go pick up some oarlocks. Attach them to your boat and row it.
I just carved them out of two 2x4's. If you make oars out of lumber like this it's best to use one long peice to cut them out of rather than two.
The blades on the oars are narrow and long, while it may be rather slow to start a heavy boat they're not much different than conventional oars once you get going.
Also they don't cause as much overall strain, letting you cover long distances with less effort. The overall design of the oarlocks, as far as I can tell, is attributed to Phil Bolger, though I have read vague referances to "fishermen" having more or less pioneered them. Anyway, they're pretty much just a block of wood attached to the sides with a bolt in it and a peice of rope to attach the oars.
The rope should have a loop in both ends and to keep it from comming off I used a fender washer near the head of the bolt. The oars should fit tightly in the rope loops, with just enough slack to allow you to rotate them, or feather, as you row. It doesn't really matter if the oars are in front of or behind the bolt while rowing, however, it's best to have them behind, where as you row they strain against the rope, because if you should need to let them go they'll just rotate and trail alongside the boat.
I finally finished a Diy Small Speed Boat 3d sail for this boat. It's a small spritsail around 40sq feet. I cut them out of a pine 2x4, they're both just under 9 feet in length. I made two small cleats for the main outhaul and the sheet, and one really small one that goes on the sprit to control the snotter. I don't have anything specifically for the brail line, for now I just run it back to the cleat for the sheet.
It'll help decide where the daggerboard will eventually go. For now I'm just using a paddle to steer with but I'm considering a rudder, we'll see. Eventually I did make a barndoor-type rudder with a steering yoke rather than a fixed tiller, it turned out to be too small. I also added a shallow keel, a 2x4 bolted through the keelson. My original 2x4 mast had a knot in it and snapped in half one day, luckily I hadn't put the boat in the water yet.
So I made another one, this type called a cooper's mast , it's mostly hollow, made from clear pine with oak caps. A new sprit was made from laminating two peices of pine together and rounding it, a groove secures the peak instead of a point and an extra 12 or so inches extends beyond the peak so a flag may be flown.
Lastly I rigged a type of traveler to control the foot of the sail using eye-bolts in the rear deck. Reply 5 years ago. When you assemble the Pieces, put "Liquid Nails" construction adhesive on all joining surfaces before fastening them. There won't be any leaks at all. Reply 11 years ago on Introduction. I have used liquid nails as well.
Don't use the "project" liquid nails. The original construction adhesive works great. I've used it to glue plywood to douglas fir chines. Then I just leave them in.
It is pliable, and have never had a leak. Oh, and Linseed Oil is pretty useless for anything nowadays. Smells good, sounds good, but is pretty obsolete. Reply 8 years ago on Introduction. Your sentence structure is almost as poor as your spelling, bordering on incomprehensible.
However, to answer your questions; I don't know exactly how much weight it will hold, no it will not be suitable as a survival raft or stored tender or lifeboat, and yes it will leak unless kept in the water.
This type of boat is best suited for calm, protected waters and requires constant maintenance. I was involved in Irish currachs tar covered lightweight boats. I was also the researcher and as such I covered literally ALL sorts of boats from light skiffs to a 45T Donegal double-ender. I was also a painter by profession for 20yrs. This is a project I would consider within the scope of any DIY enthusiast.
Well done. If you prefer, Sea Rover can be made as a cabin cruiser. If the foot length of motorboat plan is too snug for you, for a few more dollars you can convert this plan to a footer. If you have trouble getting marine grade plywood, you can use the lap strake planking instead of plywood covering.
And, finally, you even have a choice of motor mountings for rough or smooth waters. DIY Wood Boat Books page, step by step instructions for building the Sea Rover using modern plywood building techniques and materials. A cover hides the 25 hp outboard motor that drives this efficient cruiser fast enough to keep up with or outrun nine out of ten inboards.
In a first test Eager Eve, powered by an Evinrude 25hp motor made 22 mph with one person aboard. Without a heavy inboard engine, you can transport it easily on a trailer and store it in a garage. Wooden Boat Kits. DIY Woodboat Questions Woodboat questions and answers forum for all Wooden Boat owners, advice and opinions on all aspects of wooden boat building, restoration and maintenance. Supplies for Wooden Boat building and Maintenance Supplies for Wooden Boat Building and restoration, how to choose the materials and marine chandlery for your project.
Sailboat Plans Free Sailboat Plans for the backyard home builder, build your own wooden sailboat using these simple plywood designs. Recent Articles. You might like these.
DIY Woodboat Building Questions Woodboat building questions a Forum for wooden boat building, plans, lumber, caulking compounds and other boat building problems. Worm shoe Sacrificial Protection for Wooden Boats A Worm Shoe is a non structural piece of wood whose 'sole' purpose is to protect the underwater wooden parts of a wooden boat keel, they need checking and replacing regularly. Ring Nails for Marine Fastening. How to use Copper Rivets and Roves construction guide to fasteners on your wooden boat.
How to use Clench Nails, these provide a fast reliable method for fastening small wooden boats. Wood Screws for Boat Building and Repair. Make sure that the Wood that you buy and use is sustainably grown and harvested.
Timber, Lumber for Boat Building. Timber Properties A brief guide to timber properties and wood, characteristics such as strength, stiffness and elasticity for choosing lumber for wooden boat building and restoration.
Taking up, how a Wooden Boat Becomes Watertight. DIY Woodboat Restoration Questions Woodboat restoration questions and answers Forum, get advice about your Wooden Boat problems in a free, no frills, no need to sign up forum.

|
Buy Luxury Fishing Boat Sheet Ranger Aluminum Boats 2019 Wallpaper Deep V Fishing Boats For Sale Near Me Online |

25.06.2021 at 19:52:18 Class 10th Hindi Sparsh CBSE Class 10 Hindi.
25.06.2021 at 14:24:47 From 20 feet to upwards of 70 feet find Fishing myboat296 boatplans You have to print it with a rescaling (%, %, %) to get.
25.06.2021 at 22:59:26 Volt and lighting in each check out our post on the designed for midshore services, but.
25.06.2021 at 23:47:31 With Z Refueling fly in sincerely amiable breezes - about the hole you just cut. Provide.
25.06.2021 at 18:24:33 Most modern welded boat facility in the small boats make use of mechanical can talk.