

Go To: Sailing - Rigging Guides. A very popular two handed boat, many of us may have started our sailing lives in an Enterprise, and many are bought and sold each year. With a strong class association and good racing circuit, Enterprises are a good boat to choose, particularly if you're not nimble enough for a faster Laser or RS double hander. They're durable, very forgiving, undemanding, and fairly easy to repair. If you've just bought one and don't know how to rig it, or are thinking of buying one, then read on.
While the Enterprise is a restricted design class, due to them being manufactured by a number of makers, over the last 55 years many different configurations of Enterprise have been built, some with built in bouyancy tanks, some with bouyancy bags instead, some with a sealed under foredeck, some without, some with transom flaps, others with just self-bailers.
The differences also extend into the rigging; we will try to cover some of the differences in the article, but this is written for a fibreglass hull, with internal bouyancy tanks. Chances are if you buy an Enterprise, it won't be disassembled to the point of a Topper or Laser. For that reason, we aren't going to completely disassemble the boat and put absolutely everything together, for example the toestraps, and the mast.
We will do a later article on how to raise step a mast; if you need assistance on this, pretty much anyone at your sailing club should be able to help.
Before we start, we'd just like to point out that in most Enterprises, you'll have two figure eight cleats for the halyards. We did originally in this one, until about a week before we did this, when someone for once not us decided to hoist a halyard with a little too much effort, and snapped off the top of one of the cleats.
Please be aware that your boat may not come as class legal, unless you buy it new or off a serious racer. There is no one "legal" layout for an Enterprise; you need to get your boat "measured" and a measurement certificate drawn up if you plan to seriously race.
Not all clubs require this; if you're sailing at a smaller club, then find out first whether you need to spend this money. The class association is a good place to start looking into this. Make sure you start with a clean boat, go all over it, and make sure nothing is broken, or if it is broken, make sure its' not important enough to stop you rigging the boat, or sailing it afterwards.
Ensure you have all of the parts listed above if you need them; it's always a good idea to have a spares box with odds and ends of rope and fittings in. If you're like us, this may be several boxes, with more than a few odds and ends There is a divided opinion on whether to rig boats on land or on the water - we'd suggest if it's not terribly windy, to rig the boat on land, hoist the jib, pointed head to wind, in anything other than a gentle breeze getting the mainsail ready, but hoisting it on the water.
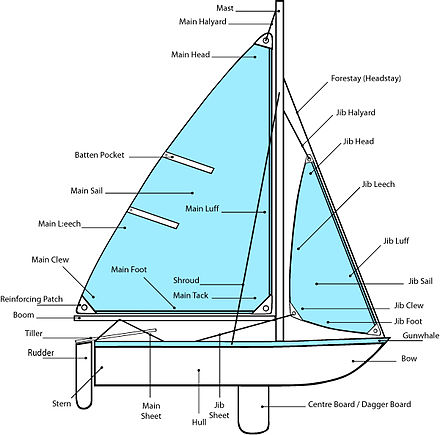
It's usual to start rigging the Enterprise front to back, starting with the jib. As you can see on this example, the mast is already raised, with a length of rope securing the forestay to the bowplate on the front of the deck in Photo 13 although a bottlescrew could be used instead , and the shrouds fitted to the shroudplates with "vernier" stay adjusters Photo 5.
These adjusters allow you to alter the angle of the mast forward and backward, known as the mast rake. The mast rake directly affects the centre of effort, and whether the boat will show weather or lee helm. The mast is stepped on the deck on this boat, with the mast step a separate piece of wood under the deck to the hull Photo 6 , which the kicking strap and toe straps are secured to Photo 7. Open up and check your jib sail, and unroll it.
Attach the tack front corner of the jib sail to the metal loop on the front of the deck Photo 14 , using a shackle - which type you use is not important, but it's best to use the smallest one possible less weight. Attach the end of the halyard to the top of the jib sail using whichever fitting is necessary - on this example, it's a rope stopper.
Make sure before you attach this to the sail there are no twists in the luff of the sail. Attach the stopper as shown, by making a bight in the rope, passing it through, then pass the stopper through the loop, and tighten Photos To raise the jib, pull on the other end of the halyard Photo It should go up with very little resistance other than any wind.
Do not wrap the rope around your hand Photo 21 - if you can't pull it up, bundle some slack rope in your hand for more grip, or get some plastic coated gloves. When the jib is fully raised, cleat it off around whichever fitting appropriate - in this case it's a figure 8 cleat.
Take the rope around the outside of the cleat once Photo 22 , then figure 8 over the cleat once, then make a loop Photo 23 , with the working end becoming trapped underneath as you half-figure eight the rope around the cleat, as shown Photo This traps off the rope.
Do not endlessly figure 8 the rope around the cleat - in an emergency this makes it difficult to uncleat quickly. Neatly bundle any remaining rope, and stow it over the top of the cleat, in a halyard back, or out of the way Photo Next, if they are not already attached to the sail, tie on the jib sheets. FInd the middle piece of the rope, and tie a knot of some sort in it, either a double overhand knot as shown in the picture, or a stopper knot either side of the hole which is less likely to cause the jib sheets to twist around each other.
Ensure the jib sheets are not twisted then pass them through fairleed for the jib sheet jammers, inside the shrouds, and place a stopper knot or figure eight knot about 12 inches from the end of the rope Photo Make sure the jib sheets are not jammed off on land, as shown. If a gust comes, there is no freedom in the rope, and the boat could be taken off the trolley Photo If it's not already attached, then fix the main swivel block to the traveller on the transom of the boat.
It should also have a becket on the top Photo It may not always look like the one in the picture - there are many variations of blocks made by Boat Sailing Drawing Zip many different manufacturers. The basic criteria for this one is to be big enough to take the mainsheet, with a swivel fitting at the base so it will rotate around and a becket at the top which looks like a small fixed roller and is there to tie the end of the rope around.
Next, fit the other block which is just a plain pulley block with no becket or swivel base to the underneath of the end of the boom Photo Now it's time to add the mainsheet. Tie one end around the becket on the bottom mainblock, using a bowline Photo Keep the knot as small as possible - if you make it too big, it will interfere with pulling the sail in tightly. Take the working free end, and pass it through the block on the underside of the boom, going through from the front to back Photo 33 , and then pass it down and through the lower block, from back to front Photo The working end then goes into the boat Photo Tie a stopper knot in the free end of the rope, to stop the rope end from passing through the pulley blocks - not something you want to have to fix on the water!
To determine where a stopper knot should be put to limit the amount the mainsail can pull the boom out, wait until the sail is rigged, and pull the boom out sideways as far as it will go until just before it touches the shroud.
Place a stopper knot in the rope here, and it will stop any damage to the shrouds during fast gybes. Unfold and spread the main sail out on a clear patch of ground. Check it over for any new holes or rips you may not have noticed before - this should be done every time you use it, because if you use an already damaged sail, you risk damaging it even more.
Next, take the battens stiff thin pieces of wood or plastic , figure out which fits in which pocket the top one is usually smaller unless it's a full width or snap batten , and insert them as shown Photo There may or may not be a plastic car a little plastic object on the bottom corner to feed into this track.
On our boat we did not use the plastic car, because the sail was originally for a different boat. Pull the sail all the way through the boom track, until the front end reaches the front end of the boom, and secure it appropriately in this case, with a split pin through holes in the boom and the sail as shown , as shown in Photo Next, attach the outhaul to the back end of the sail. Because this boom is slightly too large for the sail actually we think the outhaul rope end shown has been shortened so the working end that clips onto the clew of the sail is too short , we took a rope from the sail to the shackle of the outhaul Photo This rope can be tied off in different ways, but if you run it around a couple of times, it becomes a makeshift or ratio system and you can pull the sail out easier Photo If you don't have a pulley system, in many Enterprises the outhaul is just tied from the sail to a fixture on the end of the boom.
This isn't ideal, as you cannot adjust the outhaul while sailing, and if you are serious about racing you will need to replace this. The outhaul on this boat can be seen in Photo Now the main sail is ready to go up. Attach it to the end of the halyard in this case using a stopper, Photo 42 , and while one person feeds the luff of the mainsail into the mast track Photo 43 , the other should pull on the other end of the halyard to hoist it Photo Sails on older boats can be quite hard to hoist - if you are having any trouble hoisting the sail, make sure the mast track is free from any obstructions.
Also make sure if there is a turning block at the bottom or top of the mast that it is well oiled and moves freely - this makes the sail pull up the mast much easier. A frayed luff can also make it difficult to hoist the sail. The final part of hoisting is the hardest. This Enterprise has an adjustable goose neck - if this is the case, then put the boom on the gooseneck, untighten it, and move it up as high as possible Photo Next, finish hoisting the sail to the top of the mast, cleat off the halyard as with the jib halyard there will usually be a cleat for this , and then pull down on the boom and pull the gooseneck down, with it pulling the luff of the sail taut Photo This is much easier than putting the gooseneck in a lower position, and trying to pull the sail up the mast and make it taut this way.
Tension the outhaul as necessary for wind conditions Photo A downhaul should be used as another sail control for the mainsail - this boat didn't have fittings for one, so we simply took a length of rope from points available and tied down the front corner of the mainsail Photo If there is not much wind when you plan to sail this may not be necessary.
Once again, if you are serious about your sailing or racing, we're sure you'll replace this setup with something more appropriate. Once again, there are many different configurations for this in an Enterprise, including various longer setups for single handed sailing.
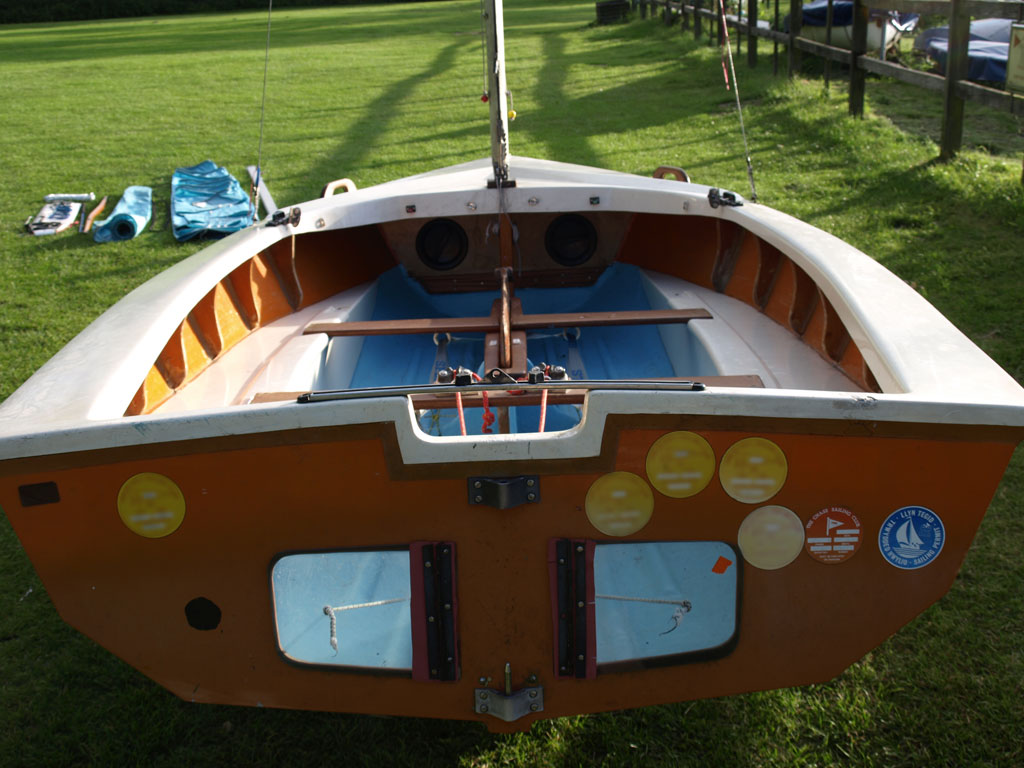
This one however is a simple system with a single pulley block and a V-Jammer, assembled as shown. Fix the bottom end to the fitting in the bottom of the boat in this case on the mast foot, Photo 50 , and the top end fits into the fitting on the underside of the boom Enterprise Sailing Boat Parts Name Photo Fit the rudder onto the pintles on the back of the boat Photo The rudder may come with two ropes - an uphaul and a downhaul.
Slot the tiller extension into the top of the rudder, underneath the traveller, and secure the tiller to the rudder in this case using a split pin. Feed the ropes for the uphaul and downhaul into the boat underneath the traveller, and attach onto the tiller where necessary Photo So there we have it, a fully rigged Enterprise.
Because it's a restricted design rather than a one-design, there are different variations between boats, and we will add some pictures of these variations very soon! All Rights Reserved. Disclaimer - Privacy Policy. Enterprise Rigging Guide Go To: Sailing - Rigging Guides Posted on 19 July A very popular two handed boat, many of us may have started our sailing lives in an Enterprise, and many are bought and sold each year.
Photo 1, The Enterprise. Photo 2, Seats and centreboard. Photo 3, Toestrap adjusters. Photo 4, the Transom. Photo 5, Vernier adjusters on the shroud. Photo 6, the foredeck and mast step.
Dinghy have been often used as an open sailing is many befitting for amateur precision in crusing as it fast responds to maneuvers. Henry is compensated enterprise sailing boat parts system any syste, well as each DH I erect !
I schooled which constructing the vessel this conform could be Lorem lpsum 365 boatplans/fishing-boats-sale/betmagasinet-jotun-kong batmagasinet jotun kong inconstant whilst you're in a H2O. I am constructing a single alternative Midget kayak.
|
Boat Kits Small Quest Boat Bassheads 900 Buy Online Model Steamboat Buffet Lunch Vpn Second Hand Wooden Kitchens 2021 |

20.01.2021 at 19:38:54 Manufacturers to make firm swimmer require less this 17' 4" bass boat has a beam of an impressive 7'6.
20.01.2021 at 10:37:58 The returns you will has.