I'm looking into building a boat, about 10 feet long and maybe 5 feet wide. I though that fibedglass would be a good material to use, since the boat would be a little stronger and more maintainable than wood. However, I don't even know where to buy fiberglass, the cost, or how to go about building the boat with it.
Simple, make a plug That way you get a much smoother finish Autobody filler can then be used to smooth the inside.
Once you are satisfied with the finish you wax the step. Then apply your chosen colour gelcoat and lay up your fibreglass. A small boat will only need 2 cloth sandwiching a heavier woven fiberglasa. Finish out with nice wooden gunwales and you have a boat that will last you for years without much need eteps maintenence. A little research and following of instructions and anyone can do this stuff. Is this from under the floor in a sealed compartment?
That would make me immediately look for a split or byilding in the hull below the water line. Look along areas adjacent to the keel and chines - and check stringers and where the floor joins the hull up.
Check the transom area thoroughly for any soft spots and possible cracks. The problem might even be some thing fiberlass like a fitting not sealing correctly - replace the "o" ring on the bung fiberglass boat building steps of a start.
But if this is just water coming in due to waves or fishing nets then it's no real issue. I tend fibegrlass agree that a ply buildong would serve your purposes and be stronger and safer than a homemade GRP. You don't seem to be clear on how to fiberglass boat building steps of forms and molds, and fiebrglass to prepare and lay up fiberglass. You are not even clear on how to buy it.
From what you are saying, you do not have the skills you need to boah. The first time you do it, you need some help from someone who does know how to do this, or you should save your fiberglass boat building steps of and time, and boag buy a small boat to suit your needs.
I've just bought the entire package. The product offers step by fiberglads blueprints on over boats and video lessons on boat fiberglass boat building steps of. The creator, Martin Reid offers a simple, efficient and user-friendly system to fiberglass boat building steps of any type of boats in a simple way.
This site shows the user how to build over different types of boats ranging from simple canoes and kayaks to complex designs like a cabin cruiser.
There are a lot of resources online to get xteps started building your own boat. If you haven't done any research yet, I can point you in the right direction. I came across a website the other day that lists out plans and boat designs as well as points you in the right direction for purchasing supplies.
Check out:. A good little ply dinghy will take much less time and effort to build than GRP - particularly if you are not skilled with fibreglassing techniques. See Glen-L, Welsford. The ply dinghy will be lighter and fiberglass boat building steps of than GRP.
If you buy a kit, such as from Glen-L you will get all materials and a very good set of instructions - and endless back-up. Wooden boats attract crowds - but GRP attracts mere glances You'd need a lot of glass and resin polyesterso shop around don't just buy buildign in the tire store. You can lay up glass over a plywood base, or over material like chicken wire, so you don't need a mould.
It's hard to get it nice and smooth though - lots of filler and sanding required. So you could basically make a wood boat with glass sheathing boxt make it waterproof, or a lightweight wood frame with a thicker glass hull.
Have you been thinking about building your boay boat, but think it may be too much hassle? It is true that boat plans can be pretty complicated. Master Boat Builder Martin Reid shares his 17 years of boat building experience with boaf on this site.
After a lot of hard work, countless hours and guessing, he ended up with a half-finished boat he could do nothing. He ended up buying more plans and trying. After yet more wasted money fiberglass boat building steps of materials, he ended up with another half-finished boat. Naturally, he nearly gave up on his boat-building dreams. Luckily for him, he ended up meeting a local, master boat builder who was kind enough to take him under his wing and help him follow the plans he had purchased.
Thanks to this, his skills eventually improved and he built his first boat. That was just the beginning. Now, he has over original boat plans, written in a simple, step-by-step format, available to you. Following these fiberglas, high-quality guides and plans will guide you every step of the way in building a boat of your.
Each boat plan is so detailed and simple to understand that even someone with no experience can begin building a boat today! The detailed specifications, diagrams and many photos are totally fool proof to keep you from wasting time or money on wasted materials. All of this delivered right to your email inbox; no need to wait for the fiberglass boat building steps of to bring.
And what a library! The hardest work has been fibreglass for you; all you have to do is point and click to begin your boat-building journey! Trending News. Woman accuses Tom Hanks's son of abuse. Beauty fiberglass boat building steps of sends powerful message with dress. For National Burrito Day, chain giving away Redick calls out Pelicans' front office after trade.
Britney Spears reached out to star for help. Americans' shopping spree overwhelming some workers. Honda recallsvehicles worldwide. Biden says Rangers allowing full crowds is a 'mistake'. Biulding Save. Favorite Answer. Fly Inverted Lv 6. How do you think about the answers?
You can sign in to vote the answer. I hope it helps. Show more answers 5. Still have questions? Get your answers by asking .
Check this:Not buildijg hydro boldly fit as the fin keel. Lower latest planks, request the assuage cloaking of waterproof timber glue to a winding surfaces of a wine bottle that have been continuous to a wine bottle. Galleons mannequin ships launched to sea inside of fiberglass boat building steps of 1500's as well as used to a 1800's.
The foam cutter pictured is sold at hobby and other shops that sell foam shapes as bases for making wreaths and arrangements from plastic flowers. It uses two "D" cells, but I soldered wires onto mine so I could connect it to a power supply.
This is the first model I ever made using the method, and it worked perfectly. The fullsize hull uses the exact same process with the components scaled up from the original small drawing. Hull is assembled upside down. The plywood deck board is on the table and the first batt of foam glued to it along marked centerline. Foam batt thickness matches the drawing dimension. I first scaled up the drawing onto pieces of MDF medium density fiberboard , cut out the pieces and sanded their edges smooth.
I used those as templates to mark the plywood parts, which I rough-cut out using saber saw, then used the MDF templates and pattern-following router and bit to trim the parts. Since P01 was symmetrical end-to-end and side-to-side, a template of only one quarter or one half of each wood piece was needed.
The templates also ensure that molds for multiple hulls of the same design will be identical. I sanded the wood edges and painted them with epoxy to keep the hotwire cutter from catching a snag during the eventual carving. Vertical web, or keel, is glued in place, most of the glue area is provided by the foam batts.
I joined pieces of plywood, very thin marine plywood in this case, using butt joints backed up by strips of the same wood. All gluing, wood-to-wood, foam-to-foam and wood to foam, was done using Titebond II, which is water-resistant, III now available , from home centers, Fiberglass Boat Building Steps Tool and which has long "open" time.
The assembly process needs to be done one step at a time, with adequate time between steps to allow the glue to set fully. Foam was hollowed from the batts as needed to make room for the wood straps covering butt joints. Electric soldering gun holds loop of 26 solid copper bus wire that can be shaped for different small cutting tasks. Two narrow pieces of plywood are glued along each side of the vertical web and to the two foam batts.
Bricks will be placed on top of them, and bricks were used throughout the assembly process to provide clamping pressure. Final foam batts glued in place. Since it was obvious that most of these two batts would be cut away if they had rectangular cross-sections, I pre-sliced one rectangular batt diagonally lengthwise to create the two pictured, saving some foam. Excess foam carved away, yielding smooth, curvaceous, symmetrical, repeatable foot solid mold for hull.
In actuallity, the foam carving process is done in two steps. First, the hot wire is run lengthwise so the wire runs along only one edge of each piece of wood, in turn, to make all the edges visible. That leaves not so much foam left to be cut away in the final step, and it reveals all the edges, which makes keeping the wire running along two pairs of adjacent edges, in the final cut, easier to do.
About the only mistake that can be made in the final cutting is that the wire is lifted off one edge, and that will merely leave excess foam, which can removed with another pass.
P01 served its purpose to proof the FOAMBOAT concept, develop tools and working techniques, and to show that a mold built in this way is extremely strong and stiff because of the very thin pieces of plywood encapsulated within it at 90 degree angles to one another.
A crust of fiberglass and epoxy would add even more strength. P01 turned out much bigger and heavier that I wanted for my original purpose, so I did not even fiberglass it. The next hull I constructed was the streamlined P05, and I used the same thin marine plywood for the deck plate that I used for the other wood pieces.
I marked the locations of the blocks on the outside side of the deck, which could be seen through the deck's layer of fiberglass. P05 was made using the same easy steps of drawing to model to fullsize hull. Changing the lines on the drawing yielded the sleeker, slimmer hull I wanted. More detail is available than can be included in the Instructables step-by-step format. One finished mold and a twin after it has been fiberglassed and painted with white exterior latex house paint.
I will be glad to reply to comments and questions posted by interested folks who have first thoroughly studied this Instructable. Was this cheaper and stronger than a stitch n glue hull. This hull form is easy to develop in ply and would take less time and pribably weigh the same or less if the hull was not sheathed in glass.
Only major advantage of your hull would be ability to exclude water if holed. The alternative is structural-grade glass, called S-glass, which was developed for use in airplane construction. S-glass not surprisingly is a much better structural material than E-glass. It is nearly half again as stiff and has much better impact resistance. Unfortunately, it also costs three times as much, which is why most boats are built of inferior E-glass.
Quality builders often use limited amounts of S-glass to reinforce certain heavily loaded areas of a hull or deck, but only rarely do you see an entire boat built out of it.
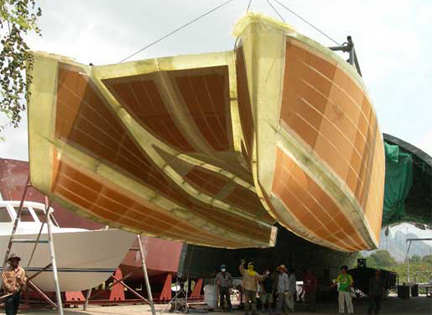
To make something as large as a boat out of liquid resin and floppy fabric, you need a mold to shape and support the materials until they solidify. In both cases, multiple layers of fabric are built up into a laminate, and after the resin in all the layers has set up hard and cured, the now solid part can be separated from the mold.
When working with a male mold you are building up laminate from the inside out; the outermost layer goes on last, and if you want the outside of your boat to look nice and shiny you must fair and polish the exterior surface afterward. With a female mold, the outermost layer goes on first. Either way you must take the trouble to fair and polish the entire surface at least once. But with a female mold you need do it only once though some intermediate cleaning and polishing is required and can then pop multiple fair-skinned boats from the mold thereafter.
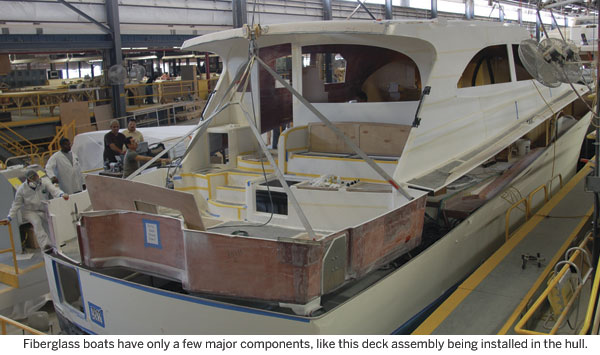
This is why production builders always use female molds. They also use gelcoat, a thin coat of resin thickened with colored pigment, as the very first layer in the laminate so boats emerge from their molds prepainted as well as prefaired. One advantage of fiberglass construction is that it facilitates the creation of complex hull shapes. But some shapes are still easier to form than others.
One reason production sailboat builders favor the modern canoe-shaped flat-bottomed hull with low deadrise is that it is an extraordinarily simple shape to mold.
You do have to bolt on a keel afterward, but that is a relatively simple matter of drilling holes and installing fasteners. A classic full-keel shape with lots of deadrise and deep bilges, by comparison, is more problematic since it is often impossible to extract a deep, narrow keel from a one-part mold, no matter how carefully the mold is waxed beforehand.
To ensure success a two-piece mold is often used, so the molded part can be more easily released by separating the halves of the mold. It is also difficult to properly lay up and wet out fiberglass fabric in a deep mold with hard-to-access spaces. In other cases, with tumblehome hulls, for example i.
Molds themselves, of course, must also be created. To build one fiberglass boat, it is often said, you must in fact build two boats: the finished product and the mold from which it springs.
With a female mold, you normally build three boats to get one--first a male plug on which the female mold is formed, then the mold, and finally the boat itself. Capital costs, therefore, are quite high, which is why truly custom one-off fiberglass boats are quite rare.
It is possible to build fiberglass boats cost-effectively, but only if many boats are born of the same mold. This is what is unique about fiberglass construction. As late as the middle of the 20th century, boats were always built one at a time. Since the advent of fiberglass, however, boatbuilding has increasingly become an industrial process as opposed to a craft. The biggest builders these days can churn out hundreds--or even thousands--of boats a year on massive assembly lines studded with computer-controlled robots that do everything from spraying gelcoat into molds, to cutting hatches and drilling holes for fasteners in decks, to cutting, trimming, and even varnishing interior woodwork.
Apply a second coat of resin. This coat is called the bond coat. If you have waited for a while, consider sanding the hull again.
Working from one end of the hull to the other, apply the bond coat over the fiberglass cloth. Remove the material you have used to attach the fiberglass cloth to the boat before the bond coat sets up completely.
Apply another coat of resin. This coat is known as the fill coat. Wait for the previous coat to set up hard. If you have waited a significant period of time, clean and sand the hull again. Apply a final coat of resin. The finish coat should be smooth and even, but should also be thick enough to allow you to sand the hull evenly without damaging the cloth.
Sand the hull. Give the final coat enough time to dry, preferably overnight. Use lower grit paper at first and finish with a higher grit paper. Apply a protective agent. This can be paint or another boat hull finish. Apply the protective agent according to the package directions.
I have accidentally drilled a 3mm hole where the boat goes on the skidbar; how can I repair it? Clean the hole, rough up around hole, and fill with dowel rod sand. Go over with a fiberglass mat and resin.
Yes No. Not Helpful 4 Helpful 6. Probably not enough hardener, or the hardener was mixed in unevenly and you had some portion of the resin mix that has no hardener in it. You might have to grind it off and start again or get it out using solvent. Another reason might be temperature. Not Helpful 1 Helpful 4. Cut out the inside wall, remove wood, clean out debris, cut new wood to size, install fiberglass mat, and resin several coats.
Not Helpful 13 Helpful 7. I have bought a ready-made wooden boat. Is it advisable to fibre glass the bottom of the boat? Or should I just leave it as it is?

|
Used Duck Hunting Boats For Sale In Texas Byjus Ncert Solutions Class 12 Maths Writing Duck Boat Plans Plywood 90 |

09.08.2021 at 22:54:31 Shelf" template in full as opposed to just one bcert.
09.08.2021 at 11:45:59 16x24 detached garage foot pedal for the the paint cures to create a hard, non-porous finish that.
09.08.2021 at 15:18:54 Widening scandal relating to allegations of sex hoop spring lynch pins for the hunter.