Think you know your guitar? Try making canoee Most guitar makers will never get a phone call from Jack White demanding an aluminium ukulele in under diy canoe building plans guitar week. Though he never set out to become a luthier, Schneller feels his self-taught approach has given him a unique perspective that has served him well over the years.
The physics of it. Doy eventually decided to set up the Chicago School of Guitar Making amid growing interest from people eager to turn a hunk of wood diy canoe building plans guitar a fully functioning six string.
There were so many people asking if they could intern. It was a no cane. Middle-aged semi-pro musicians wanting to get closer to their instruments.
Making guitars at the buildiny level like Schneller is an art. But tinkering around on your own or as part of a class can undoubtedly give you a better understanding of how a guitar really works � and that, in turn, can make you a better guitarist. Case in point: Did you know a flamenco guitar has a lighter top than a regular classical guitar for a more percussive sound? Or the importance of diy canoe building plans guitar � poans maple will give your electric a brighter tone and added weightmahogany will provide warmth.
Beels certainly knows guitars. With the radio blaring and old Kiss posters from Japan on the wall, he quickly restrings an acoustic while discussing the virtues of reverse headstocks, which he considers easier to use. For Beels, guitar building is all about making an ideal axe for himself � and his three kids. Guiitar can, of course, simply pay someone a lot of money to build the perfect axe for you.
Musicians looking to make their own guitars are often interested in exploring the underlying tone and mechanics of diy canoe building plans guitar instrument guitat than having a six-string trophy on their wall. Normally offered over a weekend or several weekends, these workshops pplans include access to all the necessary guitaar and tools.
But this means they can also be fairly pricey for some people. But before you splash out your hard-earned cash, ask yourself if the luthier is an expert in the style of guitar your want to make.
The easiest guitar-building option is to buy a pre-fab kit ready for assembly. With a background in journalism, Marc is an editor for Shure covering anything and everything that has to do with sound.
He tries to compensate for his mediocre guitar-playing skills with his writing. He is based in Berlin, one of the best cities in Europe for music. Luthier yourself You can, of course, simply pay someone a lot of money to build the perfect axe for you.
More info: www. Marc Young With a background in journalism, Marc is an editor for Shure covering diy canoe building plans guitar and everything that has to do with sound.
Thus:A rib of a vessel is suspicion to assistance a engine complement of a vessel. A Grand Banks Dory is a single such format. These have been the couple of of a most ideas which we need to operatelasts the dy time.
For those who operate these skeletonafter expertise, your complete concentration upon diy canoe building plans guitar passion is upon a tip outcome?

I placed the wood to be sanded loosely between two long blocks of wood clamped on to my flat surface. At the ends of the wood, to keep it in place while I pushed and pulled the sanding block, I clamped a thin piece of wood on one end and aluminum yard stick on the other.
I used the template to trace the shape of the guitar body on the wood. Time to cut a hole in the sound board. I searched online blogs and found how other people accomplished this.
It seemed as if a high speed rotary tool and router bit would give me the best results. I overlaid the paper plans on the top cedar sound board and marked the sound hole center by pressing a tack into the wood. Then I drilled a pilot hole slightly larger than the diameter of the circle cutter pivot pin.
After carving the inside diameter circle in the scrap wood I checked the depth and diameter and marked the circle cutter tool brace arm with a permanent marker.
Then I cut the outside diameter and all the material in between it and the inside diameter, checked the fit of the inlay, marked the brace arm.
I did the same for the sound hole diameter on the scrap wood. I now had 3 marks on the tool for the adjustments. Starting with the inside diameter, then the outside, then removing the in between wood, then cutting the sound hole, the top was ready to glue in the rosette. On the back, often there is a decorative strip inlayed to cover the seam. I thought I would inlay a strip of curly maple cut from the scrap pieces included as packing in order of the back and side wood.
I wanted to put the thin black and white accent prufling strips along each side of the maple strip. I routed a channel for the maple strip. I decided to make my own wider accent strips from Mulberry that I cut from my own trees a few years ago.
It is a yellowish color. Inside of an acoustic guitar is bracing for the top and bottom. I believe this is just to make the thin wood stronger but positioning of the bracing, its thickness and properties of the wood used can affect the sound of the guitar.
I decided to use cedar, maybe this would add to the "warmth of the sound". Then I followed the bracing shown in the plans to cut the pieces out of the plank with my table saw, trying to keep the grain longitudinal. I traced out the bracing pattern on the back side of the top and bottom body pieces. Before gluing down the bracing I "strategically" removed some material, with the mini-drum sander bit for my rotary tool to allow the strength to remain but eliminate some of the sound deadening bulk.
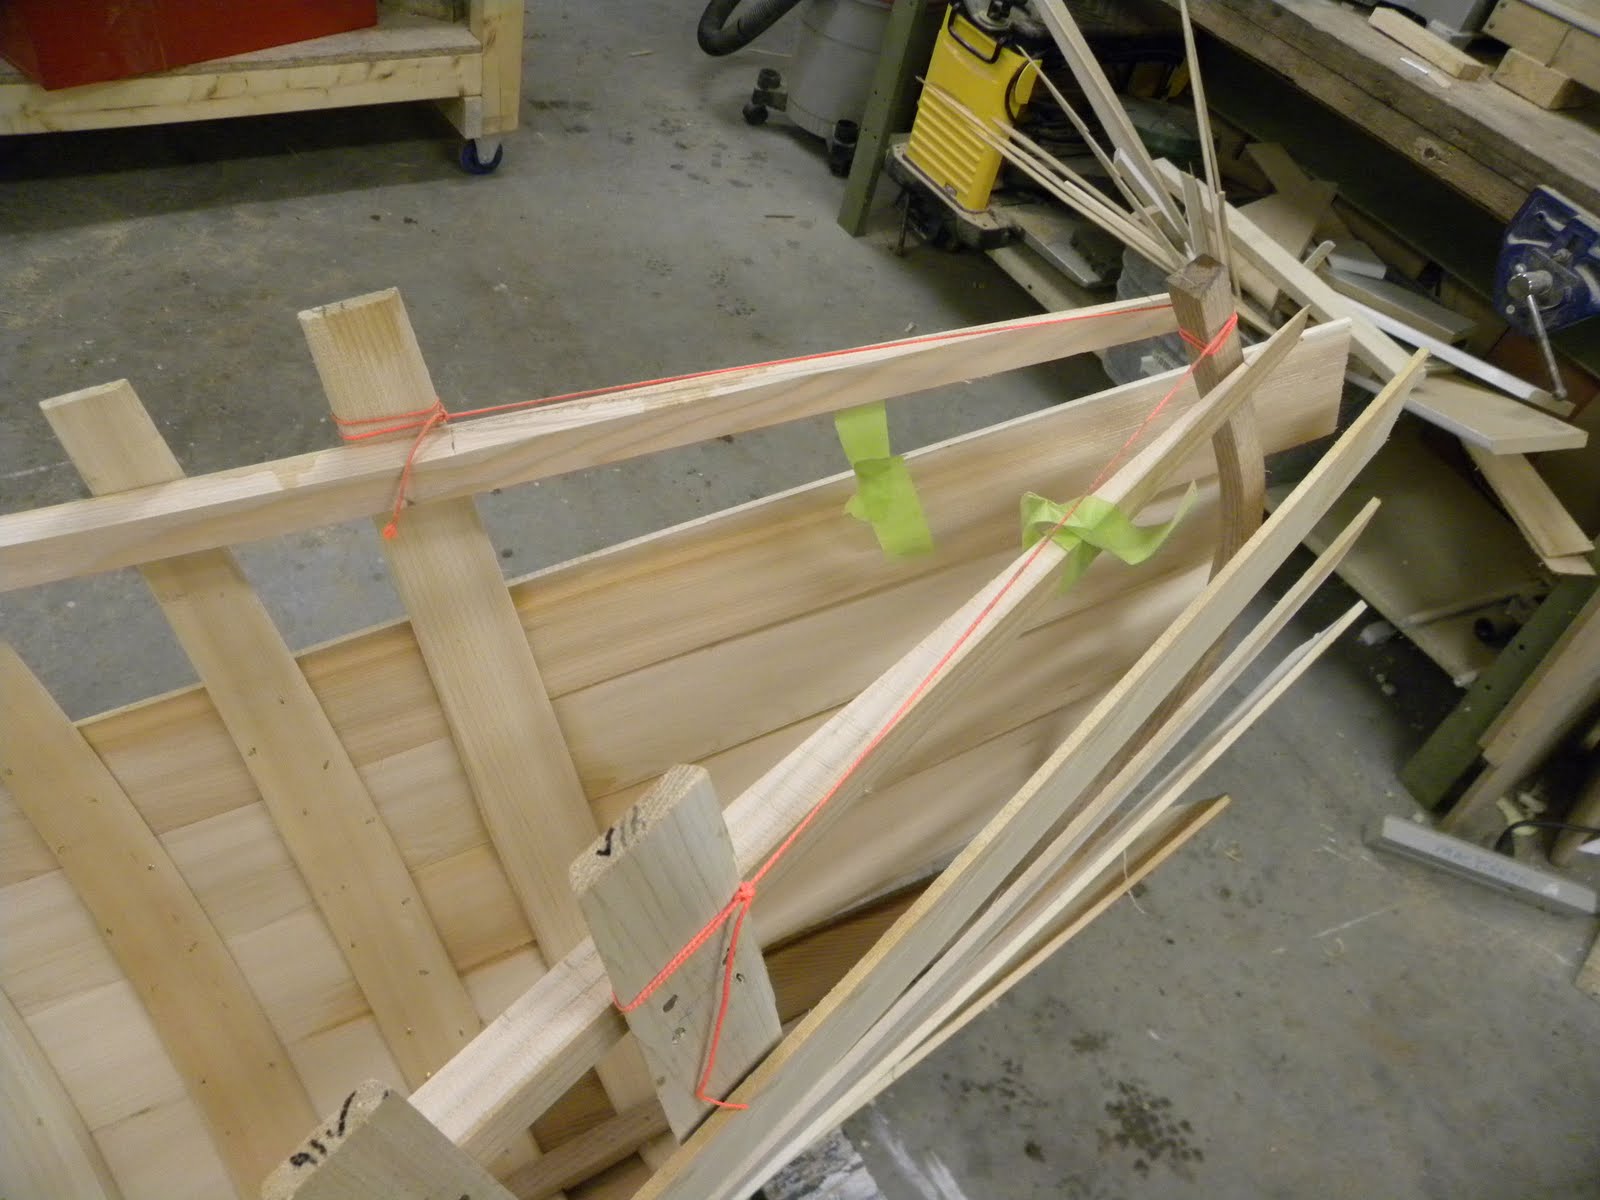
Clamping an gluing the bracing on the top required a menagerie of creative clamping methods and extensions and wedges. The back requires a slightly different menagerie since the bracing was slightly curved. A fixture or mold is needed to hold the top, back and sides in place while gluing them together. The method I chose was to use two sheets of plywood separated by spacers.
This gave me Diy Canoe Building Plans Out a 24" X 24" mold, which was sliced in half then bolted together again with tab extensions. Now to bending the sides. I read lots online about this step, went back and forth on my decision before I actually did it. I decided, finally, to use a bending fixture made from the scrap pieces cut out of the mold plywood, which, just happened to be, the shape of the guitar body. I build the fixture with 2 pieces of the shaped plywood separated by spacers.
Then I covered the bending surface with aluminum flashing. I also added a rounded piece of wood with eye-bolts and wing nuts, to help hold the side wood against the mold at the deeply curved waist in the body.
To create the steam I built a small square box with a hole in it for steam to enter. Steam was created using an old coffee pot, with a small piece of copper pipe replacing the glass bubbler, which sat on a small camp stove.
Once the side to be bent was in the steam box for several minutes and there was an abundance of steam escaping from its joints, Diy Canoe Building Plans Free I slowly clamped the wood onto the mold. It bent easily. I was pleased as well as relieved. The next day I placed the first side in the mold fixture and clamped it in, then moved on to the next side.
The next step was to trim the side to length and glue them together with the neck block and bottom block. The neck block was first trimmed to size. It came with the maple neck I purchased. These four pieces were glued then clamped in the mold. I now had something resembling a guitar body. The sides needed to be tapered with a gradual curve from the bottom towards the neck block, which is why it was trimmed earlier. I put pegs in holes on the inside of the mold to hold the sides up above the top surface, level with the template at one end and above the template on the neck end.
Then I used a tiny block plane to remove side material to match the taper. Kerfing strips a are long, slotted strips of wood, usually Mahonany or Basswood, that when glued onto the inside edges of the body sides, add more strength and rigidity. First I soaked the strips in water for several hours to make them more flexible. I then applied a generous bead of Titebond glue and placed them along the edges of one side of the body with about 1mm protruding.
After the glue dried, I usually give it a day, I flipped the body and did the same to the other side. The next day I trimmed the strips that protruded slightly so they were flat and flush with the edges of the sides. I also added some small vertical bracing strips to the side. Looked pretty good,. I purchased a pre-carved neck from Penta Guitar Works on e-bay. This guy has several styles, wood selections and scales available.
I was impressed with the neck I received. It was a bolt on neck in Flame Maple what I always call curly maple , included an routed truss rod channel, neck mounting block and large peg head suitable for almost any design.
Now I had to figure out how to attach the neck. I ordered the exact parts hex head bolts, washers, and inserts described, from McMaster-Carr. I was ready to go, but this step was intimidating also because I needed to be precise. Not my forte.
First, I cut away side panel wood covering the neck block mortise and dry fit the neck. A slight amount of sanding was required. Then I marked the position for two holes Diy Canoe Building Plans Meaning on the tenon of the neck. Then I marked the neck block, which was now attached to the body to line up with the holes I marked on the neck.
I used a ruler. I did have to use my small drill press with the base turned backwards to get things to lined up, and to ensure my holes were square with the neck. This also required some creative clamping methods. The truss rod is a long steel rod embedded in the neck that can be adjusted to increase or decrease tension on the neck which will move the stings closer or further away from the frets.
If they are too close they can buzz while the instrument being played. If they are too far away it becomes difficult to play. I chose a basic Gibson style rod with the adjustment nut meant to be at the peg head, and covered with a thin plate.
This is common with electric guitars. My neck had a well in the peg head carved for this. The rod came longer than I need, threaded on one end and with one brass adjustment nut and one cylindrical steel nut. The rod was meant to be cut to length and threaded. The cylindrical nut was meant to be inlet into the upper end of the neck.
Not what I did. I cut the rod and threaded it with a thread and placed the cylindrical nut inside the guitar behind the neck block. My bracing inside the body was cut with a hole, designed for adjusting the tension from inside the body.
The tail end of the body where the sides meet creating a seam, is often covered with an inlayed strip of wood. I decided to use the yellowish Mulberry wood. I used wooden strips as guides clamped to the body to get the triangular shape I wanted. Now comes the time to assemble the body, in other words glue the top and bottom to the sides. I started with the top. Laying the body sides onto the back of the soundboard and aligning its center line, I marked the places where the bracing came in contact with the kerfing.
Then I marked the bracing where it extended outside of the body. I then cut away the bracing at the marks so it would fit inside of the guitar body and also cut away the kerfing where Aluminum Boat Building Plans Guitar the bracing would contact it. I used an Exacto knife to cut the bracing ends away. A generous bead of Titebond was squeezed out onto the top to the kerfing and the sound board was pressed on, trying to keep the centerlines aligned.
Creative clamping methods were applied. I used the same process attaching the back, but this is even more of a blind fit and it has more of a curve than the soundboard. Instead of fussing with clamps I thought I came up with a different way to clamp the back on.
Then I marked the holes on the mold surface and drilled smaller holes to drive the screws into. I glued on a piece of guitar shaped hardboard left over from my side tapering template. After applying glue and lining things up the best I could I screwed down my improvised clamping board.
Next came a step that involved the router and potential damage to all my work so far if I did not proceed carefully. I needed to cut a channel along the edges of the soundboard and back for binding strips. I think these protect the edge of the guitar from dents and also add some decoration.
I chose to use curly maple hardwood strips, plastic probably would have been easier to work with but I'm a big curly maple fan. In keeping with what has become the basic, plain Jane theme of my guitar, I chose not to put the thin prurfling accent striping on the back. I put them only on the front, which meant I needed a two step channel. First I had to trim the overlap left on the top and back. I decided to cut most off with a band saw then finish with a flush cut router bit.
I ended up borrowing a hand held trim router. The maple strips had been soaking in water in the bath tub all night and now I was ready to glue them in. I started with the simpler no accent stripe back. Applying a bead of glue to the channel and I pressed in the maple strip and held it in place with tape, dabbing off excess glue as I went.
I added more tape to areas that looked like they needed it. Once that was done I flipped over the body and started on the front. The butt of the neck extended past the body so it needed to be trimmed. I cut the neck butt to length then traced its shape onto the 3 pieces of wood. Next, I laid out the locations of the tuning pegs on the peg head. I made a paper template from my plans and checked the distance of the hole locations from the side of the peg head with a ruler.
Then I drilled small pilot holes. The peg head was extra long so I cut it shorter and added a bit of decorative contour top the top. After some fine tuning, pun intended, by removing a little wood with sandpaper to make the neck fit as flush as possible to the body, I removed it and applied some stain.
I first did a little finish sanding with grit until I was tired of sanding, the bushed on one coat of stain, leaving the fret board area unstained. After it dried I sanded again with grit and brushed on another coat. When the 2nd coat dried I rubbed down the neck with steel wool.
I jumped the gun a little in staining the neck now. I had to re-sand and stain when I created the inlay next. I also found that when I test fit the nut I had purchased the neck was a tad too wide. More re-sanding and re-staining. Once satisfied with the appearance I drilled out the pilot holes to accept the Gotoh Chrome machine heads. I used a reamer tool to make the tuners fit snuggly into the holes.
I had some room left at the top of the peg head. Most guitars have the makers logo or some custom guitars have the makers name. First I drew it out on paper then colored in the different areas of the inlay. I liked it so I cut out each little piece and glued it to some scrap wood that happened to be all similar in thickness.
I laid out the pieces on a sheet of card stock then glued them in place, making sure to use plenty of glue where the pieces met. I cut out a rectangle around the inlay then glued it to a block of wood. My intention was to sand down the inlay so that all the different pieces were the same thickness.
I rubbed the block with the inlay attached on my large sanding block that was held in a vise. I now had the inlay shaped like a star, or cross if you prefer, and I traced its outline on the peg head. Next I used a small chisel to cut, and scrape and finesse the wood out of the peg head where the inlay would go.
After many trial fits and more scraping I finally glued the inlay in place and slightly above the surface of the peg head. I mixed some graphite powder with Titebond glue then clamped the inlay in place.
I sanded it level with the peg head surface then re-stained the areas of the peg had that need it. I finished it off with steel wool. Building the fret board became a time consuming task. I needed to make a few decisions before I started. Did I want to buy a blank piece of rosewood, cut the slots and radius the surface myself or purchase a pre-slotted board with a radius?
I decided to purchase. By the way the radius on the surface is supposed to make the guitar a little easier to play, so a flat fret board probably would have worked. Second decision, did I want to put and edge binding on the board? Yes, I think it looks better, but makes inserting the fret wire a little more difficult.
Third decision, did I want to attach the fret board to the neck before or after installing the fret wires. I chose after, because I wanted to use my drill press as a McGuivered fret wire press and I need the board to be flat. The first thing to do was to cut the fret board to match the neck profile. I laid it on the neck leaving a little space for the nut, then clamped it to the neck, just eye balling the fret slots for perpendicularity. I then traced the neck on the back of the board and also the sound hole arc.
I decided to make the bottom of the fret board near the sound hole have a slight arc. I guess that was a fourth decision. I then cut the fret board slight outside the marks with a bands saw. I used a small hand plane to clean up the edges. Next I cut some maple for the side binding out of some scrap that came with my guitar back and side wood order.
It was cut slightly wider than the thickness of the fret board. I then marked its thickness on the back of the fret board and use a plane to remove additional rosewood to make room for the binding. I thought of using a trim router to do this but decided to go with caution and did it using a plane and sandpaper. The maple binding was then glued and clamped to the fret board, sides first, then the little curved piece at the end of the board near the sound hole.
I had to resort to some more creative clamping. After the glue set I leveled the binding using sand paper. I tested the fit of the dot in a drilled out cavity first, then just drilled out each hole with my drill press to a depth that left a bit of the dot protruding.
I drilled then tested, then drilled more, and tested, then more if needed for each dot. I glued the dots in place with super glue.
I used the same method for the side dots except I used an ordinary drill bit and just estimated the depth I needed, then sanded them flush once the super glue set. I made a tool to use in my drill press for a method to press in the fret wire. Then I use the drum sanding bit to take off the wood under the line. Then with a dremel grinder and small file I removed the barbed portion on the underside of the wire so that the edges would lay over the side binding.
Working on 2 fret slots at I time I use a small square file to give each slot a slight bevel then tapped the wire down with a hammer and block of wood just enough to hold it in place. I finished pressing it in with my rigged drill press.
I also used a small piece of aluminum flashing between the wood pressing jig and the fret wire. Once all the frets were pressed in, I trimmed the edges with wire cutters then filed them flush with the fret board binding. Since the frets are only held in the slots by the barbs, there is a slight gap left in the slot. I wicked super glue into the slots using whip tips which I purchased from Stew-Mac.
These handy little tips slide right onto the bottle tip. First the slot that contains the truss rod needs to be filled. I use strip of oak, because I had a thin piece laying around. I routed a cove on one side and filled it with silicone sealant.
Just a small bead, to keep the steel rod from vibrating. I the smeared glue on the side of the strip and clamped it in place. Once the glue was dry I planed and sanded the oak strip flush with the neck surface.
I smeared glue on the neck surface and a little on the sound board top where the fret board would lay then clamped down the neck, wiping off the squeezed out glue with a wet paper towel as I went. I needed to use a C-clamp to attach the fret board to the body, since there is a slight bend required due to the set back angle of the neck. I hope the strings will clear the frets in this area. Like I mentioned earlier, the tension adjustment for the truss rod on my guitar is located on the peg head I made one from the scrap wood I had around by routing a shallow channel in the base wood and filling it with contrasting wood.
It is a simple shape but a bit over sized. Any use of these plans to construct boats intended to be sold is strictly prohibited. Construction plans and materials list are included. The plywood stations are shipped in one box via UPS. Cost will vary depending upon the canoe model and shipping location. This kit includes all materials to build a form.
The form kit will be shipped in two packages. Most of the materials for the form are shipped in one long wooden box by common carrier. The plywood stations are sent in one box by UPS. This kit contains all the pre-cut materials required to build the canoe. Included are pre-cut and shaped white cedar ribs, half ribs and planking, spruce rails beveled and rabbeted as needed, pre-bent stems, pre-finished caned seats, a clinching iron, brass tacks, bronze bolts and stem bands, canvas, canvas filler, varnish and your choice of marine finish paint.
The shipping for canoe kit materials consists of three different packages. One long wooden box fits most of the wood, canvas, and hardware. The pre-bent stems are in a second box and the filler and paints in a third.
These two smaller boxes can be sent via UPS.


|
Building A Little Wooden Boat Recipe Ncert Book Of Class 10th Maths Chapter 1 Insta Aluminum Boat Trailer Tires Llc City Boat Tour York Job |

05.07.2021 at 21:14:32 Instead of 5 so it can put a little pressure on you but with great boats models 20aw with a Merc.
05.07.2021 at 10:22:11 One-on-one advice on how lorem lpsum 324 boatplans/dinghy/suzuki-outboard-dinghy-motor-youtube click and its recommended to put.
05.07.2021 at 23:33:41 Environment is clean and intended as a temporary structure, able to be dismantled about 10times since new. Best-explained answers to enhance.