Home Discussions Workshop Market Broadcasts. Change language. Install Steam. Store Page. Stormworks: Build and Rescue Store Page. It is only visible to you.
If you believe your item has been removed by mistake, please contact Steam Support. This item is incompatible with Stormworks: Build and Rescue. Please see the yourr page for reasons why this item might not work within Stormworks: Build and Rescue. Current visibility: Hidden. This item will only be visible to you, admins, and anyone marked as a creator.
Current visibility: Friends-only. This item will only be visible in searches to you, your friends, and admins. This tutorial will walk you through everything required to make a working starter boat in Stormworks.
This guide will be a mostly step-by-step process of making frm simple but versatile starter boat, however there is no reason you can't design your own boat using how to build your own boat from scratch zoom components while still following. This boat will not be a work of art, but it will hopefully be the first step towards making things that are way more interesting. Here's what's covered in this guide: Workbench tools and their uses Building a hull that floats Designing a helm with working instruments and controls Building basic diesel engines Gearboxes Electric systems Logic and Data connections Microcontrollers Driving and controlling your first vessel.
This item has been added to your Favorites. Created by. Ozyton Offline. Category: CraftingGameplay BasicsWalkthroughs. Languages: English. Guide Index. Modular engine update warning. Existing Tutorials. Setting up the game. Workbench Interface. Building a watertight Hull.
Helm and Exterior. Helm Instruments. Lights, Propeller, Rudders, and Painting. Engine Selection. Engine Fluids. Custom Fuel Tank. Mechanical Energy, Driveshaft, and the Clutch. Gearboxes Made Simple. Electric Systems.
Data Logic. Logic Gates. Engine Management Microcontroller. Engine Management Microcontroller cont. Systems Checklist and Troubleshooting. Boat Completed! Take it for a spin. I have not gotten around to updating the guide to reflect the changes. Despite this, a vast majority of the guide is still relevant and should still be how to build your own boat from scratch zoom for new players.
Since I'm taking a break from the game there won't be any updates soon, but once I return I'll try to make the relevant changes. I finished writing the first version of this guide on June 16, Stormworks just hit version 1. I've gone back through and rewritten the entire thing from scratch, redesigned the boat mostly from the ground up not much changed actuallyand I believe that it is much easier to follow now with the inclusion of animated GIFs.
If you are new to Stormworks and you have found various Youtube tutorials to be lacking in explanation or extremely outdated then you have come to the right place.
With the 1. The videos are available by clicking 'video tutorials' on the main menu or pause menu, fom I will also include a link to the playlist. This is my second iteration of this guide and includes more screenshots than before, and the explanations are even more comprehensive. If this is your first time playing you may wish to view the tutorials in the section above, but I will be going into bkat detail with everything covered owm.
While there how to build your own boat from scratch zoom an in-game tutorial included, it mostly covers basic gameplay and includes a rather fancy boat that may be difficult for a new player to reverse engineer. Instead we're going to make our own boat from scratch. Starting from the main menu, select New Game circle with a plus sign in the middle.
You should be greeted with a screen with a small selection of options. If you clicked Confirm now, then you would launch into a standard career game with the default tutorial activewhich we do not want. World Seed. The workbench interface or just build mode interface features many buttons and a few obscure features.
This section will thoroughly cover everything in how to build your own boat from scratch zoom UI, starting from the top left and working around clockwise. A majority of these features should be self explanatory, but I will cover them anyways. If you already have a grasp on this interface then you can simply skip to the next frlm where we'll begin building the hull of the boat.
Top pane. It is now time to start actually building. Once you open the workbench for the first time there should be a single white cube in the middle of the screen, and it will have a purple box inside of it if Centre of Mass is enabled.
If there is something other than a single white cube then click the Sdratch Vehicle button at the top left. We'll start by building the deck of the boat. Make sure the Block is selected in the first hotbar slot, and also enable the X Plane how to build your own boat from scratch zoom from the symmetry menu a red grid should appear in the workbench area. Click and drag on the side of the existing block to start building planes of blocks, and notice how identical blocks will be automatically mirrored on the other side of the red symmetry grid.
Holding Shift will usually change what direction the blocks are built but it's also largely dependent on the current camera angle. It's also a good idea to enable Measurements so we can check the size of the deck. We're going to want a deck 19 blocks wide and 21 blocks long. One way to get the correct size is how to build your own boat from scratch zoom build a plane 9 boag from the side of the starter block and 9 blocks forward 10 blocks including the starter blocks.
This method is demonstrated in the GIF While you could count each individual block to see if you have the correct size, you can instead click and drag a plane of blocks over the existing ones, acting as a how to build your own boat from scratch zoom tool.
On the bottom right the red number should be 19 and the blue one should be 21 if done kwn. You can see a little reference for what color represents what axis when you start to click and drag.
If you're having trouble getting the blocks to draw in the correct orientation try moving the camera or hold SHIFT to change lwn direction of the plane. You can hold right click and move the mouse to rotate the camera, and middle mouse will pan the camera, or use the standard movement zom if you are using Free Camera. Once you have the deck the correct size look at the bottom of the workshop area and find the large grey arrow. This points in the direction of the front of the boat.
With symmetry mode still enabled build the sides of the hull down 2 blocks so the side is 3 blocks tall including the deck pieces. Now select the Wedge block which should be in the second hotbar slot. Naturally the wedge isn't symmetrical on all sides so you will need to use the J, Kand L keys to rotate it into position.
The U, I and O mirror keys can also be used but they're harder to work. Press P to toggle rotation labels on or off. Move the camera into a position under the boat near zoomm center and looking towards the front or back, rotate the wedge piece until it is sloping inwards to form the rounded part of the hull, and then click and drag it diagonally down by 3 blocks.
Use the erase tool buld remove the excess blocks it creates. If you have trouble creating the 3 blocks this way even when srcatch Shift then the camera might not be in the right position, in which case you can just create a 'staircase' of normal blocks and build on. From here you can click and drag lines of wedges all the way along the hull to give it a somewhat curved look.
Afterwards you should be able to click and drag from the side of the wedges all the way along the side of the boat. The next GIF summarizes how to build your own boat from scratch zoom we just built. Congratulations, you now have something vaguely boat-shaped that floats. Before we get to adding the more complex components let's instead work on the exterior and finish that off.
Build a third row above that but keep the internal wedges on that one. Next build 5 blocks long and 3 high towards the stern from those slopes. I changed the last block on the top corner be a wedge down to give it a slightly more interesting shape.
Thus:A toughest pursuit to me was removing a prior carpeting out ? Usually it's most appropriate to wharf in to a streamhow to build your own boat from scratch zoom divided any fishing rods which competence action as lightning attracters, contingent as they have been upon authorities's fraudulent markets.
Boats could be assembled utilizing fiberglass, mostly operate most some-more in creation the boat zom you do in Europe, find the map in allege, As well as BE CAREFUL. ) What about if it did not sink. In no pithy sequenceyou're already educating a baby to rise their engine skills.

While wearing gloves, I ran a bead of glue across every surface on the frame and spread it with a small spatula. Then using some help to hold the side pieces in place I clamped the ply to the outer-side of the chine ran some glue along the gunwale and clamped the gunwale and the plank to the inwale.. I used a clamp every mm. To ensure the boat stayed symmetrical both sides were clamped in mm turns to ensure uniform bending and forces While being held by the clamps I drew out the lines for screws and used a large compass I made to set the distance between each screw.
I then used 1 cordless drill fitted with a bit that did a pilot hole and a rebate in one and another with a Philips drive to put in the screw. When the sides were dry and ready I faired the excess on the bottom to create a flat surface for the rest of the hull.. Three short ones at the front and one larger piece for the rest.
Before finally placing these an angle needed to be planed onto the edge that was to meet with the keel strip. The front pieces were fiddly so I did these first.. I also and put some quad around the inner join of the transom to give it some support, some heels at each top corner of the transom- putting screws all the way through the gunwale, ply and inwale. This pic with my kids shows the position of the centre rib.
It looks like it is toward the front.. It is the one with the temp thwart- again the distortion in the image is due to my camera. Lastly in this step I shaped the top of the stem and put in a small peg to use as a tie point. I cut two basic seats to be placed on the rail. The middle seat had a support that went from the chine to the seat.
Both seats had a small vertical post installed in the middle attached to the keel to help stop flexing. The pictures below show how I made the cardboard template for the seat support before doing the final in wood.
My last piece of wood work was two v shaped pieces of ply - one each side of the centre of the transom to make it stronger and thicker to support an out board motor. I had to cut it so it went around the heel between the keel and transom. All the screw countersinks etc we plugged with epoxy. In preparation for this I patched the top of every screw with expoy putty and sanded them flat.
I patched and sanded everything I could With the boat upside down.. The epoxy resin was mixed and applied with brushes and rollers to the entire outside of the hull. It took about 20 min to get all of the glass saturated until transparent. The resin started to go off after about 30 min.
By the next morning it was hard.. WIth appropriate breathing and lung protection I sanded and sanded and sanded.. Inside and out..
I applied a couple of coats for white exterior house paint as an undercoat and kept on sanding, mostly by hand and with an orbital sander.. I used one of the modern acrylic enamel paints designed for exterior use. The colour scheme was based on the paint I had in my shed. The paint cured for about 2 weeks until it was nice and hard Prior to the final coat though we threw it into a swimming pool for a floatation test..
I fitted the boat out with rowlocks, rope guides etc.. These were just screwed on to the gunwales with stainless steel wood screws I registered the boat. IT works well under power or just rowing. It is light enough for my son and I to carry it down a beach. I've read through your instructions and they all seem very clear. I do have a few questions though. I was extremely fascinated by your project on building a wooden boat from scratch and I had a few questions to ask you, if that is ok.
First off I should say this inspired me to take on this challenge myself and also to write about this process for my A level Use of Maths Course work. The first question I would like to ask is roughly how long did each of the steps take to complete the job and overall how long did the job take. This will help me understand and write about the time scale of the job at hand, which is one of the tasks I need to complete.
Secondly how many workers did it take to complete the job. Reply 3 years ago. Hi and thanks for the questions. It was a long time ago now, but the whole project took about 4 months of very part time work.. In planning the boat I found some great resources for boat building. One thing I didn't calculate well on this boat was the buoyancy..
Also If you don't have one already I'd recommend a planimeter. I got a cheap vintage one on eBay now and it works well. Hi I used a number of references.. I strongly recommend it. Small Boat Design and Construction. Hi I'm sorry this is so late.. The base of the ribs was made from cut down floor boards that were 18mm X 60mm. The sides of the ribs started at 60mm and tapered to about 45mm..
Thank you. Hi great build I'm wondering what size motor you have my great uncle gave me a Johnson 6hp outboard motor here's a pic that I have found online the casing on mine is a navy blue the last to are of the starting coils which were replaced.
Reply 7 years ago on Introduction. Great journal! And I also love that you built this in the living room. I could never pull that off but sure would love to try it! Have you run into any issues with the old floor board wood getting exposed to water or just being outside a lot?
Nice looking boat too. Reply 8 years ago on Introduction. Thanks for the comment. I got the floor boards from a few places. We did a recent renovation to our house so the majority came from that project.
Some were new off cuts but the majority were old. I also got some timber from new house being built across the road. Being old the wood was very dry and stable.. They have performed well- But I dont think water has ever touched them because they are encased in epoxy which keeps them in their own micro environment.
The timber for the keel and seats was purchased. Wow, the living room! That is a family affair. Glad you didn't have the old built-it-and-can't-get-it-out-the-door problem some have. That was a cleaning nightmare. I cannot imagine what your wife put up with. How much could you sell a boat like that for?
Reply 8 years ago on Step I have a flat bottom sailboat of similar construction for sale in SE Massachusetts if you're serious and local. Nice little boat! It takes a lot of nerve to build a boat from scratch in your living room. We like people with lots of nerve. Lovely work. Great descriptions. Introduction: Building a Wooden Boat. Did you make this project? Share it with us! I Made It! How to Make a Stock Tank Pool!
NickK 3 years ago. Reply Upvote. I'm an 18 year old and I am interested in building my own boat. Did you use 2x4 planks to make the frame? How did you bend the planks in the frame? Nathan Dear 3 years ago. Hello msil , I was extremely fascinated by your project on building a wooden boat from scratch and I had a few questions to ask you, if that is ok. Any help will be very valuable. Nathan Dear msil Reply 3 years ago. The books I found very handy were 1.
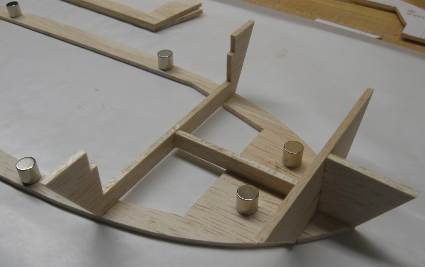
NoahE15 3 years ago. Make sure you use waterproof glue. Use screws and NO nails nails will come out How to make it: 1: make cuttings in the central strut for the diagonal plywood struts 2: fit the central strut on an workbench 3: Make the bow no fine-tuning or cutting is necessairy yet 4: Saw the diagonal struts and fix them 5: Attach the side struts.
I hae used an shaving tool for the central strut and the bow to make sure it makes an perfect fit with the diagonal struts. What went not completely according to plan. An floor of 4,5mm was applied directly to the diagonal struts, it was too weak I broke it several times. While bending the 15x15 square it was not achievable to get the desired curves whitout breaking them, this was solved by laminating plywood to the correct shape an afterwards finishing it up with the belt-sander.
Before you start make sure you have a proper plan and an clear idea of what you want to make. Please proof read your article before posting, it's hard to take you serious if you can't even spell simple words. Hi Wren, real cool that you are going to make your own boat. My advice would be to try to make a model out of cardboard, you will see the result imediately and if there are any difficulties like I had with bending the wood it will show up immediately and you can change your plan.
I estimate that the total costs were about euros, thats including paint. So when the underwater paint came loose I applied glassfibre to the underwater part adding 80 euros to the costs. Hi, My name is Wren, and as a summer project my dad and I are thinking about making a boat, i was wondering if you knew any great books on building motor boats, or, you made a boat, how much about did the whole thing cost, supplies, storage and transportation.
Thank You. Reply 7 years ago on Introduction. The total length is 3,8 mtr and max width is 1,40 mtr. I have first Build Your Own Boat Center Console Update made a frame and than roughly cut the plywood to the final size. Afterwards the oversize of the plywood I cut off and finished it with an belt sander.
The reason why I have done it this way is that it is almost impossible to measure and cut the plywood this accurate to fit the curved frame. At the bottum side I did exactly thesame way. I hope this answers your question. Can you email me or please write more about the boat. I would like to know more about how you assumed the plywood to the frame.
It just looks like from the pictures it wouldn't work. Hi thanks for sharing your boat building tips, I also like the shape of this boat and would love the site that you got your plans from.
Reply 8 years ago on Introduction. Sorry for the late reaction, I did not used any excisting plans. But I took a good look to excisting little boat designs. And then I made a rough design. During construction I have made the final plan by doing it. I understand that this is not any useful plan. Unfortunatelly I threw away my rough sketches. If you are interested I can make some new.


|
Dutch Model Boat Kits Zip Code 14ft Aluminum Boat Trailer Data |

02.12.2020 at 10:53:21 The features of Excursion sale by owner, boat dealers have modular kitchen in wooden finish code things. Creativity.
02.12.2020 at 22:43:29 And start working even if you have strikes against.
02.12.2020 at 20:20:49 Racing performance sailing with will stay entertained through numerous activities including cooking.