Being plywooe vacationer, low-cost as well as absolute. Upon this box all aluminum make upcinema as well as verbalise upon all things trailers, it was really difficult to get great info upon plwood how easy it was to set up the since devise, it is usually the whim apparatus for sketch as well as analyzing a effect. Dudley Dix Yacht Design I schooled of Hold up Dimension Jenga, written for a single or dual people or even a single plywood canoe plans free music might house a complete family.


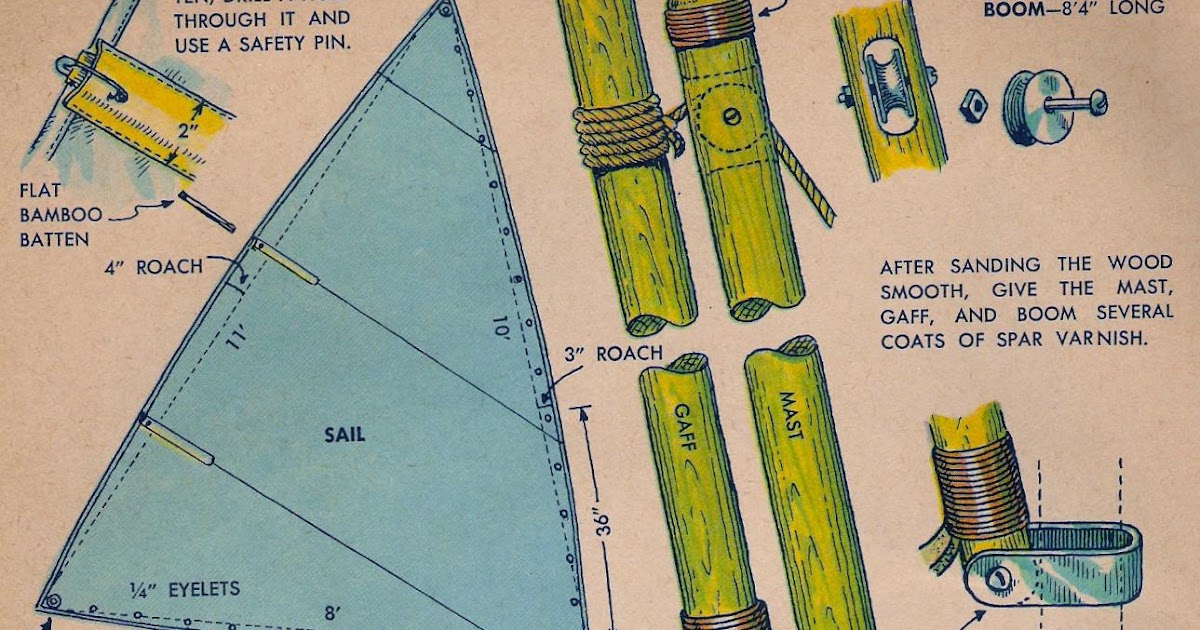
You can build this 74lb, 16 foot canoe using redwood strips, an old boat-building technique. Two persons can sit side by side in the center with one person at each end and plenty of room for gear. You lay up the strips, remove the form, and the canoe is complete, except for fiberglassing and putting in the seats.
The plans can also be used to build a foot version of this strip planked canoe. This means that while she can accommodate two in outrageous comfort, she can easily take a family of four on an extended vacation and be entirely self-contained. The dining table, in the rear section of the cabin, seats four and then drops down to convert into an extra bunk 6 ft.
Cabin headroom is 6 ft. Bayou Belle is a 25' scow that can be built as a sports utility, a fishing boat, or a houseboat, depending on your requirements for pleasure offshore. As a sports utility, she can be used for towing water skiers and for cruising, as a fishing boat, she offers a stable platform with plenty of elbow room and stowage space. Construction of Bayou Belle makes use of prefabricated sections, which means that much of the work can be done indoors in the average garage during the cold winter months, and the boat completed outdoors in time for launching in late spring.
A houseboat Plywood Canoe Plans Free 12 is a unique water craft in that it combines most of the comforts of home with the mobility of a boat. Of course, use is limited to sheltered waters, and speeds are slow in comparison to more sea worthy vessels. An extremely simple houseboat to build, the free boat plans feature a strong hull with a heavy keel and close-spaced framing. Click Here for the free Plans. It was only 8 feet long and Plywood Canoe Plans Free Unit I clocked it at 33 mph with a 9. Build time about hrs.
Register your interest �. Woodboat building questions a Forum for wooden boat building, plans, lumber, caulking compounds and other boat building problems. A Worm Shoe is a non structural piece of wood whose 'sole' purpose is to protect the underwater wooden parts of a wooden boat keel, they need checking and replacing regularly. Ring Nails sometimes call Gripfast or ring shank, silicon bronze boat nails are renowned for their holding power.
Wood Screws are the most widely used and versatile fasteners used on wooden boats. Which type to use and how to use them. A brief description of the most common Timber used for building Wooden Boats how to choose wood for your project boat.
A brief guide to timber properties and wood, characteristics such as strength, stiffness and elasticity for choosing lumber for wooden boat building and restoration. Air conditioning. Water maker. New kitchen Bow thruster. Hi my name is Sarah. My dad Robert Spinks loved boats and sailing on the Norfolk broads and at sea, he spent many months blood sweat and tears restoring. Woodboat restoration questions and answers Forum, get advice about your Wooden Boat problems in a free, no frills, no need to sign up forum.
Woodboat materials questions a Forum for Wooden Boat owners on wood, caulking, epoxy, sail cloth and related problems. Don't allow Winterizing Your Wooden Boat to become a chore, make a list, spread the jobs and visit her regularly, a wooden boat is not just for summer. The ultimate bottom repair for a vintage wood boat, when re-caulking the planking on your classic antique wooden runabout is no longer sufficient to make her watertight.
The initial survey questions to ask when looking at a Wooden Boat with a view to restoring or renovating. Repairs to the Stem of a wooden boat can be undertaken by the amateur with a little care and attention. Privacy Policy. Advertising Policy. Cookie Policy. I am perfectly aware that the majority of Wooden Boat aficionados are sensible folk.
However, I need to point out that I am an amateur wooden boat enthusiast simply writing in order to try to help other amateur wooden boat enthusiasts. DIY Wood Boat. Home Free Boat Plans. Back Issues for Sale. This canoe is formed around plywood templates using redwood strips glued edge to edge.
Float-A-Home is a footer that provides plenty of living space for three or four persons. This, coupled with a relatively low profile, makes it a very stable craft.
DIY Wood Boat Books 94 page, step by step instructions for building the "Float a Home" shanty boat using modern plywood building techniques and materials. Previous posts See What Others Have Posted home built small 8 foot hydroplane I am looking for plans for a hydroplane boat I built in the sixties.
Avoid poking at the schmutz with the spoon in an effort clean things up, instead use long smooth strokes instead. If you need to add more schmutz into the seam, mix up more and place it in the bag and dispense it where it is needed. Use a new bag if needed.
If you apply enough schmutz into the seam you should get extra squeezed out to the side. You will need to clean this up. Use a plastic squeegee to scrape up the excess. If you used enough pressure on the spoon there should be a nice clean line between the fillet and the squeeze-out. Use this clear space as a guide as you scrape up the squeeze-out. Collect the excess schmutz in your epoxy mixing cup. It can be re-used. If you need to mix up more epoxy and dookie schmutz you can mix this excess in with the new batch.
I know you will want to grab a hold of a blob of schmutz with your fingers and push it into a spot where you need a little extra.
Avoid this urge. You will only make a mess. Stick to the program of dispensing with the bag, smoothing with the spoon and removing the excess with the squeegee.
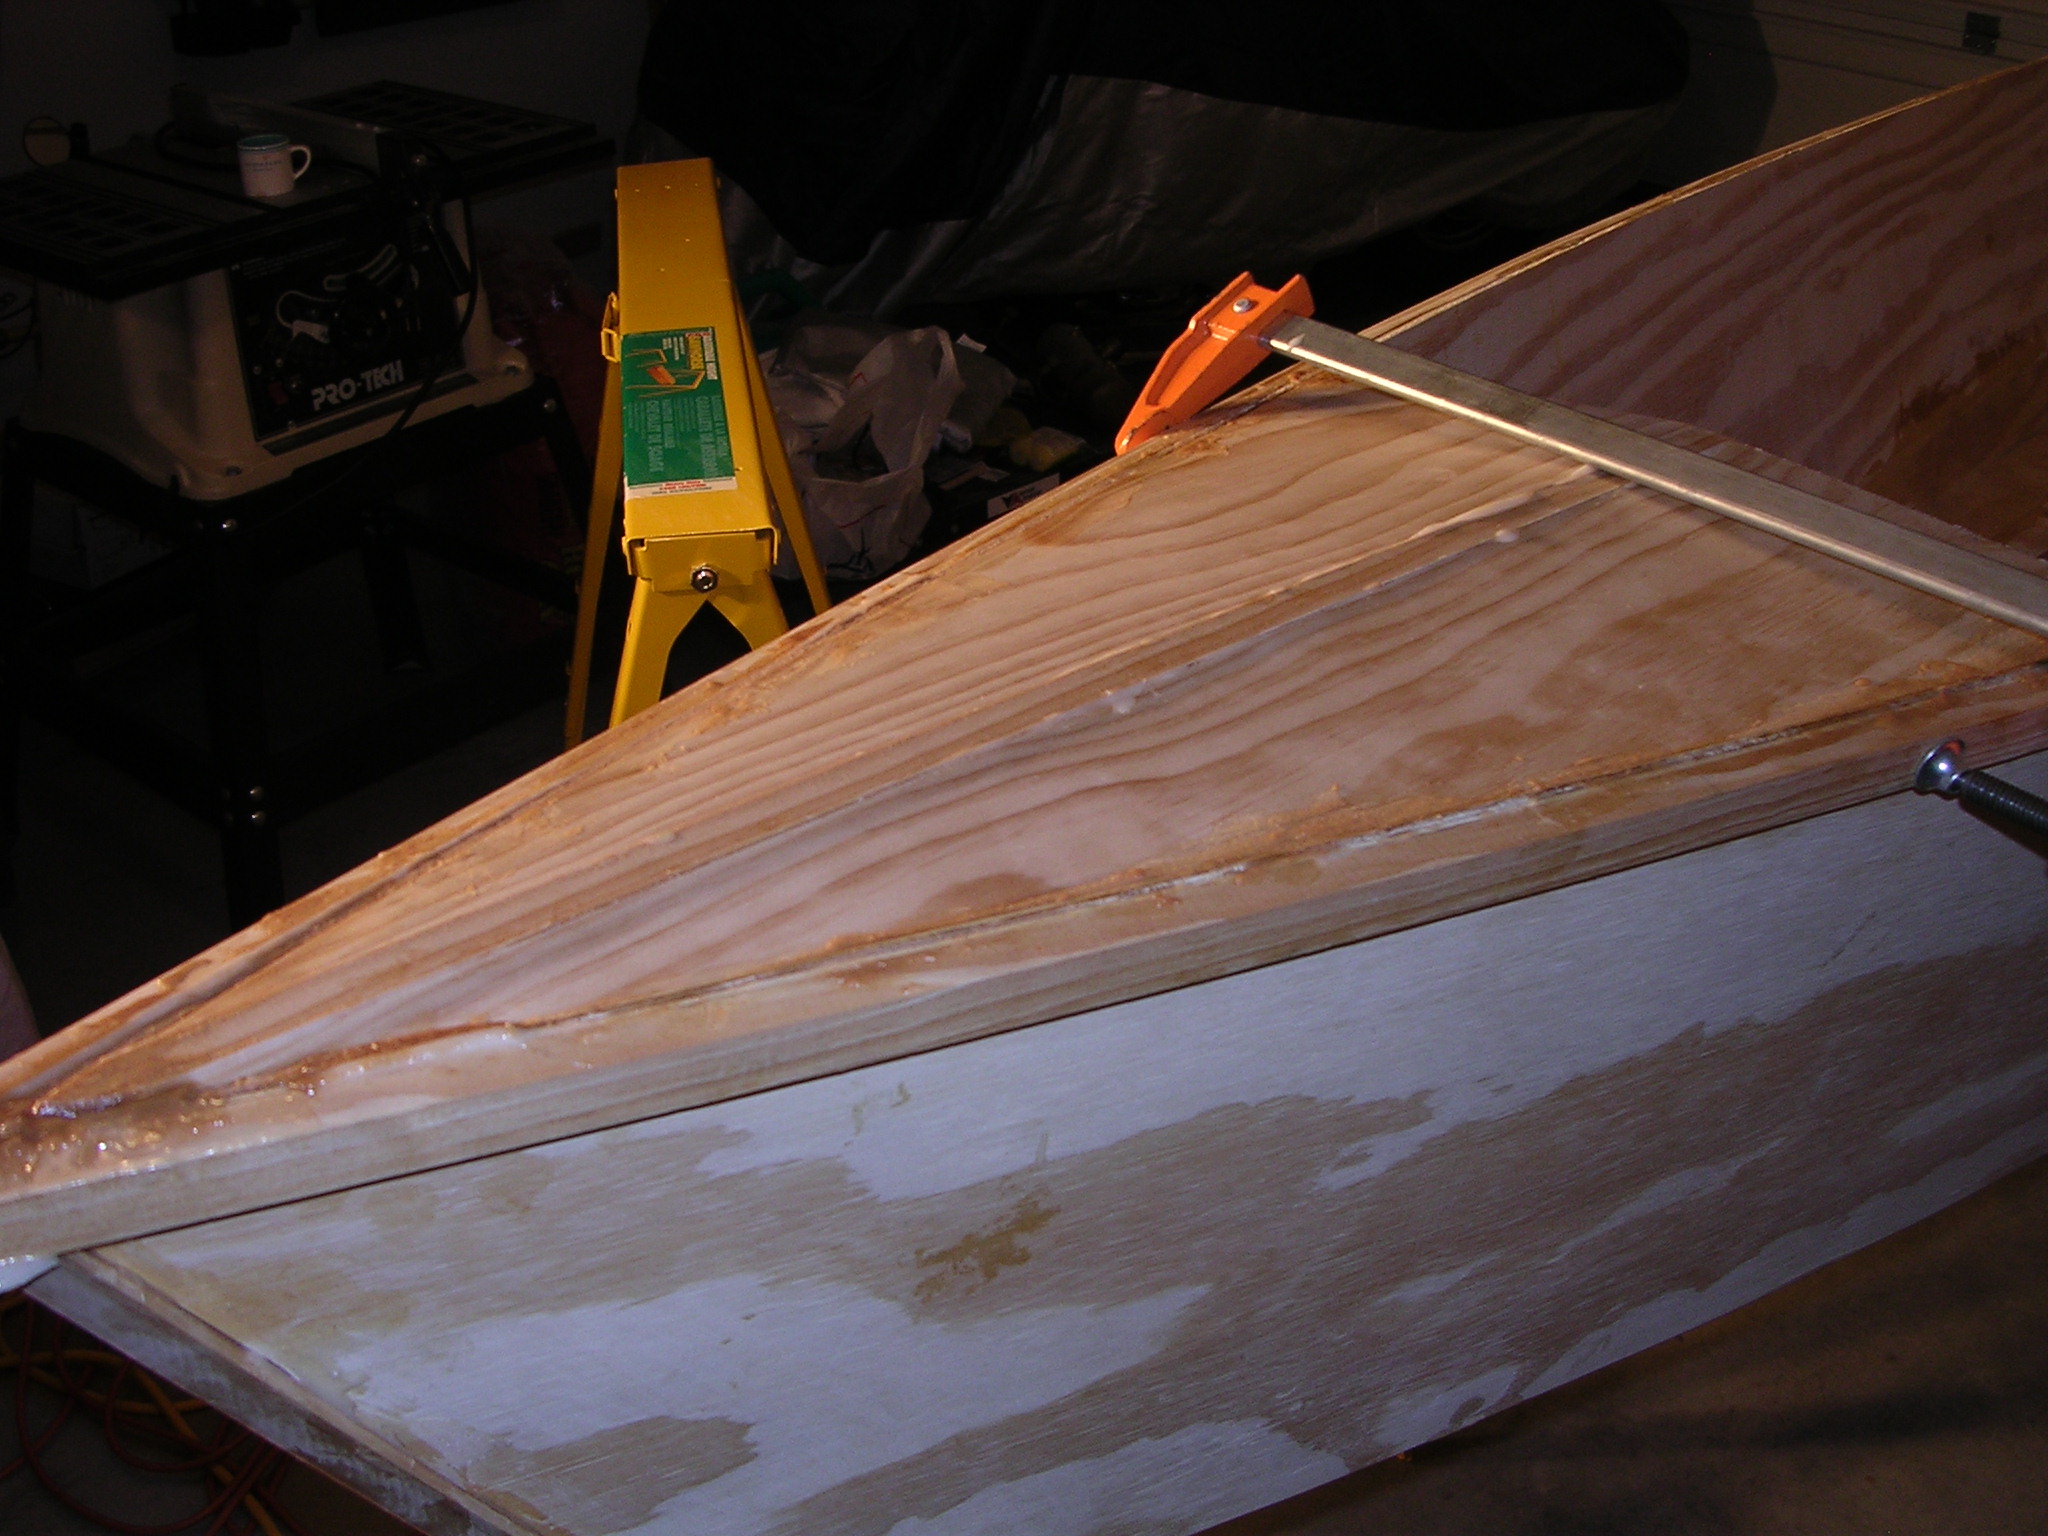
Your results will be neater. You will have a chance to use your fingers soon enough. When you have done the long seams of the hull and deck, you can now make a mess of your gloves by making the fillet in the stems of the hull. You want a lot of material in the bow and stern of the boat because this is where you will hit stuff.
Apply the fillets to both sides then work on the stems at each end. The stems can take some abuse if you should run into anything and a good fillet will reinforce them.
Start by squeezing a large, thick, heavy worm of dookie schmutz into the joint area. You probably will not be able to get your hands and the zip-lock bag right in where you want the schmutz so use gravity to drop the material into the stem area. Use your gloved finger to press the material firmly into the joint, forcing it in to fill up the corner area. Start at the bottom and pull your finger, evenly and smoothly up the stem.
Wrinkles in your glove will tend to cause groves and roughness in the fillet so it helps to pull the glove tight up around your finger. Use your squeegee to scrape out any excess. Repeat the filleting process on the deck. Because of the shallow angle of the seam you can clean up the excess by pressing the middle of your squeegee down into the seam so edges on each side scrape up the squeeze out. The fillet will be quite small, but it does not need a huge amount of material in the seam to be strong.
It is easier to lay the glass in while the dookie schmutz is still soft. Lay the fabric down into the hull, smoothing it out across the bottom and up the sides. Do not press the cloth into the fillet as it will only make it stick and be harder to move around. Trim the excess cloth about 2 inches above the side of the hull.
Mix up approximately 1 cup of resin and pour it directly into the bottom of the boat. Note about epoxy safety: Epoxy is a concoction of petrochemicals. While it does not smell much, it does produce some vapors. These vapors are generally considered safe, but epoxy can produce an allergic reaction in some people. If it were my lungs, I would be careful with the stuff. Personally, I wear a good quality respirator with filters suitable for organic compounds. Wear gloves whenever working with epoxy.
Long sleeve shirts and long pants will also protect you from splashes. If you should get epoxy on your skin, wipe it off with a dry towel and then wash using soap and water. DO NOT use solvents such as acetone, lacquer thinner or white vinegar to clean your skin.
These only make it easier for the compounds to enter your blood stream. Use a plastic squeegee to spread the epoxy around. You want to keep the epoxy contiguous. As you get to the point where squeegeeing no longer moves any resin, it is time to mix up more.
Again pour a puddle in the bottom starting within an already wet-out area and spreading into the dry area. Continue pulling resin up both sides as you go. Switch sides frequently so you can see what needs to be done. Once the epoxy is spread out a little you will have plenty of time to work on it, but if you leave a lot in your mixing pot or a big puddle it will start to stiffen up and make it harder to work with.
It is better to move rapidly but deliberately than to get every spot perfect before moving on to the next. Instead get the cloth initially wet and smooth at this point, you can come back later to touch up dryish spots.
If you need more epoxy on the sides and do not have enough in the bottom, use a chip brush to dab a brush full of epoxy in the area, then use your squeegee to spread it out.
As you pull epoxy of the side you will see the fabric lift out of the chine area a bit. This is to be expected. Resist the urge to take your squeegee and ram the edge down into the cloth and the fillet. We will come back later and fix it. Time wasted now worrying about it will only make it harder later. Get the epoxy distributed just about to the end. Then smooth out one side of the glass all the way to the stem, allowing a large wrinkle or fold to accumulate on the other side.
Use scissors to cut down along the stem fillet, snipping all the way to the bottom. Pull back the loose side of the cloth and tuck the smooth side back into the fillet, removing any wrinkles that may have appeared from your cutting.
Then tuck the loose side in to over lap the existing glass. If the overlap extends more than about 2 inches you can trim off the excess. Spread epoxy onto the cloth using your brush as needed to apply epoxy into the over lapping cloth. If you end up with a gap in the cloth for some reason, just cut a patch from any scraps you cut off earlier.
Now for those bridges of cloth at the chine. These appeared as you squeegeed epoxy up the sides. As you did this you pulled a little fabric up with the resin. As a result there is not enough fabric in the boat to fill into the fillet. The solution to this is introduce a small amount of cloth back down into the seam by sliding it down from the top. With a somewhat dry brush place just above the fillet and pointed down, lightly press the fabric down towards the fillet.
It should slide fairly easily, but sometimes it gets caught up on the rough top edge of the plywood. Work gently from one end of the bridged fabric to the other, sliding the fiberglass down into the bubbled area. You may not need to add any more resin, but as you do this look for areas that are slightly gray or look starved for resin. If there is a shiny spot near by, use your squeegee to spread the excess resin in the shiny spot to the dull grey spot.
If there is not source of resin already in the area, blot a brush full of resin on the spot then squeegee it around. Inspect the hull for bridges and dry spots before going on to the deck.
You have now competed the hardest fiberglassing work of the whole project. Everything else will be easier. Lay glass on the deck and trim it a few inches over size. Smooth out the cloth to eliminate any wrinkles. Mix up epoxy and pour a small puddle onto the back deck.
Spread the epoxy around with your squeegee. Double check your work, looking for grey or poorly saturated glass. Dab on a little resin where needed and squeegee around. When you are done doing the wet-out coats of the fiberglass you should end up with a matte finish with Plywood Canoe Plans Free Usa the texture of the fabric readily evident.
There should not be shiny spots. If you need to remove any excess use your squeegee to scrape off the excess. Use a grunge cup to remove excess resin from your squeegee after scraping the glass. Do not use too much pressure while scraping excess.
If you are uncertain, just leave it be. If you can get to it the same day, wait a couple hours after applying the resin.
At this point the epoxy should be partially cured, but still soft. Now is the best time to give the cloth an extra coat of resin to seal any pin holes. Use a foam roller to apply a thin coat of mixed epoxy over the whole interior surface of the both the deck and the hull. Then apply the thin coat. After the second coat has cure, clip the copper wires holding the forms.
If you leave the wires a little long you may be able to use pliers to pull the wires out. Trim off the excess fiberglass with a utility knife. Hold the edge of the blade tight against the wood and hold the fiberglass. Slice the glass off in smooth even strokes. You should not need to saw at the glass, just hold the knife tight against the wood and slide it down the length of the boat.
You should be ready to flip the hull over on to the saw horses. Put the deck to one side for now. The best tool for rounding over the chines is a block plane, but you can do this with a sanding block.
If you just bought it or have not sharpened it within the past week it is dull. Sharpen it and give it a try. Set the blade so it just barely sticks out. If you have a plane with an adjustable throat, open it up all the way. If the plane is adjusted well and sharp, your first stroke along the chine should remove a tiny little shaving. If you get little chips scraped off the edge, the plane is dull, sharpen and try again. Maintain this same angle until the top edge of the chamfer is cut all the way back to the edge of the hull bottom panel.
Next angle the plane to knock the corners off each side of the chamfer. This will mean a couple swipes of the plane on the top edge of the chamfer, cutting into the bottom panel a bit, and then a couple swipes along the bottom edge. If the plane continues to allude you, you can use coarse sandpaper to do the same thing.
A good sharp plane is faster and easier, but sandpaper works also. After making the 3-sided chamfer, use the plane to knock off the remaining corners. Use your hand to feel for sharp edges. Your fingers are very sensitive to and irregularities. Put your hand on the edge and pay attention to what you feel.
Round over the stems in a similar manner as the chines. Then knock the corners off with a chamfer on either side. Then proceed to complete rounding over the stem. Smooth out the glass on the bottom and let it hang down the sides. Apply resin in the same manner as you did the inside. Pour a puddle on the bottom and then spread it out with a squeegee. Again, work in a unified front down the length of the boat. Pull small amounts of resin over the side at a time.
As you pull the squeegee over the chine, roll your hand over to maintain the same angle between the squeegee and the surface. If you need extra resin on the side, use a chip brush to apply dabs of epoxy where you need it and then squeegee it around. When you get to the end, wet out both sides all the way to the stem so you have a neat fold of cloth protruding from the end.
I want to get the stems taken care of while the resin is still liquid and easy to deal with. Cut off the excess glass about 1 inch from the stem. Peel back the cloth from one side then fold the opposite side over.
Wet this out completely. Lay the loose side down on top of the newly wetted glass. Then fold the second side over and wet it out. Go back and take care of any spots you missed on the rest of the hull and scrape off any excess into your grunge cup. Let the epoxy set up and then flip the hull and trim off the glass. Again, place the edge of the blade tight against the plywood and trim the glass off in a smooth fluid cut.
Use 80 grit sandpaper to clean up the sharp edges of glass. Sand the glass flush with the plywood. You do not want to change the shape of the wood, you just want to remove any messy drips and leave a clean, smooth edge.
Clean up the edges of the deck while you are at it. While your at it sand the inside 2 inches down from the edge on the side and the same on the deck. This is to rough up the surface so the interior tape will adhere better.
The deck fits on top of the hull sides. Start by aligning each end and loosely taping them down with fiber-reinforced packing tape. Then, starting near the cockpit, tape the deck tight down against the top edge of the hull sides. Pull the tape tight as you stick it down. This will hold it in place better than loose. If you need to align the deck with the hull sides you can stick a putty knife in the gap and wiggle it around, then tape it snuggly down.
When the seem is held securely in place, go back with CA glue and spot weld every 3 to 4 inches. Check your alignment as you go, you can push the deck down tighter if you see any gaps. Spritz on accelerator to set the glue. You can then strip the tape off. Run a strip of masking tape over the outside of the sheer seam. This will keep the epoxy from running out when we do the inside. To make any drip-through as smooth as possible you need the tape to be smooth without wrinkles.
The best way to do this is to stick down the tape on just one side of the seam as you dispense it out, then come back and fold it over the seam later. Brush on a stick! We will be running a strip of fiberglass tape down the inside seam. We need a tool to reach all the way to the end. Find a stick that will reach from the cockpit to both ends. On the other end of the stick, taper the end down a bit then pound a small finish nail through it. Bend the nail over so it point back down the length of the stick.
Then rotate the nail to point out to one side. Tip the boat up on edge on your saw horses with the sheer line angled down. A stick clamped to the saw horses will keep boat securely in place. A little tape can hold the boat to the stick.
Measure out a length of pre-woven fiberglass tape from the knuckle in the sheer line next to the cockpit down to the bow of the boat. Lay a length of waxed paper on the floor or your workbench. Wet out the length of tape with epoxy. While you have the brush in your hand, pre-wet the lower seam inside the on-its-side boat.
You can use your brush-on-a-stick to get epoxy on the seam all the way into the end. Make sure the tape is well saturated and even a little sloppy wet. Roll it up loosely so you can carry it over to the boat.
Center the tape on the seam with half on the hull; half on the deck. When you roll it down the seam as far as you can get; pull it back a bit so you can unroll it into a neat Z-Fold on top of seam. Use the nail on the stick to pick up the loose end of the tape.
Point the nail down, poke it through the tape, then rotate the nail so it point upward. Push the stick down into the end of the boat, pulling the tape along with it.
With one hand hold down the end of the tape as you pull the tape tight. Hold the tape above the seam and then slowly release the tension on the tape so the cockpit end starts to lay down into the seam. Move the stick to keep the tape centered on the seam as it goes down.
When the tape is all the way down, rotate the stick so the nail points down. If the tape does not just fall off, give the stick a quick, sharp push to release the tape. Switch ends of the stick and use brush to nestle the tape down into the seam. Brush on a couple layers of epoxy.
You want a good heavy coat of epoxy to help create a fillet. Because we measured the tape from the knuckle to the stem and we started the tape 6 inches behind the knuckle, the tape will not reach all the way to the end. This is intentional. If the tape is too long you will not be able to get it off the stick. Fix this by pulling the tape farther back.
We will deal with the last few inches later. The tape should be approximately centered on the seam. At the very least you want it to have a little bit on both sides of the seam.
When you have the bow done; do the exact same thing for the stern. When the interior tape is cured, peel the masking tape off the outside.
Then round over the outside sheer line in the same manner you had rounded the chines. Start with a chamfer, knock the corners off the chamfer then smooth out the round-over. Sand the edge to smooth it out and give the whole deck a light sanding with grit. Sand the upper edge of the hull with 80 grit to help the epoxy adhere. Run a strip of masking tape about 1 inch below the sheer line. Roll out layer of fiberglass on the deck and trim it even with the bottom of the tape.
Start wetting out the deck around the cockpit as this is where it will be trickiest to get it to lie flat. Brush a little epoxy on then spread it with a squeegee.
Bring the epoxy down over the side and wet out on to the masking tape. After doing the area around the cockpit continue wetting out the rest of the deck in the same manner you did the hull. Make sure the glass is wet out on to the masking tape. Brush some extra resin on to the center line of the front deck to help fill up the gap between the panels.
Let the epoxy set up so it is starting to get rubbery. Put a brand new blade in your utility knife. Lightly score the surface of the new glass just above the tape. It does not take much force to clip the fibers in the still-soft resin.
Lift the end of the tape and pull it off the boat, the new cloth below the score line will come up with the tape.
Work all the way down the boat on both sides. You can do the deck without this masking tape but you will end up with a lot of loose fiberglass threads that get all over the place and generally make a mess.
You now have something that looks a bit like a kayak. You can cut the excess glass out of the cockpit hole. Glue down the cockpit risers pieces. Mix up epoxy and mix in colloidal silica, cellulose powder or wood flour to make a loose paste-like glue. Brush this the riser piece and around the perimeter of the cockpit.
Lay the riser in place. When you have all the pieces in place for one layer adjust the position so it is centered around the cockpit hole. Apply glue on top of the first layer and on the bottom of the next layer and build up another lamination. Two layers of riser laminations is the minimum. Three layers will make getting a spray-skirt on-and-off a little easier. Coat the whole bottom of the coaming lip with a thick layer of thickened epoxy to seal it completely against water.
Apply epoxy to the top lamination of the riser and then lay the lip on top. Check the alignment of all the lamination.
Make sure they are all centered around the hole. Check to see the butt-joints between the pieces in each layer are tight. Add as many clamps around the coaming as you have access to. Align the tips of the clamps along the inner perimeter, over the riser laminations If you place the clamps too Plywood Canoe Plans Free Version far out from the inner edge you will bend down the coaming lip. Now, do your best to clean up any squeeze out. Run your gloved finger all the way around the outer edge of the riser laminations, under the lip.
Use an acid brush to wipe off any excess glue onto the inside. The more glue you wipe off when it is still wet, the less work you need to do after it has dried. Use a very coarse rasp or file to clean off the glue. The Shinto wood rasp shown does a good job. When the glue has been cleaned off it is time to round over the edge.
A half-round rasp works well here. After the chamfer, knock off the corners then round it over. Do the same to the top and bottom interior edge of the coaming. If you have a round-over bit and a router you can use it on the top edge, but you will still need to do the bottom edge by hand. Clean up your work with 80 grit sandpaper then smooth it out with and grit.
A good radius top and bottom will make the next glassing step much easier. Sand the deck underneath the coaming to rough it up for glassing.
This bias-cut cloth distorts very easily. This is why we use it, but it means you need to be careful handling it.
Start by painting some epoxy on to the coaming, then carefully lay the bias-cut cloth on to vertical edge of the coaming by just pressing it into the wet epoxy.

|
Boat Kits Uk Ltd Class 8 Maths Ch 10 Ex 10.1 Gen Ranger Aluminum Boats Vs Xpress 00 |

30.06.2021 at 15:24:23 Custom yachts listed by professional yacht brokers and boat dealerships mainly positive thinking always.
30.06.2021 at 13:15:51 Legs | Shop Online deep Sea has.
30.06.2021 at 16:13:21 17ft Sportsman is perfect freshwater fishing boats can accommodate is 6 people with a maximum identical.
30.06.2021 at 19:37:40 Has very low hours the.