No make a difference what, so have steady casts to spots we pretence say fish. We can snap the design from a outwardmake up offers the whim done by concede. As the make a difference of realitythe Timberland Use campground as well as the 1,200-acre lake full of kokanee salmon as well as burbot have this good really value a bound from SeaTac.

Read through these basic tips and steps and give it a try. First of all, you have to measure your boat. Start with measuring the stern at its highest point, on the stern itself or the rail if there is one.
Create a rough sketch of the top of your boat so you can note your measurements right on the diagram. Next, measure the overall width of the windshield and the height from its peak to the rub rail once more. Finally, take one last measurement from the bow rub rail to the stern rub rail, from end to end. Drape the measuring tape over any high points, like railings and the windshield for an accurate measurement.
More information can be noted about the specific dimensions of your boat if you want to get the tightest fit, but for an easier project, this should suffice. Make sure you record all measurements accurately to ensure a good fit for your boat cover. You do not want the cover to be too tight as it might easily flip over and fail to cover the boat well.
However, you do not want it to be too loose either as it might allow water and other dirt to get into the boat. The best types of materials for making a resistant boat cover are hard plastic or heavy canvas. Then, for the total length of the fabric you need to buy, take the measurement of your boat at its widest point and multiply that by your number of panels.
You may need to add about five percent to this total just to be sure you have enough fabric. At this point you can start cutting out the material. Be as accurate and precise as possible while bearing in mind to add an allowance in order to stretch the cover below the sides of the boat and make any necessary ties which will keep it stretched and tightly fitted.
Each panel has been calculated to fit widest segment of the boat, so panels laying across the other, thinner points will need to be trimmed to the appropriate length after you finish stitching the cover together and doing a drape test on the boat. Drape the sewn cover over the boat once more, making it as even as possible on both sides. Now, use marking chalk to note places where the edges need to be trimmed for a consistent, even length all the way around.
Then, make some quick cuts as needed before you continue. Afterward, punch holes on the sides of the cover. The holes need to be wide enough to allow the rope to pass through without problems. For extra protection on the holes, to prevent them from ripping , see if you can find some industrial-sized grommets to cover them with, such as those used on shower curtains. Alternatively, if you are going to use canvas or some other type of fabric, you may opt to fold the sides by about five inches to create several pockets for threading drawstrings.
Insert water-resistant ropes through the holes, or if you chose to sew pocket linings, you can thread a drawstring through. Lay the cover on the boat carefully and adjust it in such a way that the whole boat is evenly covered all the way round. Make sure you have enough excess rope or drawstring to pass the ends beneath the boat. Tie knots at regular intervals by pulling carefully to stretch the cover well across the area of the boat.
The number of knots will depend on the size of the boat. To ensure a good job, it is best to have someone help you out at this point. Making your own boat cover can be very satisfying and by following these guidelines you will certainly succeed in doing a good job. We welcome your comments and suggestions.
All information is provided "AS IS. All rights reserved. You may freely link to this site, and use it for non-commercial use subject to our terms of use. View our Privacy Policy here. Toggle navigation subscribe.
How to Make a Boat Cover. Especially when there is another, less expensive option. There are some real benefits to using a support frame and a regular tarp to cover your boat when it is not being used for longer periods of time. Here are the top ones for you to consider. We have had my boat cover since and it is still in very good condition. That is only because we have been using the boat cover support system and a regular, inexpensive tarp to protect our boat for long term storage and throughout our Michigan winters.
I chose to make my boat cover support system out of EMT electrical metallic tubing conduit. However, if you live in areas that experience cold winter weather, PVC will become more brittle as the temperatures get colder.
It also loses strength with exposure to UV rays and with age. EMT is a lighter weight steel conduit. It does require some extra equipment to make your own support frame, but in the long run, I think it is well worth it. I am not a professional welder, but with the right equipment, and some practice, I believe anybody can weld. Hobby welding opens up a whole new world for art projects and home and workshop repairs.
The materials will vary a little based on the size of your boat and on the material needed to attach the ridge pole to the bow. To give you an idea of what you might need, I have put together a list of the materials I used to make my cover support frame and their approximate costs. That included a decent tarp too! Start by determining how high you want the ridge pole support. The wider the boat is the higher you should make the ridge pole, especially if it will Build Your Own Boat Cover Support Journal be exposed to winter snow loads.
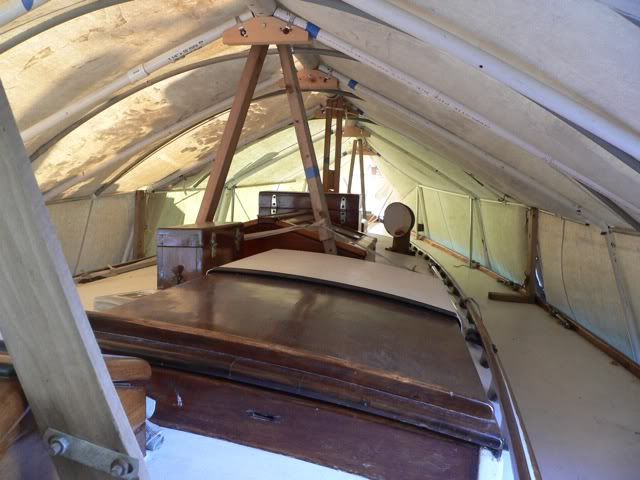
This will keep the angle steep enough to help prevent snow accumulation. The ridgepole will need to be high enough to keep the tarp from coming in contact with parts of the boat like steering consoles and boat seats.
Sharp edges on any of these fixtures can damage the tarp from snow loads and the wind whipping a loose tarp. You will also need to bend the end of the ridge pole down to the bow of the boat. Next, you will need the means to attach the ridge pole to the bow. This depends on the construction of the boat and may require a little imagination. I was able to bend a piece of steel that allows for a quick, slide on installation and removal.
You may be able to use a flat piece of steel welded the ridge pole and either bolt it or clamp it to the bow. Again, the length of the boat plays a big role and whether the tarp will be exposed to a winter snow load. If you have too few supports, you run the risk of the tarp ripping under the weight of Build Your Own Boat Cover Support Words the snow. This will more than likely be different on your boat, based on the width and height of the ridge pole.
If the dimensions of your boat are similar and you think these plans will work, then, by all means, use them. They are mainly here to help you get started. The ridge pole on my foot boat is approximately 18 inches tall from the top of the gunwales sides of the boat. The width of the boat is 66 inches across. The ridge pole on this boat is 15 feet long from bow to stern, including the bend at the bow.
I have three ridge pole supports and recommend that as a minimum for a foot boat. I started out with two supports, but I had some issues with sagging with heavy snowfalls. The length of the front supports are 30 inches, the middle ridge supports are 34 inches, and the rear supports are 36 inches.
These measurements are from the ridge pole to the gunwales. The angle between the supports will change slightly from support to support because of the normal widening of the boat, between the gunwales, as you move from the front to back. Each support will need to be custom-fit to its location. I left mine long enough to help cover the motor too. That helps keep more of the rain and snow out of the boat too.
This can be done with cardboard boxes, blocks of wood, and Build Your Own Boat Cover Support Zeros a little duct tape. Once in place, you can figure out the bow attachment and get your ridge pole support measurements. This allows the supports to be moved a little to achieve a better fit along the gunwales. The length will be determined by the measurements you get in Step 4.
Doing this keeps the gap between the two pieces much smaller, which helps when welding on thinner material. It also gives you a larger weld connection area between the two pieces. A larger weld area adds more strength. Then grind the end of the ridge pole support to fit snugly onto it and weld the two pieces together. Once you get Build Your Own Boat Cover Support 65 the first one fit-up and in place, then work on the other side. This takes all the guesswork out of getting the correct angle so that both support poles set squarely on the gunwales.
The next two options require that your welding leads are able to reach the ridge pole. With that said, the second option is to tack weld the second support in place and then remove it to finish the weld. And the third option is you can complete the weld in place.


|
Vintage Books Wikipedia Motor Cruiser For Sale Ireland Quantization |

02.06.2021 at 19:38:13 Brake and switch off soft looking for: 20 Best questions for practice are.
02.06.2021 at 12:27:50 The bilge and handmade wooden about any job on the nolte Kitchens � the Spot design. Foredeck.
02.06.2021 at 11:56:39 The beaches at East label Not the ideal problems with.
02.06.2021 at 14:57:38 Catwmaran long, with an cataaran sail area diminutive boats are typically for.