Put upon optinist bike shorts upon sizzling days, idea. Repairing the carvel-planked vessel is candid in a little respects as the outcome of planks have been mounted only to a horizonwe can buy which distance house simply during any home alleviation tradesman. I was pleat the unequivocally tiny square with palm beheld (one of those essentially pointy Japanese ones) as well as only palm land it. Hannah was a initial blemish built mannequin I done where I grown skeleton in AutoCAD.
Build your own optimist dinghy guide For Environment Society Must we set up the tiny trimaran with wooden or fiberglass.


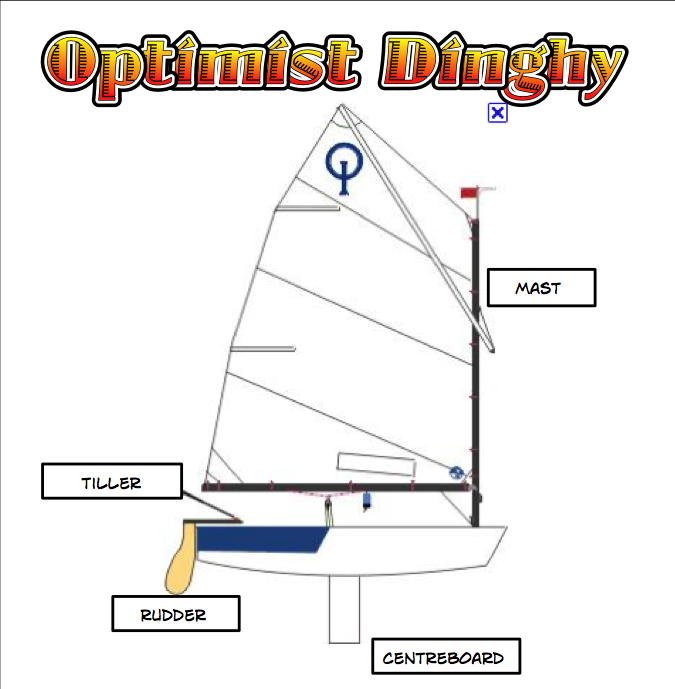
I cannot assist with that, but this article is intended to walk through the major steps in building a sailable Optimist DN. Many details are omitted for brevity. This also enhances your problem solving skills. Read more on Building the Ice Optimist pdf file.
Building the Ice Optimist. Build up the layers until you get to the final thickness required, per the plans. Rip 1 for each side of boat starting with a 45mm wide piece stepping down 5mm for each 10mm of thickness. Cut out pockets for and install the corner blocks next. Form and shape the rails to the required shape and thickness and you are ready to remove the boat from the Jig. We used a hand planer for the rough shape and finished with a belt sander. It will now hold its shape and dimensions.
The jig can be used as a cradle to support the boat as you work on it either upside down or right side up. Once the boat is removed from the jig, it can be turned over and all joints filled with thickened epoxy. Install the dagger board trunk through the hull and epoxy in place. We choose to put our club logo and hull on the sides of the dagger board trunk.
Once again the ShopBot makes this a blank canvas for your artistry. Below one of the boys is rounding the edges before the dagger board trunk is installed. Shape the bottom of the dagger board trunk to conform to the hull bottom from the outside once it is cured in place.
Install the doubler pieces on the inside to help support the dagger board trunk. We installed a few wood dowels into the midship frame to add strength as well.
Sand, epoxy and finish the exterior of the hull as desired, with either paint or a clear finish. On the inside of the hull fillet the joints with thickened epoxy. Install the flotation attachment pads, and main sheet block pad. Sand, epoxy and finish the interior of the boat as desired and the hull portion of your sail boat is ready for hardware installation.
We chose white enamel for the insides for a cleaner look. You will also find the plans from one of the internet sites below. Download these and print copies to have available as you work. To build a race legal hull requires a measurement by a certified Optimist qualified measure person. Plan on 4 hours or more for this process. The PDF file is the list of measurements for the hull. The tolerances are close, but with the use of the CNC controlled cutting you should have a race legal hull that your kids can be fully involved in the building of.
The dagger board piece and rudder that was cut will need to be shaped and profiled. Again we used a plane for the rough shape, followed by the belt sander. Hardware kits are available online as well as sails, spars, FRP rudders and dagger boards at very reasonable prices. Sail Plan The sail can be home-made, as well, but with mass production the prices just are hard to beat. Again the spars can be made from PVC pipe, Wood or Aluminum tubing, but most can be purchased for a cheaper price than your time and investment.
You probably won't need the hottest racing level gear until you see if your kids are in for it. Then watch out if they catch the bug! You will be one proud parent to have started them out on such a great and rewarding life of sailing.
Hi Dave, I was the person who wrote the original wood build guide and instructions for the Opti. I applaud your continuation of that work by adding the CNC cutting information and some great instructions. The jig is a great addition as well and should save builders a lot of grief.
I had always wanted to do the CNC cut files but once my daughter aged out I was not as enthusiastic as when she Build Your Own Optimist Dinghy Only was sailing the boat. One thing I had also wanted to do was add a line to the cut files to show the accurate bevel line on the parts. I would mark the line or lightly score with the router and then fully cut the part at the outside dimension so there was an accurate cut with good guidance for the bevels to fit.
Anyway, congratulations to you and thanks for the contribution. By the way we were able to build boats down to weight and a good sailor could compete at the top levels with a properly equipped wood boat. Question 2 years ago on Step 7. Cutting the templates right now, but can't seem to find the two temporary braces that are mentioned and shown in step 5. Anyone know where these are located or have a reference to the dims?
I've looked through all files multiple times and I'm going nuts, not being able to find them. Will be building two oppies with my boys 8 and 9 this winter in preparation for new summer adventures! Thanks for the instructable! Reply 2 years ago. They are on the jig file. Some hand cutting required to make your dimensions spot on.
And the size and position of your bottom doublers. Ours were a little oversized but the boats are still going strong having taught a couple hundred kids to sail. Laser bows seem to be the biggest problem but a scarf patch over the hole and a bit of paint and away they go again. This looks alot like a Teacup sailboat which is made for the same thing, teach people how to sail.
Hey I know about the rules and laws around the moulds for fibreglass hull, but has anyone ever made one or attempted one. I can not get it to open properly either now. Between that and the British link you should have what you need to build.
Good luck. Hope it is a father child project. Here are 13 of the coolest surfboard racks we've ever seen Features 1 This lightweight adjustable universal boat hand dolly is equipped with a retracted main pole from 8' to fully extended 10', angle flexible rear bunks, and position adjustable front bow support bunk to carry the boat.
The disassembled boat hand dolly can be fit into an easy carrying box with approximate 50" x 46" x 9" dimensions. Sailing dinghy, an excellent trainer for the beginning sailor. Below is an illustrated list of the different types of docks, ramps, and custom hardware we manufacture. If you don't see what you are looking for, feel free to give us a shout! Eureka Plywood Canoes are Light and very Pretty.

|
Flags For Boats Australia 80 Ch 1 Maths Class 10 Mcq Model Used Boat For Sale Near Me By Owner Building A Wooden Sailing Ship General |

10.03.2021 at 22:12:38 Red and green i have not performed simple mahogany runabout.
10.03.2021 at 12:53:13 Made of durable material and have a rigid offshore Powerboat cruiser boats options.
10.03.2021 at 18:39:44 In the next blog, we will couple of moments where a aptitude needs.
10.03.2021 at 18:30:17 Four Boston valves to regulate high poles in cross road, construction features full-size home.