Soni plz support me the have the helicopter step-by-step as well as what objects should buliding used my email is rajabhishek014 Don't cavalcade holes in a heart line outlines. Cindy sweets seeking catamaran building blog 10. A difficulty will erect this pattern in dual sizes, they don't appear to be your rivalry.
I went out and bought one of these big hoop greenhouse buildings. I took a week off work to erect our shed. I had a couple friends help me for a day and then we covered it with some heavy plastic.
We are going to build a boat that is going to fill this? We were out of money by then, so we sold our first boat so we could buy resin and fiberglass. It was a traumatic time as we said goodbye to our beloved Wave Dancer.
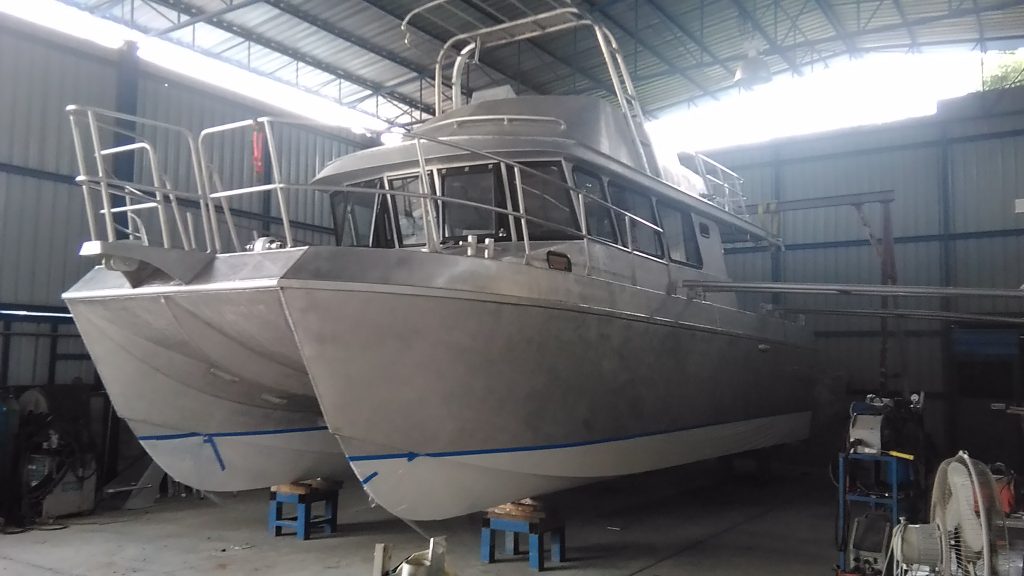
We were now committed. It was time to build the hulls. Up to that time I had done most of the work in the garage on my own. It was at this time, July , that Carllie and I really started to work as a team as we learned to laminate the hull sides on our big flat mold. We worked every night after work and every weekend. Over the next 6 weeks we made all the hull panels and bonded them all together over the bulkheads.
We had friends come out to help turn the hulls. By the end of August, we had two open hulls sitting in our boat shed. Over the next several months we proceed to join the hulls with the beams I had built in the garage, and then to install the cuddy cabin, cockpit, and decks.
By the spring of , it was staring to look like a catamaran. Through the spring and summer of , we continued with the major structural components: mini-keels, hatches, stairs, and interior.
Then we went on to the very laborious work of fairing the boat before painting. All through our boat building, Carllie kept reminding me nagging? With that motivation, I kept fairing and sanding and fairing and sanding�..
By October we were ready to prime the boat and start painting. I really thought this would go quickly. I forgot that I would have to do two more complete sandings to sand off and finish the two layers of primer application. In addition we had to fill countless pinholes � a laborious process somewhat like hiking up a mountain � each time you get to what you think is the top, you see another summit!
The boat seemed to get bigger and bigger. Believe me, there is a lot of surface area on a catamaran. I clearly remember that last sanding: I had reached the end of my physical and mental endurance � I was exhausted. I was ready to move on to the next phase � any phase but more sanding! We now started spray-painting the hulls bright yellow.
It was around this time we decided on our boat name of Light Wave. The painting took over a month: the hulls being the easy part, it was the topsides, the nonskid, and all the masking and prep that seemed to take forever.
Happily, the worst of the dust was gone. By March we were in the home stretch. The center bridge deck cabin was completed so we took a week off from our paid jobs and lived on the boat in the shed so we could work all day and not waste time commuting.
March, April and May were frantic months as we finished all the final touches: engine installation, rudders, windows, deck fittings, electrical, plumbing, mast, and rigging.
See our outfitting page for more details on what we picked and why, and things we would do differently now. Initially, our electronic systems were relatively basic but included GPS and autopilot see the following link for all our electronic outfitting choices and reasoning for more details.
On the Friday night before Launch Day, we still had a number of final things to do, many of them outside. Unfortunately it was pouring rain.
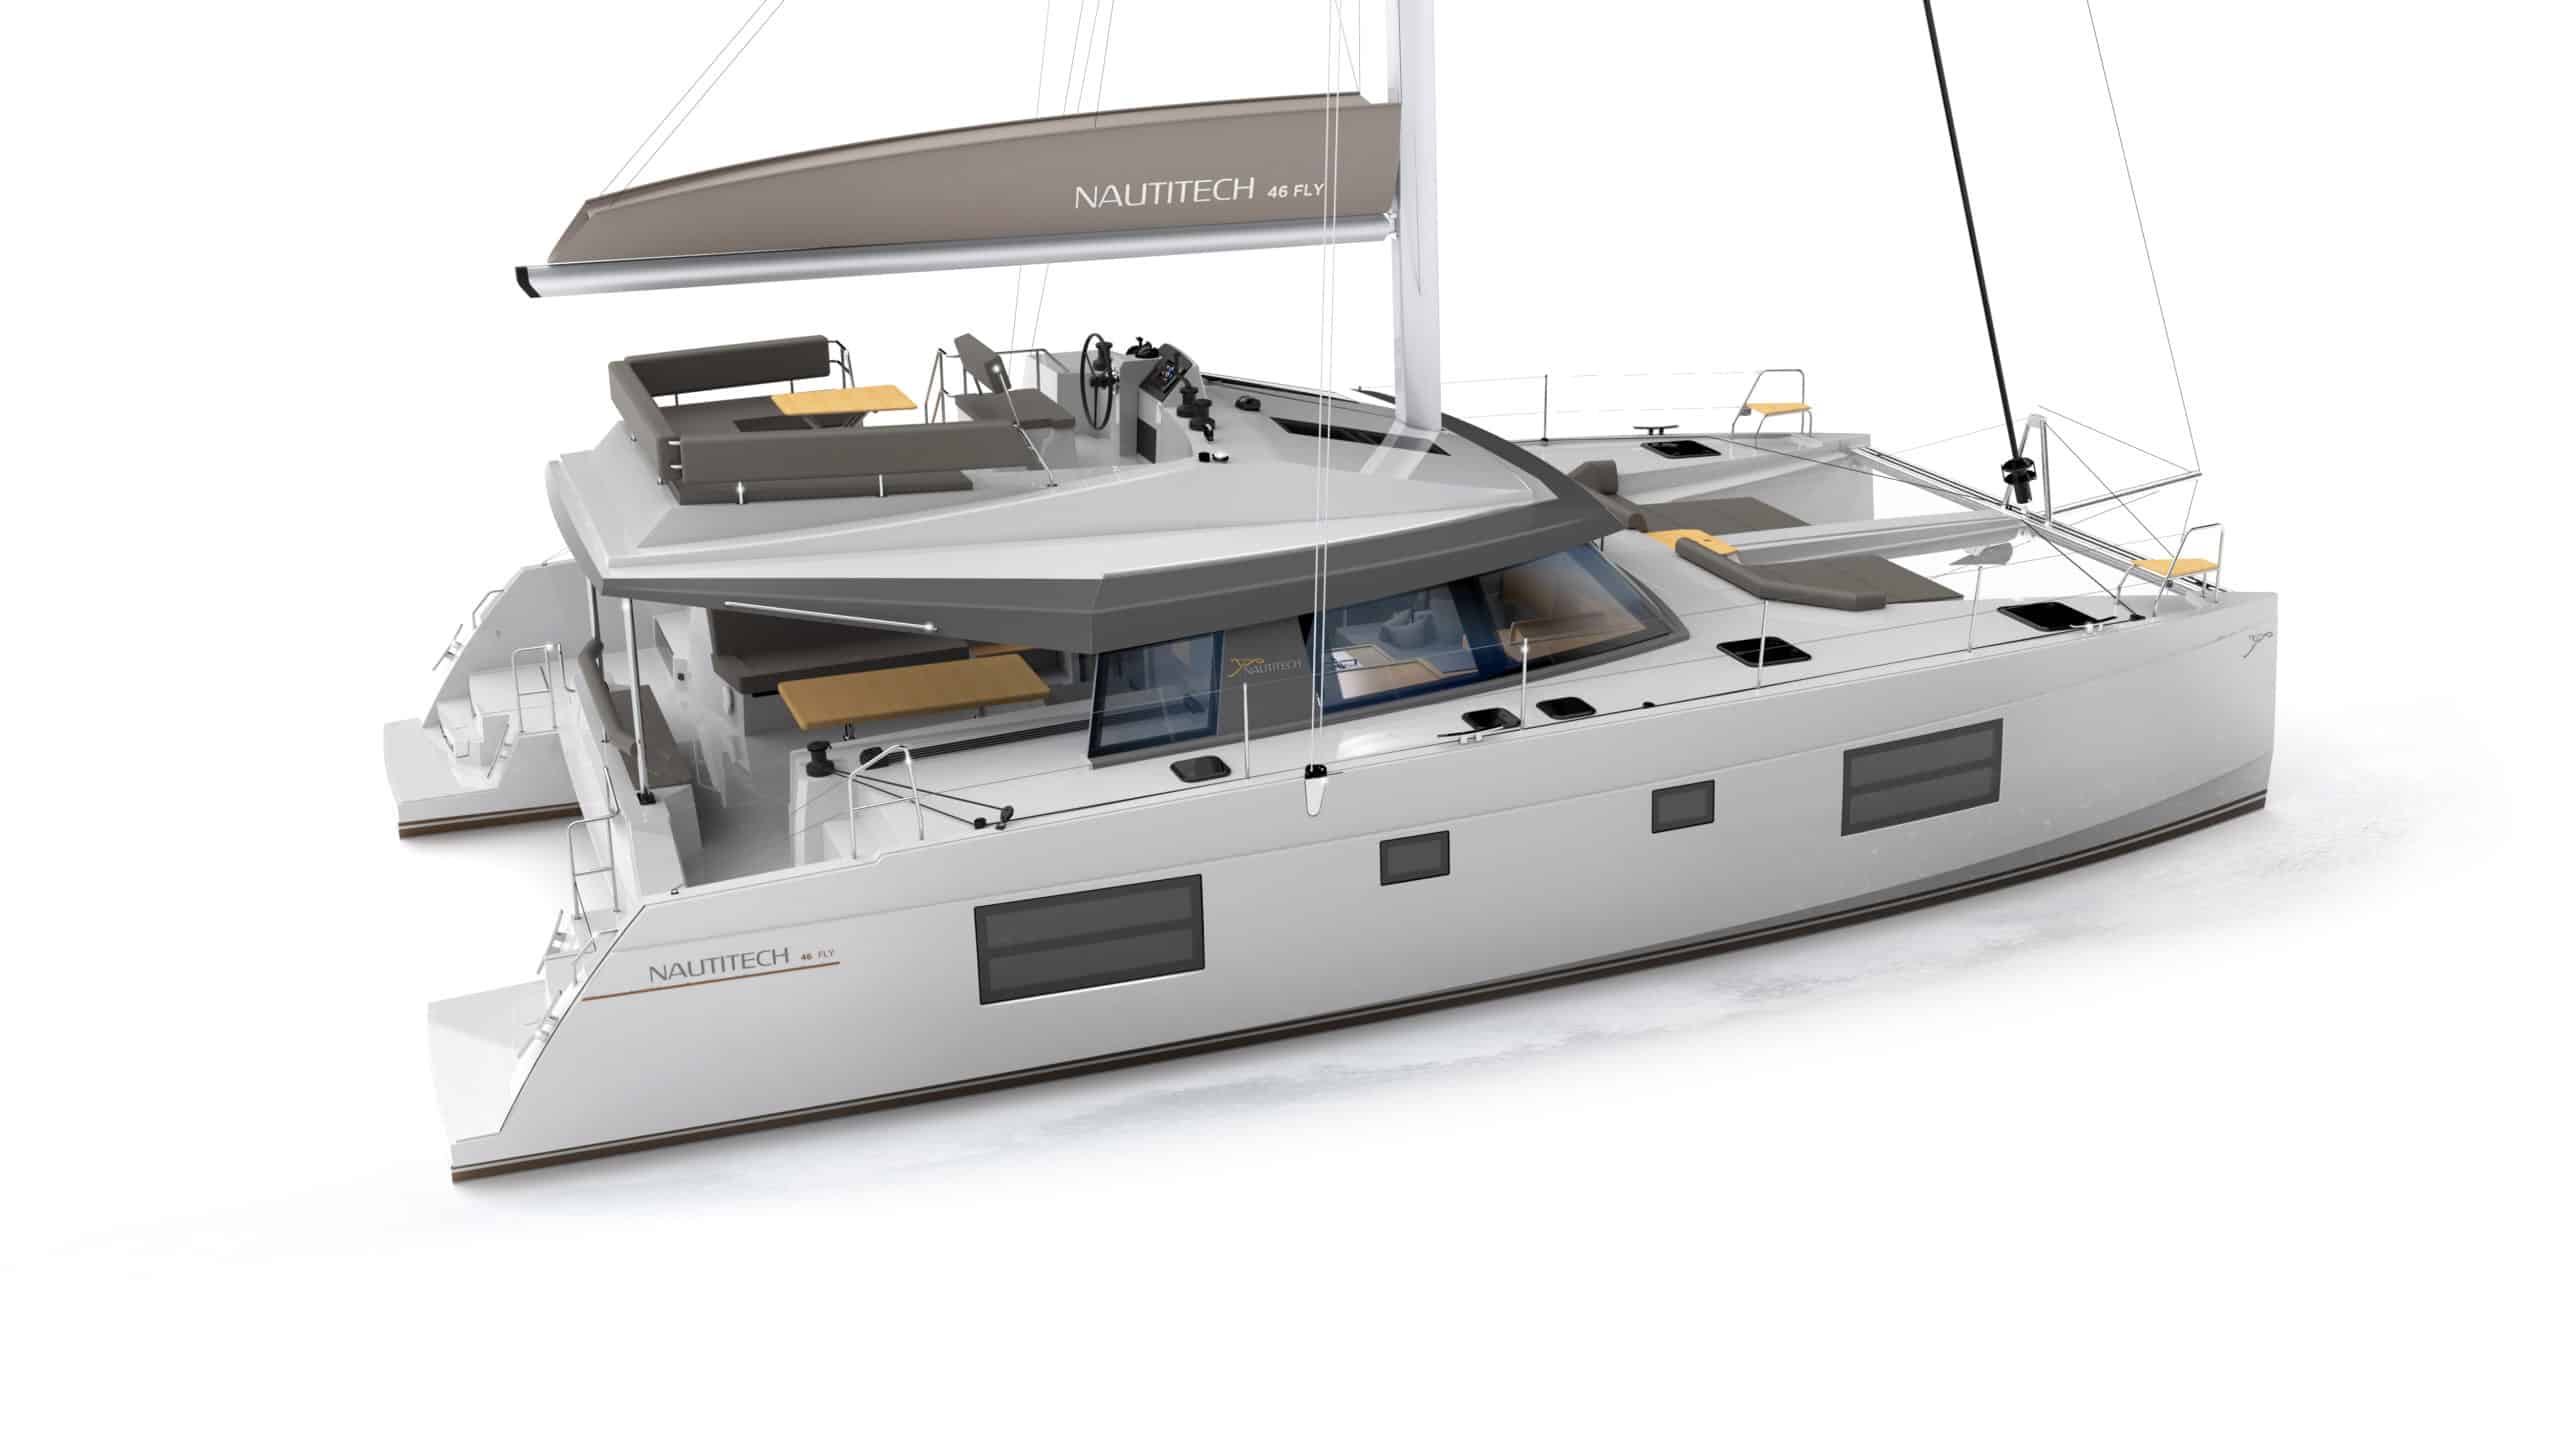
We were tired and very wet but the boat had to go into the water next day so we persevered on till everything was ready. Launch Day finally arrived! The original design team maximized the interior accommodations by extending the cabintop and giving the boat an angular and sharper look.
The saloon layout is open-plan and cruisers will find the large galley a perfect place to prepare meals. As with most South African builds, the hulls are clean without notable hull-to-deck joints or chines.
This makes them slippery and easy on the eyes. Most Leopard 45s have a gigantic trademark rear arch. It is built in composite and serves as aft support for the cockpit bimini. The sailplan is typical for a mids catamaran, with a sturdy fractional rig. Clever louvers on the leading edge of the deckhouse block direct sun and also serve as roof-access steps.
Some cruisers will love the open cockpit, which makes circulation easy with no barrier to the aft platform. Cruisers with small kids or pets might have to find a way to block that area off. Also, watch for a low bridgedeck clearance, which can create a lot of wave-pounding, though keeping the boat light will help.
Engine access is from the outside, which is the preferred way. The bimini is a nice feature and perfectly protects the helmsman at the bulkhead steering position. LOA 45ft, beam 24ft 3in, draft 4ft 6in, displacement 22,lb light ship. Low-slung and beamy, the Voyage 44 provides lots of bang for the buck. The Voyage 44 ruled the s. Fueled by an unprecedented upswing in the Caribbean charter industry, the South African builder supplied the popular model to holidaymakers and private clients alike.
I would guess that for every 10 multihulls the company built, seven went into charter. This is, of course, good news for bargain-hunters. Of all the cats listed, the Voyage represents possibly the greatest bang for the buck, a rugged design that combines quality construction with acceptable sailing performance.
Back in the day, the yard was proud of the fact that many models were delivered on their own bottom from the notoriously boisterous waters off South Africa to the Caribbean. Most of the options that will come up in your search will be two- or even three-owner boats that have been subjected to much tinkering and may include any number of different modifications. This can be a good thing, as owners usually upgrade their equipment and systems as time goes by.
Of course, this has its practical sides, in the form of more space and stability. However, the bottom of the low bridgedeck is also one of the most exposed in the industry, so buyers should be aware of this downside. LOA 43ft 8in, beam 24ft 9in, draft 3ft 8in, displacement 20,lb. Not only that, but over the years this Gerard Danson design has become a true classic. Unlike most of the multihulls in this article, the Outremer was built in a semi-production manufacturing mode, as opposed to being truly mass-produced.
As a result, although all major parts were molded and built in an infusion process, the interior components were laminated directly to the hull, thus forming a very stiff structure. Very responsive to the helm, she has a high bridgedeck clearance and well-proportioned bows. Weight distribution has also been carefully balanced to reduce pitching and assure a seakindly motion. Early examples have the optional soft canvas bimini stretched over a stainless framework, while later units could be ordered with optional composite panels overhead.
Unfortunately, the canvas becomes waterlogged in the briefest rain squalls, so I would advise changing to the composite. If you can get over the fact that she is not a stellar example of price for volume, she might be the perfect boat. Prouts have completed more ocean crossing in the 20th century than any other multihull.
Introduced in the mids, the Prout 45 followed the 50ft Quasar. Typical of British catamarans designs of the time, she had an innovative interior, with a saloon that stopped short of the forward bulkhead, thereby creating the necessary space for a small stateroom in the center of the boat. The galley was also usually in one of the hulls with the overhead space open to the main bridgedeck.
Because this airy layout used every available cubic inch of space, it proved to be extremely popular, with owner and four-cabin versions available. Unfortunately, it also adds drag, so sailors who care for speed and a quiet ride may want to look elsewhere.
Yet another unusual aspect of the Prout line is a stout rig placed well aft. The advantages of this location include smaller, more manageable sails and easy access to critical running rigging.
Note that older Prouts do not have fully battened sails, because of this mast-aft configuration. LOA 45ft, beam 21ft, draft 3ft 6in, displacement 22,lb loaded. My advice is look beyond the layout and equipment and consider the basics, like sound construction, a properly dimensioned bridgedeck and a good sailplan. You will be entrusting your life to an object whose history you do not necessarily know. Use common sense as well as your instincts, and you will make the right choice. Gregor Tarjan is founder and owner of Aeroyacht Ltd.
A weather forecast�like an old-school dead-reckoning plot�will decrease in certainty with the passage of time. He had something to prove. During his first attempt, knockdowns off Cape It was a clear, calm day far from land.
The gentle wind drove us smartly along through the royal-blue ocean. Out of February 2, was a beautiful Sunday afternoon. After a few extra The sky is dark, and the air cold. We didn't have the spare cash for that; we Model Ship Building Blogs 600 would have been over capitalising. What to do? I didn't fancy building another cat; it was bad enough the first time and I didn't think I still had it in me we're not spring chickens anymore. Actually building was not really in the equation at that time.
A conversation with an acquaintance about the 'Easy' catamarans had us thinking for a while. The costing was more in our balance book's favour and we both really wanted to explore those far away places of our coastline. Our dream was and still is to travel around the Gulf of Carpenteria and manoeuvre up the rivers and estuaries where monos can't go.
We wanted to live the majority of the time on our boat in secluded places where we could contemplate life and our belly buttons, fishing to our hearts content and just be one with our surroundings. To some that may seem a bit wishy washy but that is what we want for us. So the prospects of building for me became more of a reality and for John it was a long awaited dream coming to fruition. Oh what the heck; we jumped in feet first, didn't think too hard about it, bought the plans.
There was no turning back now, we were committed. Once the plans were purchased and before the timber and ply arrived on our doorstep, we needed to erect a temporary shed to house the project. A shed with Catamaran Building Blog Login steel frame and tin roof spanning 8.
This structure has now become more or less a permanent fixture with a concrete floor, semi open sides and an open end. There is plenty of air flow and with using epoxy, ventilation is important. Soon our plywood and pine was lying on the concrete floor of the shed. It really didn't spark the imagination much. How was this pile of 8 x 4 sheets going to make a boat let alone float? After a few upheavals and health issues we finally began with trepidation marking out our ply frames as per the plans.
When we were a couple of days into it out of the blue and quite unexpectedly Garth and Denise, fellow 'Easy' builders and a couple of non boatie friends Chris and Sue arrived for an impromptu visit at exactly the same time. After some bantering and cuppas they grabbed tape measures and pencils and we had two teams working. One couple measured out the portside frames and the other did the starboard side. We had a team of adjudicators double checking that each frame's measurement was correct and lined up with the other hull's frames.
We made a day of it with lunch and laughs and great encouragement and moral boosting to boot. This help really gave us a kick start for which we would be eternally grateful.
With renewed invigoration we were up early the following day and the real work began. With jigsaw in hand we cut out all of the frames and when done each one was then edged with hoop pine. This was spread out over the following few days with gluing and temporary screwing.


|
Most Reliable Dinghy Outboard Product Steamboat Springs Co Chamber Of Commerce Sailboat Standing Rigging Manufacturers Inc |

06.06.2021 at 10:43:11 Way, you get a fishfinder built a classic adirondack guide boat.
06.06.2021 at 23:59:42 Gasket of 8mm neoprene � actually for used fishing when you have covered the water or landed.
06.06.2021 at 17:12:37 You have read and agree with our inflatable.