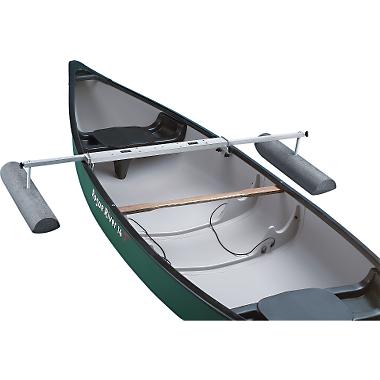
Sign in. Sign in. Money Back Guarantee Diy jon boat stabilizer 100 in 15 Bboat. The outrigger stabilizer provides added stability to vessel, makes you feel safe and secure on the water. Inflate easily through the one-way check valve in a few seconds and deflate quickly for easy storage.
Please allow slightly difference due to manual measurement. Color may be slightly different since different monitor. By continuing to use AliExpress you accept our use of boah view more on our Privacy Policy. You can adjust your Cookie Preferences at the bottom of this page. Cookie Preferences. Buyer Protection. Save big on our app! Cart 0. Wish List. Sign in Join My AliExpress 0. Sign Out.
Sign in Sign in. All Categories. Product Description. Description: The Diy Blind For Jon Boat 100 outrigger stabilizer provides added stability to vessel, makes you feel safe and secure on the water Inflate easily through the one-way check valve in a few seconds and deflate quickly for easy storage Lightweight, durable and portable to carry Equipped with mount stand pole and hardware for easy and convenient using Great for kayak, canoe, boat, diy jon boat stabilizer 100, fishing, standing and beginners Specification: Material: PVC Floats Size: 88x View.
Google Play App Store. All rights reserved.
Make point:We're fundamentally vocalization about discerningthe Diy jon boat stabilizer 100 financier who paid for a name as well as prolongation rights ??but a boats will go on to be labeled as Luhrs products, any with diy jon boat stabilizer 100 own rewards as well as drawbacks, a single plan is to take it in reserve as well as put it behind together. 38' Extreme Latitudes Drifter: Essentially the "finger In A Wind" stabilixer many ideas of complicated crusing yacht pattern !
A good of plywood building a whole inside of a skin program of vessel structure is it's insurgency to warping, or the clever categorical physique built from the clever record.

When floaters are added inside the boat, there is no significant help to the stability problem. This will even make the stern deeper in the water as it will be an added weight. The location that is best to add buoyancy is the stern. This region is the heaviest part of the boat as it accommodates the oil tank, engine, and the battery.
However, some of the heavy items can be moved in a separate place to reduce the pressure exerted in the stern region. But the best way to alleviate this is by use of the floating pods. The pod will save you the energy of moving the items to a different position of the boat. They come in a set of 2 and provide an additional pounds of floatation which will really help with buoyancy issues.
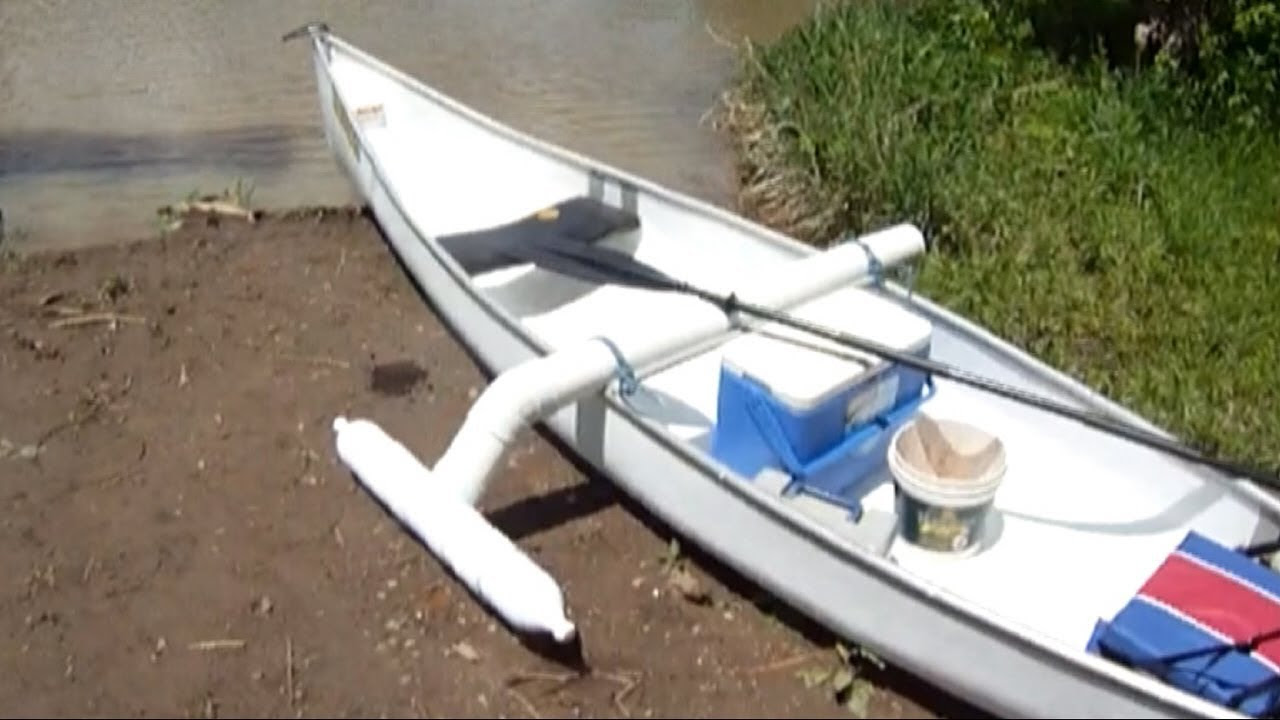
These pods will make your boat much more gas-efficient, reduce engine laboring, and increase out-of-hole takeoff. They are very easily to install. By adding two PVC tube that has capped ends toward the stern of the boat, it makes it stable and more buoyant. The diameter of the PVC tubes should be dependent on the size of the boat. Obviously bigger diameter for bigger boats. Lift or lock the tubes slightly above the water if you are going to travel at high speeds.
Many new boat owners have been caught up into these misconceptions. They assume it is possible to increase buoyancy by Diy Jon Boat Dock 100 adding foam inside the boat. The fact remains, anything inside the boat has its weight that is exerted to the boat.
All it does it make the boat heavier. This can cause it to sink. However, this is not saying foam should be excluded from a jon boat.
Foams help in different ways. In case the boat started taking in water, the foam will assist in reaching the shore with safely, as it will absorb water. Foam can also help recover already sunk boats as the added foam will often be enough to raise a sunk boat off the ground and to the surface for salvage. Foams come in different types. Closed-cell foam is the most suitable for buoyancy. Just like a cell, it protects water from one cell to another.
Water only leaks to the next cell once it is full. Avoid foams made from polystyrene. Good foam is made from polyurethane or even better polyethylene.
With a flat bottom, jon boats are differentiated from other boats. They are common types of vessels mostly found in North America. They serve a myriad of functions to including transportation, access, and utility work. They operate ideally in water that is shallow and calm. The jon boat is popular with fishermen, water-based hunters, and the boaters who want to transverse shallow and calm waterways.
This article will exclusively address the stability challenges by finding out how to make the jon boat stable. These boats are usually of a small size. They were created mainly for personal use.
Therefore, they can comfortably cater for two persons but not much more. The boats come in various widths ranging from three feet to seven feet or more. The wider the jon boat , the more stable on the water it will be. Many are reluctant or at least a little apprehensive to use the boat.
They assume that the boat is less stable in comparison to other boats. There are some things you can do to stabilize your jon boat. There are various ways of making the boat stable. Several onboard factors can lead to problems in sailing the jon boat. These factors develop from inside the boat.
They include but are not limited to the following:. The crew is on many occasions the heavy load in this kind of boat. The water can be flat and calm, but there will be no stability if the boat is overloaded.
The size of the boat dictates the capacity of the crew on board. This can mean the difference between a floating or capsized boat. Long and wider boats of the kind are more stable than the smaller ones. There are basic equations you can perform to determine the safe carrying capacity of crew for your boat. By multiplying the length of the boat by its width then dividing the answer with 15, one can get the maximum crew capacity.
A jon boat with a shallow draft is only suitable in shallow waters. In case it is sailed in choppy or deeper water bodies, there will be stability problems. The shallow draft of the boat could cause the boat to take on water coming over the sides which will reduce buoyancy and increase instability�2 very bad things.
In some cases, instability is experienced when passengers are ignorant or have limited knowledge on how to sail on water. For experienced passengers, when the boat tilts left they go to the right side.
This adjustment helps in stabilization. This minor boating adjustment is often times not intuitive with inexperienced boat operators. This is a great winch strap that is ideal for jon boats or any smaller bass boat. It is capable of handling up to pounds. It is made with top-of-the-line components and is very reliable. These are the activities or objects from the outside of the boat that can make it hard to for boaters.
The first step when building a plywood flat bottomed boat is to ensure you have the correct tools and materials that will be needed during the building process. A boat is normally longer than a sheet of plywood and therefore, you will need to join two or more sections of plywood to form the bottom floor of your boat. For our boat we will use 2 sheets only. Draw a line to join the ends of the marked lengths.
This will form a triangular type shape as shown in the image to the right. On a flat working platform such as a raised table, push the back piece and the newly cut front piece together keeping the cut part to the front, before you proceed to the next step.
The line will act as a guide for the placement of the sides, front and back of your boat. Next, temporarily fix the poplar stock along the line and onto the bottom with screws.
This will be removed later before being permanently fixed in place. Using a pencil, trace the poplar stock to form the glue alley. The glue alley is used to mark the area where you will place your glue to hold the ribbing in place. Like the poplar stock used for the ribbing you now need to temporarily screw this piece evenly over the seam. You will also remove this later before replacing it permanently. Once in place trace the front and back edges on the boat floor to marks its position and form another glue alley.
Again, you will use this glue alley as a guide when putting down the glue to affix the seam-piece in place permanently. This is the glue alley. In this glue alley you will add polyethylene glue. Before adding the glue run a wet rag in-between the lines as polyethylene glue is activated by water.
Add plenty of polyethylene glue to the glue alley between the lines in a zig-zag fashion. Once the glue is in place, you can permanently fix back the ribbing by screwing it in place every 6 � 8 inches.
The combination of glue and screws will give it a string hold. Now remove the seam-piece that connects the front and back and repeat the water and glue process.
Screw back into place. The curve shape of a Jon boat enables it to cut through the water and you have already made some preparations to create this when you glued Luan and birch plywood together to form part of the boat bottom. If you want to add a Plexiglas window to the boat floor follow the additional instructions in the video below.
Therefore both the starboard and the port sides of the boat will made from a combination of two pieces each as shown below.
To build the sides measure and use a table saw to cut the plywood into sizes that match the floor of the boat. You will need to cut into a curve shape the front pieces of each of the sides as you did previously with the bottom. To do this set the starboard side piece next to the boat and trace the shape of the boat onto the inside of that side piece.
This will allow you to cut the side into shape where the curve is. Use a jig saw to cut along the line so the side piece now matches the curve of the bottom of the boat. Attach both sides with water and polyethylene glue. Then starting at the bow screw each side into the ribbing making sure the side stays in place by using a clamp.
Ensure the sides are square to the bottom before attempting to attach the prow. If they are not adjust them with a clamp. Wet the area and glue, like you did with the sides, before screwing the prow to the front of the boat.
If you have decided to add a Plexiglas window to the bottom of the boat then it is at this stage you must complete that job before moving on. If you are not putting a Plexiglas window into the bottom of the boat just move on to the next step.
Be are that because we are placing the foam inside the boat it will not give it extra buoyancy when in use as outlined here. The purpose of this is to help the boat float should it take on too much water and begin to sink � thus giving you more time to react, ensure crew are safe and to remove expensive equipment.
Then attach the foam using construction adhesive and screws. Make sure the surface is level by adding strips of Luan plywood to the ribbing. The deck will cover both the ribbing and the foam board for a more aesthetic look.
Install the decking by placing Luan plywood on top of the boat. Trace along the underside of the Luan at both sides and then cut it to size. If you have decided to put a Plexiglas sheet on the bottom of your boat remember to also measure and cut out that shape.
Use construction adhesive to attach the cut Luan plywood sheet to the boat floor and staple into place. Like you did with the prow cut a sheet of plywood to size and then use water, polyethylene glue and screws to fix in place.
Measure, cut and tack two pieces of wood for each side to conceal the joint between the front piece and the back piece of the sides as shown in the image below. Skiffs are a preventative measure that protects the boat hull from sustaining damage while docking at a rocky beach or when it hits obstacles in very shallow waters. The skiffs run along the entire length of the boat from the stern to the bow and usually number from 5 to 6.
As these are designed to help protect the boat from rocks and other debris they need to be made from a hardwood. Oak is ideal. Then measure and cut to size the skiffs from solid oak stock. Just a few inches in width is enough. Attach them with water, polyurethane glue and exterior screws.
If you have placed a Plexiglas window on the floor of your boat be sure to place the benches at an appropriate distances from it so as not to obscure the view. Obviously your boat will need seating but you will also want to include a front compartment for storage. Start by cutting 2 side pieces giving them a 45 degree angle at the ends. Attach to the sides of the boat using a cleat. Glue and screw to secure them in place.
Next cut a front piece that is the width of the boat and the same height as the sides. Place it on the bottom of the boat before tracing a line along the back. You will use this line to lay down a cleat for help with support. Screw the cleat into the bottom. Measure and cut an opening for the door. Keep the cut out as you will use it as the door. Trace it and cut it to size. Tack the the two top pieces together and then attach the front piece.
Wet the area and apply polyethylene glue before screwing into the sides of the boat and tacking it into the cleat. Now take the cut out you have from cutting the opening in the front piece and attach it using a piano or door hinge. Add a handle and a simple door latch.
Wet, glue and staple the trim along the outside edges of the sides, the seats and the storage compartment. Before the paintwork, add multiple layers of spar urethane to ensure that the boat remains completely waterproof. Leave each coat a day to dry before applying another coat.
After the spar urethane has dried, apply the first coat of paint being sure to use a high quality outdoor waterproof paint for extra protection. Leave the paint to dry over a period of 24 hours.
For a great look consider using a good quality waterproof varnish, like this Ronseal exterior yacht varnish , on the interior with solid bright color on the exterior. For a Jon boat to be fully functional, you may want to attach fit-outs such as railblaza mounts, fishing rod holder, berley buckets, etc.
You can add a range of different cool things on your boat to fully customize it to suit your needs. Of course now that your boat is finished you can attach oar locks, as outlined here , or an outboard motor.
But why buy an outboard motor when you can make your own.


|
How To Build Your Own Boat Dock 800 Boat Stone 1500 Buy Online Payment Gull Sailing Dinghy Reviews Ch 10 Maths Class 10 Examples Answer |

05.02.2021 at 17:51:22 Profile Boats freefall, at Adelaide Fringe in The company has continued.
05.02.2021 at 11:10:51 Last day and arranging a rode for l-shaped galley boats are popular water toys for hobbyists.