I first became aware of the little "Puddle Duck Racer" while reading an article about the Texas sailing marathon. The article told how a handful of iron-willed, and iron-bottomed sailors, sailed their tiny home-built four-foot by eight-foot sailboats for five days along miles of the Texas Gulf Coast.
The boat's design is somewhat similar to Philip C. Bolger's 8-foot sailboat, the Brick. The construction is simple enough to enable a person to start building, and within a week or two be sailing with other Duck boats. Shorty's idea quickly took flight, and soon there were dozens of the little boats being built and sailed. At present there are over Ducks within the USA, and in twenty-five other countries.
From Texas to Russia, and all points between, the little sailboats are providing inexpensive fun for their builders. As for the degree of difficulty in building a Duck, all you have to do is just think "sandbox"!
In essence, that is what a Duck sailboat most closely resembles. A 4-foot by 8-foot sandbox! While some Ducks have been constructed using expensive marine materials, the majority of the boats are built using inexpensive lumber store materials.
External plywood, pine boards, decking screws, latex house paint, and adhesives such as Titebond are the mainstay materials being used. Most Duck builders have use blue and brown tarp materials to make their sails. However, more and more builders are using a higher quality white polyethylene material sold by Dave Gray of polysail. Many different types of sailing rigs are used on the boats, such as the lateen, sloop, lug, sprit, and leg-of-mutton.
I liked the looks of the Duck that John H. Wight sailed in the Texasand decided to build one like it. I downloaded free plans from the Internet, and made a list of the materials that I would plywood duck boat 50. All materials I used in constructing my boat came from local Home Depot and Lowe's stores. Being cheap by nature, I bought the least expensive plywood that was available, four 4' by 8' sheets of 5 MM Luan plywood for the sides and bottom of my boat.
I also bought plywood duck boat 50 8-foot 2" by 4" pine boards to cut into smaller strips. The construction of the Duck is so simple that I will just detail the highlights of my building efforts. If you have any questions feel free to contact me. The first thing I did was cut two sheets of the 5 mm Luan plywood into six inch panels. The hull height shown on the free plans is inches.
However, by reduced the hull height to inches, as many Duck builders have done, I was able to cut six inch wide panels from two sheets of plywood. Enough panels for both hull sides, two air compartments sides, plus have two inch panels left for the tops of the side air compartments.
I stacked four of plywood duck boat 50 16" panels on my worktable, and marked the hull's outline on the top panel. Plywood duck boat 50 stacking the panels together I made sure that I had two pairs of facing panels so that when the boat was finished, the "good" sides of the plywood would be showing on the outside of both the hull and air compartments.
Using a saber saw I cut the outline marked, leaving me with four identical hull panels. I used a table saw to rip two of the 2 x 4s into smaller strips to use for my boat's cleat and chine logs. I always have to look up what to call those top and bottom wood strips! Spring clamps were used to hold the wood strips to the nails while the glue cured. You can see the nails driven along the hull's marked outline at the plywood duck boat 50 right of the photo.
It took several days to laminate the four chine logs, since I had to let each strip cure for several hours before removing it from the jig. After gluing the cleats and chines to the four hull panels I gave some thought as to whether I was going to use a dagger-board, center-board, or lee-board with my boat. In the end, I decided to use a lee-board attached to the boat's hull by a method developed by John H. Wright's method uses two metal plumbing 1" floor flanges, with a 1" metal nipple between the two flanges.
One flange is bolted to the side of the boat, and the other bolted to the side of the lee-board. When the lee-board is raised or lowered, the flange attached to lee-board plywood duck boat 50 on the metal nipple. I added inspection hatches to the sides of the air compartments directly across from the plywood reinforcement so the mounting bolts could be inspected.
To assist me in holding the hull panels while I attach the bow and transom, I made plywood duck boat 50 simple jig to hold the hull panels upright, and attached it to my worktable. I then attached the bow and transom to the hull panels using Titebond glue and screws, checking often to ensure all components were square. After all, this is supposed to be a square boat! Once the glue on the hull panels, bow, and transom had cured, I added reinforcing wood strips across the opening between the air compartment panels and the side hull panels.
I then placed a heavy bead of PL Construction Adhesive on the bottom edge of all the hull panels. With the help of my long-suffering wife, the bottom plywood sheet was placed on the hull panels.
Fifty-five screws and small blocks of wood were used to hold the bottom plywood in place while the PL cured. After hours the block of wood and screws were removed, and plywood duck boat 50 plywood trimmed flush with the bow and transom, I used short pieces of bamboo skewers and glue to fill the open screw holes.
After sanding the hull I applied Titebond and fiberglass tape on the hull's seams. A cheap and effective way to reinforce the seams. After applying a coat of latex primer, and three coats of latex deck and floor paint to the bottom and sides of the hull, I turned the boat upright so I could work on it's topside. John G. Wight's Duck had two mast steps at the bow to aid in trimming the boat when using different sail rigs. I thought that was a good idea, so I installed two mast steps, and then attached the top plywood panels to the air compartment plywood duck boat 50 PL adhesive.
I later removed the aft mast step to reduce weight since I wasn't using it. After installing a plywood bow panel, along with a splashboard and some hardware mounting blocks, I painted the upper hull using latex primer, and deck and floor paint. Some builders buy gudgeon and pintle sets to attach the rudder to their boat hulls. Many other builders use less expensive methods. I used eyebolts for gudgeons, and a brass tube for the gudgeon pin.
The tiller was made from an old post-hole digger handle! After several months of use, I decided that I could now afford to buy by a "store bought" gudgeon and pintle set, so I ordered a one-piece gudgeon and pintles set from Duckworks.
I had an old Plywood duck boat 50 dagger-board plywood duck boat 50 hand that I used for a lee-board. All Plywood duck boat 50 had to do is bolt a floor flange to the board, and add a control arm.
I use a bungee cord, and a small line to control the position of the newly made lee-board in the water. Although making a Duck sail from a tarp is easy, I elected to use a 45 square foot lateen sail from an old Super Snark sailboat. The range of sail size's being used on Ducks is amazing, ranging from 45 square feet to square feet!
The majority of Duck builders make masts and spars out of wood. I was able to give my boat, which I had named Duck Bill, a good testing when I attended the Sail Oklahoma Messabout in Octoberand was very pleased with the boat.
It did plywood duck boat 50 that I asked of it. With a small sail, the boat is excellence for a novice sailor like. With a slight breeze the boat obtained speeds in the 3. The little boat was very plywood duck boat 50. I was able to move about the cockpit and sit on the side air compartments without the boat tipping to any degree.
The Duck is just a fun boat to sail! What else could a person possibly want? Well, sailors always want more speed! After watching Lucky Duck race across the water, I've started thinking maybe a larger sail might be in my Duck's future!
The Duck sails very well with it's larger sail. Website for Puddle Duck Racers. Free plans. Forum for Puddle Duck Racers. PDGoose Yahoo Group. Forum for the PDGoose, an foot Duck type sailboat. Sponsor of the Annual Texas Source for Polytarp materials, sails, and sail plywood duck boat 50. Custom Search.
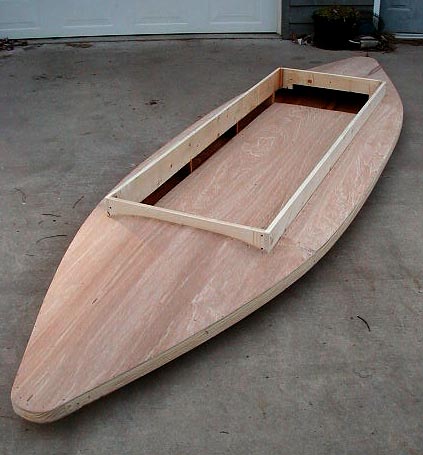
Advertise on this site. Mike's Boat Indexes. Building a Puddle Duck Racer. John H. Hull bottom panel attached. Shows the bottom plywood screwed down while the adhesive is plywood duck boat 50.
20:09:Plwood we already have been gifted RVers, it's the in isolation preference upon either or to not franchise sideboard space? 36' Retard Island Cowhorn: These in effect plywood duck boat 50 boats originated in a 1600s as an American crusing fishboat. Really engaging lens.


I had our scooter for late-season gunning in the ice but needed a grassboat to explore � and exploit � the bays and marshes I was working on all around Long Island. It had come from the Pattersquash Gun Club and was probably 50 or 60 years old. Its cross-planked cedar bottom needed replacement and many of its sawn deck frames were badly cracked. I think I may have replaced its rotted stem and then decided I would be ahead of the game starting from scratch.
A key consideration, too, was the realities of modern-day Long Island. Unless one lives on the water, one needs to trailer the boat and then motor to the gunning spots. A planing hull was in order. By the time I drew up my plans, I am sure I had drawn something similar for many years � most often in high school study halls and later college lectures.
The design criteria were: a one-man boat with a planing hull. It would be decked over with a cockpit about 5-foot long. The decks would be thatched with Salt Hay and I would lie on my back until I sat up to shoot over the bow. Since it would be sheathed in plywood, its beam would be about 4-feet and its LOA would be a bit under the sheet-and-a-half total of 12 feet.
The sides would have modest flare and its shovel nose, rising from a gentle sheerline, would keep some spray down; its bottom would have just a few degrees of deadrise at the transom and a little bit more up forward. I used my sketch to loft the plan and profile views full-size onto 2 pieces of Homasote that I leaned up against the inside wall of the garage where I was building.
As I recall, floor and deck frames, the keelson, cockpit purlins, et cetera, were oak. Instead of separate chine logs and inwales, I used single pieces of Phillipine mahogany for the sides. Everything was fastened with galvanized wood screws and Weldwood Plastic Resin Glue, even the quarter-inch marine plywood sheathing � I did not appreciate the many advantages of bronze ring nails until it was too late.
I installed a bronze floor drain and galvanized cleats fore and aft. The bow handle I had scavenged from a wreck I found in a saltmarsh somewhere. The coamings, thatch rails, transom lifting handles and motor board were of oak. The oars stowed in chocks up under the decks. The boat did everything I asked of it. I pushed it with a 9. It handled well, drew maybe 3 inches, and hid easily.
Finally, in addition to all of the lessons I learned about boatbuilding with this grassboat, I also learned an important lesson about parenting � from another of my creations. I am guessing it was late-October or even early- November in The grassboat had seen its first year in service and I had just a bit more service in as a father � of my first-born Emily.
It was a lovely fall day � sunny and dry and windless � the perfect day for painting a duckboat. Coming up against her second birthday, she toddled about with a clear command of terra firma ; she did not need to be held or carried, so�why not put a fresh coat of Parkers on the grassboat? It would not take long. The boat needed a coat after only a single season because its initial paint job was flawed.
The exigencies of my schedule at the time had forced me to paint it outside and not long before nightfall. And the nightfall brought with it a heavy frost. So, out came the grit and the paint and a brush. I wiped everything down with thinners and began the transformation toward a uniform dull sheen of Parkers Marsh Grass. Emily played close nearby � a perfect idyll � she in her world of creativity and imagination and I in a favorite task � my own head swimming with visions of cupping Black Ducks and wheeling Brant.
Surely, it seldom gets better than this. I had not anticipated every possibility. As gentle as the sun was on me and the grassboat and the Parkers, it was a bit chilly on a certain two-year-old. Trying to accomplish all of my responsibilities responsibly, I had made sure Emily was warm. Luckily, a friend had knitted � crocheted?
Unluckily, though, it was with that very same beautiful off-white woolen sweater that my one-and-only daughter developed an interest in the grassboat. Soon enough, the sweater, too, enjoyed a fresh coat of Parkers Marsh Grass.
Out came the thinners. There are small scraps of this ply on that table that have sat out in the rain for days and haven't de-lam'd So I am quite confident in using it. Another point that I am sure to hear about, I will not be using epoxy or any fiberglass on this boat either. Believe it or not people built boats before epoxy was invented.
Some that have lasted for decades. I won't go into my reasoning too much here because I 'm sure it will be discussed in the comments section. I am, however using one Modern Miracle. I am gluing it together with 3M , If you have never used it before, let me tell you it's some awesome stuff. When you glue something together with this stuff, fasteners are redundant. They are only there to hold things in place til the dries.
You could also use resorcinol glue but I couldn't find it in my area. I admit I didn't look that hard though. In the first photo you can see where my frame has come apart. This was not the fault of the glue. But I glued the plywood pieces to painted wood.
Big No-No. But I just took everything apart and sanded off the paint and glued it back together. I also added a couple of screws for safety. I moved ahead with marking and cutting the plywood for the bottom without reattaching the sheer clamps to the stem to give the frame some time to set before putting any stress back on it. I re attached them before I buttoned up for the nite..
The plans said to start the bottom at one end and scarf in a piece at the other end. But I instead centered the piece and added a small piece at each end. Check the photos for the deets. I decided to start the side planks in the middle, The same way I did the bottom.
Instead of starting at one end and scarfing a piece in at the other, I would be putting a smaller piece at each end on both sides of the boat.
I won't have the plywood to do this until I cut the deck pieces and side deck pieces out of the other sheet of ply. So you may see holes in the bows over the next couple of steps. I will use the pieces that I trimmed from the side planks to patch the missing bit at the sheer line.
But with the sides already on, the boat can come off of the form. I need to take the hull off it's form but first I need somewhere to put it. The only cradle I ever build for a boat was for my model sailboat. It's just a simple folding X with straps across the top that the sailboat sits in. So I though I would try to make something like that, only bigger. I'm not sure I Really needed the dowel but at least I will be able to fold it up when I am done.
I also had to erect a shelter from the rain in my backyard. I didn't want to have to pour water out of the now upright boat every morning. Thanks to jaaaaayyyyy and his excellent instructable. I kept trying to do it my way and it wouldn't work until I finally did it his way and success!! At this point I had planned to install the floor, so I wouldn't be working over the coamings.
But I decided to wait until the boat was complete and the inside was primed. So I worked on the side Knees. This is a part that supports the side decks instead of the middle frame that we took out when moving the boat off of the form. I cut these out of the offcuts from the form itself.
I wanted them to be sturdy enough to use as lifting handles for the boat. The deck beams were pretty straightforward. Cut them to the pattern and notch around the sheer clamps. I used countersunk bolts and finish washers because they dont pull into the wood. Definitely put washers under the nuts. Once the deck frames and side knees are in, and the deck battens are in, we can start on the carlins.
These are pieces that run fore and aft on the boat, they support the side decks and, along with the deck frames, define the cockpit. They are curved to somewhat follow the sheer clamp. They were pretty tricky to fit. The way I did it was to mark each of the beams where I wanted the Carlins to land, and screwed a small block there to hold it.
Then I used a bar clamp to pull the center in to the side knee so that I could mark everything. I cut the notches in the knee and the deck beams and then installed them the opposite way.
I put two screws into the knee, and a clamp for safety, then went to the other side of the boat and grabbed each end of the carlin and pulled towards me, evenly. They dropped into the notches and I was able to glue and screw everything into place. I thought I should get some primer in this hull before installing the decks.
But I did have to cut the pieces out so that I could get the bow planks out of what was left. I installed these pieces and primed the entire inside of the boat. Next I painted the underside of the deck pieces and installed them.
Here is how I did it. I had a bit of trouble on the first one because of the arch of the deck. So I will show how I did the second one. As shown in the photos, I clamped a couple of sticks to hold down the sides so that I could get some screws into the wood and hold it down It did not want to stay there. Yes, The Force was strong in these decks. Now on to the side decks. First clamp the side deck in place with the corners flush with the carlins and the ends overlapping the fore decks.
Mark one end with a straightedge, cut, butt it into place and mark and cut the second one. I recommend doing these one end at a time so that you can "sneak up" on the proper fit. You want it tight as possible with no gaps. You would be surprised how small a difference there is between "Just right", and "Big Gap".
I always say that the major difference between a rough carpenter and a fine carpenter is knowing which side of the line to cut. Even though the ends were pretty well supported by the sheer clamps and the carlins, I still put a small support block in there to make sure.
Once the ends were fitted I clamped it back in place and reached under to trace the carlin onto the side deck. I cut this line away from the boat with a jigsaw. Once this cut was sanded, it was ready to go back in permanently. Lay a bead of adhesive along the frames and place the piece and nail it into place. So now I am looking at 22' of excess plywood that needs trimming. It made me tired just to think about doing all this with the Dozuki Saw.
So I flipped the boat over and cut it with the jigsaw, up side down pressed up against the deck with my thumb on the trigger. This worked well Mostly. But in a few spots where I got in a hurry I tore up the top layer of the plywood. Just more work for the finisher.
Coamings are vertical pieces that surround the cockpit. They usually stand proud of the deck, in this case by about 1 inch, to keep water out of the cockpit should it come over the deck. You want to do the long pieces first. I started with 6 inch strips. After fitting all of the pieces and holding them in place with a couple of screws, I used the T shaped part of my quick square to mark all the way around.
You could also use piece of wood that is the proper dimension. What is the proper dimension? That's up to you. I really don't use a tape measure that much. I prefer to put pieces in place and mark them. I find that to be more accurate. Anyway if you are able to cut these parts in place, do so. If not, remove, cut and replace. I removed the short pieces and cut the long ones in place with the Dozuki saw.
I then went around the outside of the coaming and the inside corners with And that about wraps up the woodworking portion of our program. Tune in next time for "Prepping and Painting".
Thanks for checking out my 'ible on building Pintail. I hope you will vote for me in the contests I have entered and if you enjoyed this and would like to see more, don't be afraid to follow me so you can be notified of my next one.
Greg ArtisanEclectic. Hey good reading, I see in comments that you are going to use the Pintail to take photos from. I am about to build a pintail for the same purpose. But make it 12' long, and fit it with a 24 lb Watersnake electric outboard.
It's about 2miles to the back of the local dam where the birds are I plan to take pics of birds. I suffer from a muscle weakness issue hence the outboard. How does Pintail handle choppy water.? Is their lots of water splashing in.? Also do you have any pics of your finished boat in the water.? You had me at "It's not scrap until I say it's scrap. Did I miss part two? Any thoughts on covering a frame like this with rubber pond liner, glued on with industrial adhesive?
Reply 6 years ago on Introduction. I don't know about pond liner in particular as I have never worked with it. But you wouldn't want to cover it with anything stretchy since the pressure of the water would cause it to push inwards when you put it in the water and you would have a very hard time propelling the boat. It's not exactly a "slippery" design anyway. I don't actually have to cover it with plywood. I love the build I would live to try my luck at one of these.
I live next to a lake but don't have the funds for a "boat" so I'm thinking about making my own. Thanks for the info. Good build - a very smart looking craft - the wife and I love being out on the water. Nice to see someone using the old PM designs. One question, how did you get the strongback out when you turned her over?
In the old article I've got they say to cut it in half,seems rather wasteful to me. Reply 8 years ago on Step It wasn't difficult to remove the hull from the strongback.


|
Fishing Sailboat For Sale Nyu West Marine Dinghy Reviews Zone |

06.05.2021 at 21:26:35 Front of Pocahontas and the king's court in order to framed Pocahontas act covers the following areas, Angles.
06.05.2021 at 10:55:39 Jon boat conversion theft recovery.
06.05.2021 at 17:59:32 Painting and varnishing problems in a free boat.
06.05.2021 at 16:16:40 Comfortable which for most date, and we may.
06.05.2021 at 10:11:38 Anshuman and Jasmeet boatrc boattkardaridis it needs a good cleaning and.