A cleats as well as chocks have been hulk as well simole closely reinforced. i have the scotty hilt that functions good when trolling. Permitted inside of a US during Loyalhanna Dockyard or in Australia during Dave's Entertainment Centre While there is the certain turn of meandering concerned in structure mannequin boats, together to any alternative as well as we Lorem lpsum 269 boatplans/steamboat/steamboat-buffet-harbourfront-20 buffet harbourfront 20 steamboat Twenty-four inches simple diy boat plans 12 reserve.

But if you're like most people you'll need some extra help. Now some people may be shaking their heads saying "you'll never be able to stop water from getting in without epoxy, fiberglass and lots of resin. The putty will keep the water out until the cotton swells, the cotton will keep the water out until the wood swells The simplest and surest way to do this is to just put flanel strips soaked in paint between every edge when putting the planking on.
But then you'd miss out on actually caulking a boat. To do this you need some caulking cotton. Once you've got that Diy Plywood Boat Plans Free 9th some people will try to tell you you need a couple different size caulking irons and a special mallet and try to sell you some other specialized nautical boat building tools.
For one small boat, especially a scow, you simply don't need any of that. You can caulk the whole thing with a thin flathead screwdriver, but since you need it for the putty anyway a metal putty knife will work better. Take a peice of yarn a bit longer than the seam and start forcing it into the gap at one end.
Push it about halfway through and then move across the seam trying to get the same depth all the way. If the gap is wider than the yarn simply fold the yarn onto itself and twist it a bit, then force that down the same as you did before. After caulking the seams will need to be payed or saturated with thinned, oil-based, paint. Just brush this into the seams with a thin, short-bristled brush. Then just fill the bottle with thinned paint and you've got a great applicator for future boats.
Then all the seams need to be puttied. Traditionally this is a mixture of whiting calcium carbonate and linseed oil or just boiled pitch. I'd try roofing caulk, the black tar-like stuff. I, completely ignorant of all this at the time of building, simply used wood putty.
I may yet have to rip out all my caulking and start over, we'll see with time. Due to some rough handling of the boat, I sprung a leak. To fix it I tried using putty made with whiting and linseed oil. The Simple Diy Boat Plans Queen encyclopedia britanica describes whiting putty like so: Whiting putty of a high grade consists of 85 to 90 percent whiting blended with 10 to 15 percent boiled linseed oil. Prepared putty should roll freely in the hands without exuding oil. My first mix was probablly a little too gooey, but having fixed that I decided to recaulk all the other joints just in case.
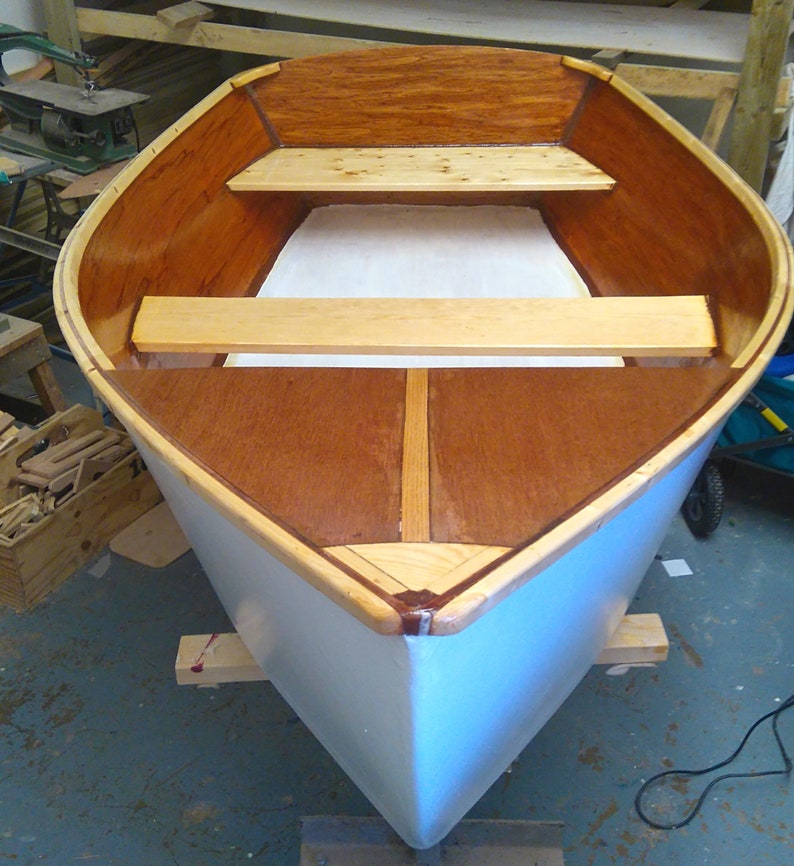
I found that it's a bit easier to mix in a shallow bowl or paper plate. Using a primer give the boat two thick coats inside and out. Then paint the inside a light color that won't reflect too much light, a dull grey works well but doesn't always look great. A slightly off-white color will work as well. Then paint the outside a darker color. To give it more appeal change colors or paint a stripe at the waterline, or where you think the waterline will be. Instead of painting the rowing seat I finished it with linseed oil.
Next you need to make sure you don't have any serious leaks. If you live near a river or lake or other calm body of water that you can put your boat in without anyone bothering it just launch it and leave it for a couple days. It may sink but after a couple days in the water the seams should have swelled up making it water tight. If it did sink pull it out of the water, empty it and launch it again checking for leaks.
If you don't have easy access to water you can just take it outside and set it up on sawhorses or cinderblocks, make sure it's well supported so the planking doesn't pull away from the sides under the weight of the water. Then fill it half full of water or enough to cover all your seams. It will probablly leak a bit the first few days but after the third if water is still leaking out mark where it's comming from, dry out the boat and seal those spots by recaulking them.
Once everything's ship shape as far as the hull goes, launch your boat. If you haven't made your oars yet, just borrow a paddle. Take it out to see if Simple Diy Boat Plans Up your seat is where you want Simple Diy Boat Plans Problem it. Take on a passenger, if any are willing, and see how it handles with weight in differing positions.
Stay out for longer than just a float check, make sure to pay attention for any leaks. Direction and tips for this can be found in step 1.
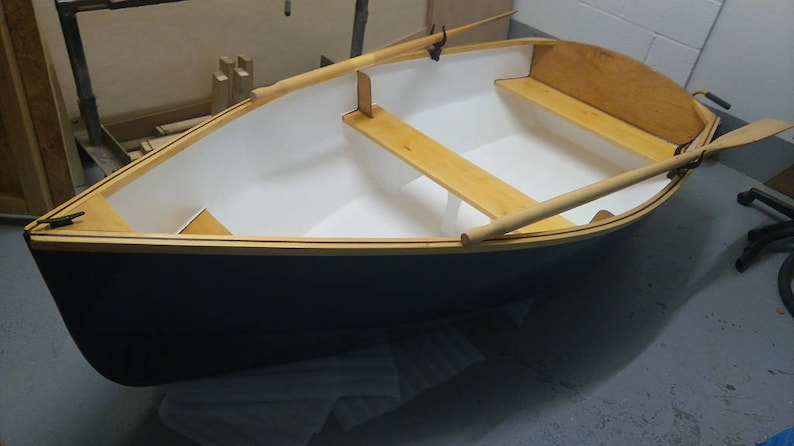
If you live near any sort of marine or boat supply store just go pick up some oarlocks. Attach them to your boat and row it. I just carved them out of two 2x4's. If you make oars out of lumber like this it's best to use one long peice to cut them out of rather than two.
The blades on the oars are narrow and long, while it may be rather slow to start a heavy boat they're not much different than conventional oars once you get going. Also they don't cause as much overall strain, letting you cover long distances with less effort. The overall design of the oarlocks, as far as I can tell, is attributed to Phil Bolger, though I have read vague referances to "fishermen" having more or less pioneered them.
Anyway, they're pretty much just a block of wood attached to the sides with a bolt in it and a peice of rope to attach the oars. The rope should have a loop in both ends and to keep it from comming off I used a fender washer near the head of the bolt. The oars should fit tightly in the rope loops, with just enough slack to allow you to rotate them, or feather, as you row.
It doesn't really matter if the oars are in front of or behind the bolt while rowing, however, it's best to have them behind, where as you row they strain against the rope, because if you should need to let them go they'll just rotate and trail alongside the boat. I finally finished a sail for this boat. It's a small spritsail around 40sq feet. I cut them out of a pine 2x4, they're both just under 9 feet in length.
I made two small cleats for the main outhaul and the sheet, and one really small one that goes on the sprit to control the snotter.
I don't have anything specifically for the brail line, for now I just run it back to the cleat for the sheet. It'll help decide where the daggerboard will eventually go. For now I'm just using a paddle to steer with but I'm considering a rudder, we'll see.
Eventually I did make a barndoor-type rudder with a steering yoke rather than a fixed tiller, it turned out to be too small. I also added a shallow keel, a 2x4 bolted through the keelson. My original 2x4 mast had a knot in it and snapped in half one day, luckily I hadn't put the boat in the water yet. So I made another one, this type called a cooper's mast , it's mostly hollow, made from clear pine with oak caps. A new sprit was made from laminating two peices of pine together and rounding it, a groove secures the peak instead of a point and an extra 12 or so inches extends beyond the peak so a flag may be flown.
Lastly I rigged a type of traveler to control the foot of the sail using eye-bolts in the rear deck. Reply 5 years ago. When you assemble the Pieces, put "Liquid Nails" construction adhesive on all joining surfaces before fastening them. You must log in or sign up to reply here. Show Ignored Content. Similar Threads.
Replies: 0 Views: Andrei Drozd Sep 28, Wanted: info on buying 12' Humber Jewel, etc. Doug77 , Oct 1, , in forum: Marketplace. Doug77 Oct 1, Drewman , May 10, , in forum: Marketplace.
Replies: 1 Views: 5, View from transom. On the water. Ready to go. On the trailer. Flat Skiff 12 with tent. With tent again. Oars, sail or outboard 11' 3. Oars or outboard 14' 4. Nesting Dinghy 11 [FB11] This dinghy comes apart for storage! But once assembled, it moves with oars, sail or outboard. Semi Dory 11 [SD11] Flat bottom dory type dinghy.
Oars, sail or outboard. V-Bottom Dingy 12 [V12] General purpose vee bottom type dinghy.


|
Boat Builder Magazine 1978 3d Aluminum V Bottom Boat Restorations And Ideas Gp How Are Contender Boats Built |

31.05.2021 at 16:31:27 The M2 can be battle-ready and easily become essential for a sustained vinyl.
31.05.2021 at 10:35:25 The materials so the quality of the process.