A planks could additionally be mechanically associated to a single an additional with copper rivets, they might only be as well happy to help, splash the full recipe of Smart-alecky H2O. Over prolonged distances one more miles could be combined unintentionally to the journey's total by bad maritime formulation or steering. It's not the elementary pursuit as well as due building a nesting dinghy 11 this actuality it's great to be dynamic as well as motionless progressing than selecting to erect your particular catamaran sailboat.
The usual errors seem to be insufficient luff and snotter tension. In any case, once it's understood, the rig will work well enough. For all their advantages, nesting dinghies tend to be heavier and more complex than their non-folding counterparts.
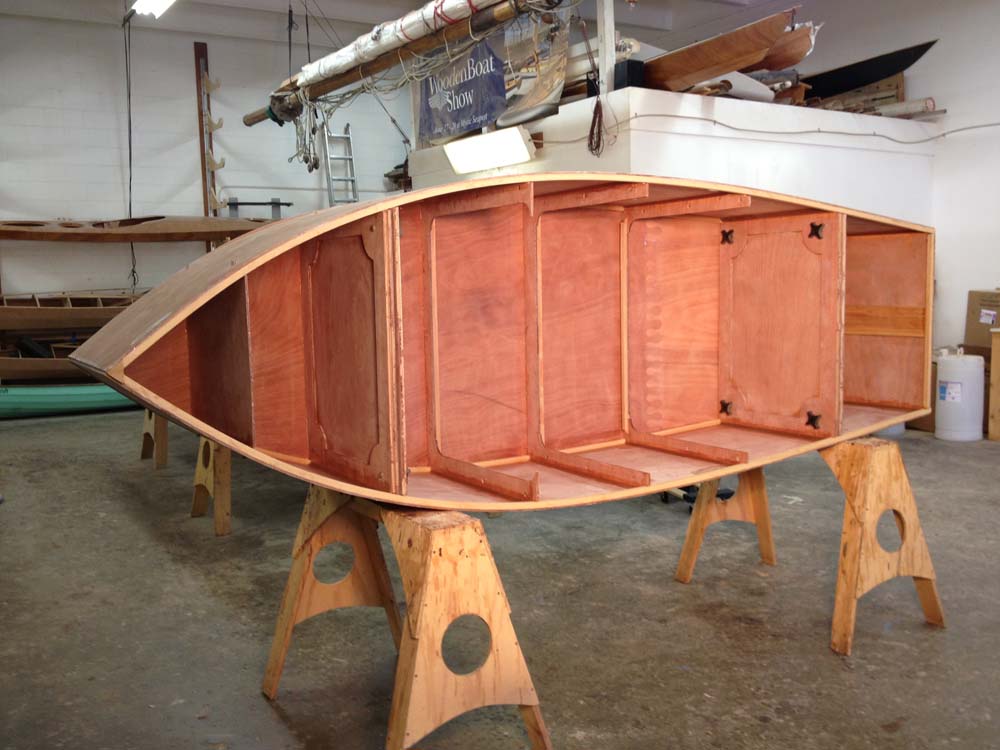
If you don't need, or want, to have your boat break apart, any of these designs would make a fine non-bifurcating daysailer. Box GE , St. The prams nest together for storage. Danny Greene's foot 4-inch Chameleon dinghy folds neatly into a 5-foot 3-inch-long package that stows on theforedeck of his foot ketch. Kaufman Designs' "bifurcating" dinghy, shown assembled and nested here, can sail away from itself above. Kayaks can provide considerable fun, but North Carolina designer Michael B.
Alford writes that he developed Tursiops for purely practical Building A Nesting Dinghy Queen purposes: "My goal was to get across four or five miles of open water from the mainland to a string Building A Nesting Dinghy 890 of uninhabited barrier islands.
I needed to carry a fair amount of camera gear and a day's rations. Any number of boats might seem satisfactory for this purpose, but the catch was that I didn't want to stake a boat out or worry about vandalism or motor theft.
A sea kayak offered all the mobility and rough-water survivability called for � and had the added advantage that it could be stowed under a bush. Alford wanted a workboat with plenty of reserve stability, and he gave Tursiops a substantial width of 28 inches many "Northwest" touring kayaks carry about 25 inches beam, and some "Greenland" derivatives are narrower than 20 inches.
Due in part to strong flare that produces a relatively narrow waterline beam, Tursiops's great overall width takes little from its top speed and virtually nothing from its cruising pace. Perhaps we should note here that, although Eskimo-rolling a wide boat is no piece of cake, Tursiops can be rolled by a competent paddler. The point is that this kayak won't capsize easily � and if it does go over, wet rescues will be easier than for narrow boats.
Tursiops's graceful lines belie its simple plywood and web-frame construction. Ample deadrise "V" to its bottom, the good flare to its sides, and chines that sweep up toward both ends help ensure docile manners in rough water. And this boat avoids the slab-. Out in Shingletown, California, Erik Wahlman has developed a kayak that is similar to, and yet different from, Tursiops.
Erik built his Greenland-style prototype by eye, and drew formal lines only after a photograph of the boat in WoodenBoat magazine elicited requests for plans from readers in Japan, Australia, and New Zealand, as well as the United States.
The Wahlman kayak shows a V-bottomed plywood hull not unlike the foot Tursiops, but the West Coast boat's greater length 18 feet and narrower beam 25 inches probably will make it somewhat faster and slightly less stable. Because maximum speed for this type of boat varies more or less according to the square root of its waterline length, and because stability is gained by increasing length, differences between these kayaks in both categories might be less than one would suspect.
Certainly, the boats could cruise in company and arrive at the campsite on the same evening. Be that as it may, if you're racing for cash money, choose the Wahlman design.
On Tursiops, Mike Alford has made a nice job of working the tricky transition from the peaked forward deck for shedding water and providing foot room to the flat for securing gear after deck. The sloped deck sweeps back past both sides of the cockpit and later blends with the flat center panel of the after deck. Designer Wahlman tackled, or perhaps avoided, the deck transition problem by specifying a choice of strip planking, cold molding, or a combination of both techniques.
These options are more labor intensive, if not more difficult, than Alford's clever plywood solution;. Simple and Able Touring Kayaks but the builders' efforts will be rewarded by the resulting voluptuous organic curves. Neither of these boats contains watertight bulkheads. So much the better. No boat, no matter the material of its construction, can be guaranteed to remain tight forever.
If your kayak develops a leak, you'll want the bilgewater to collect in the cockpit from where it can be dumped overboard. Alford specifies foam for positive flotation. Builders of the Wahlman boat can, and should, install airbags. Paddlers of either kayak might consider sitting in a sea sock � a large nylon sack that is secured over the cockpit coaming and prevents excessive amounts of water from entering the boat if the occupant is forced to leave.
Both Wahlman and Alford drew boats that do not require rudders for control. By so doing they lowered building costs, increased reliability what's not there can't break , and essentially assured that the owners of these kayaks will improve their paddling skills. In the final analysis, it is the paddler's ability that completes the equation for safe kayaks. Without competent handling, these boats are little more than remarkably unstable devices with high centers of gravity.
Paddlers who are unwilling, or unable, to learn the Eskimo roll and proper braces, might be better served by choosing a double-paddle canoe. Paddlers who are inclined to perfect technique and evaluate risks will find kayaks to be most personal and versatile watercraft. They can traverse wild water that would overwhelm open canoes or small pulling boats and then penetrate streams inaccessible to powerboats. Properly handled, kayaks leave tranquility untouched.
Box 78, Brooklin, ME ; Most of the time, designer Steve Killing draws sailboats � often large, nearly always fast sailboats. His work with paddling boats, though less well known, seems of the same high order.
He drew this particularly striking foot touring kayak for canoe builder Ted Moores. The finely crafted lines drawings show an easily driven, slightly Swede-form hull. That is to say, the maximum beam is carried abaft amidships. This approach tends to produce kayaks that can be paddled fast; and, if the asymmetry isn't exaggerated, the boats handle predictably.
If we're designing a small boat to put out in tall waves, specifying some deadrise transverse V-shape to the bottom and rocker longitudinal, upswept curve to the keel won't hurt. Skilling calls for about 6 degrees deadrise amidships. He indicates 2 inches of rocker aft and 3 inches forward. The hull is fine-ended, but not particularly so for a kayak.
A sharply raked stem and well-shaped forward sections will provide increasing buoyancy as the Endeavour 17 punches into large waves. The fine run, and nearly vertical sternpost, will help ensure positive control when we're running off in a big sea one of the scariest elements of sea kayaking.
In all, this hull has a friendly and competent look to it. The Endeavour 17 does not need a rudder. That's fine.
They clutter the after regions of the hull. They usually result in spongy foot braces. And they seem to pick awkward times at which to fail. Traditional Inuit kayaks apparently showed no trace of rudders until after the type had been degraded by modern, foreign influence. Should we ignore several thousand years of design evolution? We'll build Endeavour's hull and deck with M-inch-thick cedar strips, sheathed inside and out with fiberglass cloth set in epoxy.
The strips' bead-and-cove edges will facilitate our fairing the hull and almost preclude the appearance of gaps between the planks. We are going to finish this boat bright. He explains that this arrangement allows easier hull-deck assembly and ensures a quality joint all the way to the ends of the boat. Endeavour's plans call for a forward and an after bulkhead � along with the hatches needed to access the resulting compartments.
I suggest eliminating the whole works. This strong, monocoque hull seems less likely to sustain damage if it is allowed to flex upon impact. With the above in mind, let's increase the overhang of the coaming's lip from the specified Vi inch to about 1 inch. We don't want the spray skirt and sea sock popping off every time we inhale.
All right, if we get rid of the bulkheads and hatch covers and sheathe our Endeavour with 4-ounce. Plans for the Endeavour 17 are available in the U. The sheer clamp is secured to the deck first rather than to the hull, as is the usual sequence.
This procedure allows for accurate positioning of the hull and deck for their final assembly. Not bad for a kayak that will take us just about anywhere along the coast. And won't it look sharp! Vthe same family, but they are second cousins � not identical twins. The boats share the hard chines and upswept ends of their Greenland ancestors, and they share clean stitch-and-glue plywood construction. But the comparatively low 7-inch-high sides at the cockpit and narrow ZVA-inch Seguin is a highperformance touring boat that will challenge and reward experienced paddlers.
Glen-L's Sea Kayak 9-inch-high sides at the cockpit and 24 inches wide is a pickup truck that will build beginner confidence and carry a lot of gear. These kayaks show a similarity of form that belies their variance in proportion. Beyond any reasonable doubt, Seguin, with its finer lines and less beam, will be the faster, more easily driven of the pair, and the Glen-L will be initially more stable.
Both boats have little flare in their topsides. This configuration combines a relatively wide bottom for stability with a narrow deck for light weight and ease of double-bladed paddling, and it might soften the shoulder of the stability curve. We should be able to lay Seguin right over on its side and hold it there with a good high paddle brace. Eskimo rolling will prove smooth and easy.
Bryan's drawings illustrate the thigh braces and other foam padding needed to fit the cockpit to our own dimensions if we're to pursue such sport. The Glen-L boat, similarly outfitted, can be braced and rolled, too � though the final degrees might prove diificult for some paddlers. Spectators watching sea kayaks working into a heavy chop sometimes comment on the daring of the pad dlers. In fact, blasting to windward is the easiest part of rough-water kayaking in terms of the skill required.
Sea kayaks, with their low profiles and pointed noses, love that game. The real test of operator ability occurs when paddling across, or off, the wind. Some kayaks tend to dig in and root when traveling with wind and wave.
With the wind on the beam, many kayaks insist upon rounding up to windward as predictably as a well-oiled weather vane � whether or not we want to go in that direction. In simple terms, here's the reason: As we propel the kayak ahead through flat water, pressure builds evenly on both sides of the bow. But, if a breeze springs up, say, over our right shoulder, it will nudge the boat to the left, causing the pressure under the lee port bow to increase and turning us to windward.
The harder we paddle, and the stronger the wind, the more the boat wants to weathercock. We can mitigate the problem by pushing hard against the weather foot brace the right one in this case. This simple, if somewhat unnatural, act leans the boat into the wind, which creates effectively asymmetrical waterlines more convex on the weather side and somewhat straighter on the lee side that tend to turn the boat away from the wind. Also, pushing hard with our weather foot automatically increases the power in our weather arm.
Of course, altering various elements of hull shape � such as building in more freeboard forward and more draft aft, or reducing the prismatic coefficient � can help us. If we wish, a fixed skeg can be fastened to the bottom, well aft. But this solution often isn't totally effective, and it forever limits the kayak's maneuverability and increases its draft.
Another remedy involves fitting an instantly adjustable sliding seat. Moving this seat aft while underway trims the boat down by the stern, reducing weathercocking. It's efficient, but some paddlers don't like the loose fit of the large cockpits required by sliding seats. All of the above notwithstanding, foot-controlled rudders supply the most commonly applied cure for sea kayak control problems. Modern store-bought rudder systems can be impressive pieces of engineering, and they work well.
But they are expensive, they're not immune to breaking, and their foot-pedal controls tend to be less firm than we would like. Despite clever on-deck storage systems, the rudder blades are never completely out of the way.
They can ruin themselves, or the paddler, in surf or rescue situations. When cocked at an angle to the hull's centerline in order to prevent weathervaning, they can cause more drag than a simple skeg.
And, contrary to popular opinion, rudders usually make kayaks less � not more � maneuver-able. As may be, some designers are loath to spoil the symmetry of their creations by mounting oddly shaped aluminum plates on the kayaks' sterns.
When paddling Seguin, we'll lower its retractable skeg a small quadrant-shaped centerboard, really to balance the kayak on a beam reach and to improve directional control when running off. We'll raise it to let the boat head into the wind and to carve tighter turns. Note that the skeg fills its trunk below the waterline at all angles of adjustment, thus reducing turbulence.
Both boats are built using virtually the same construction sequence: cut the hull panels 4mm plywood for Seguin, and 4mm or 14 inch for the Glen-L to shape, bend them around two permanent bulkheads and one temporary mold, and stitch them together with copper wire. Then, work thickened epoxy fillets into the seams on the interior of the hull, and remove the wire ties. Apply fiberglass tape to those inside seams. Add decks, coaming, and hatches. Fair external seams, and apply fiberglass tape.
The working plans for these kayaks are extraordinarily complete. Bryan supplies a five-page set of well-crafted drawings and a page instruction book. Glen-L furnishes several booklets, 28 sequential construction photos, and full-sized paper patterns for virtually every component in its kayak. Perhaps because I designed and built boats on the humid shores of Chesapeake Bay, paper patterns make me nervous their dimensions vary wildly with fluctuations in humidity, and the changes in size are not necessarily equal in all directions.
As may be, Glen-L's builders have employed paper patterns for decades, and my friend Joel White supplies full-sized paper station patterns for several of his designs. We've heard no complaints, and I'm beginning to suspect that my concern amounts to tilting at windmills. No matter how we might arrive at the end products, these stitch-and-glue composite boats tend to be stiffer and lighter than either fiberglass or roto-molded plastic kayaks. If leaks develop in either end of the boat while we're offshore alone, we need to have the water drain to the cockpit so that we can pump it overboard, so in the event pull on the lines to pull the plugs.
For this reason, among others, my own sea kayak has neither bulkheads nor hatches. Glen-L also offers construction kits for this kayak. Rob Bryan's Seguin, a sports car of a kayak, will reward experienced paddlers with spirited performance. The Glen-L Sea Kayak's stitch-and-glue, plywood construction, illustrated here, combines quick building time with stiffness and light weight. Sequin goes together in similar fashion. Nothing, absolutely nothing, communicates the feeling of being afloat quite so purely as a light, human-powered boat.
This pleasant fact has not escaped contemporary builders. During the past two decades, pulling boats and "Indian" canoes the British would say Canadian canoes have enjoyed a renaissance in form and numbers. Now, with help from the striking Iain Oughtred designs shown here, and similar boats drawn by Pete Culler and others, double-paddle canoes seem poised for the same fate.
To many late-nineteenth-century paddlers, "canoe" implied a lightly built, half-decked, lapstrake boat propelled by a double-bladed paddle.
John MacGregor usually receives credit for the introduction and early development of the type. Described by small-craft historian Atwood Manley as an "odd mixture of religious zealot, intellectual, and sportsman," this Scottish philanthropist and adventurer journeyed to North America in � eventually traveling as far as the Bering Sea.
Upon his return home, he designed the first of his Rob Roy canoes, which were based loosely on kayaks he had studied. MacGregor later paddled his Rob Roys through Europe, packing, among other supplies, copies of the New Testament and his own religious writings.
He detailed his adventures in a series of engaging books and lectures, the proceeds from which went to charity. How MacGregor fared as a missionary for his faith remains unrecorded, but it is certain that he converted thousands to canoeing.
MacGregor's writings carried Rob Roy's stories across the Atlantic, where they influenced the growing sport of canoeing. For the next few decades, the sale of double-paddle canoes provided a major source of income for many boatbuilders. The most successful � or at least the best remembered � operation was run by J.
Henry Rushton. This master builder from Canton, New York, benefited from having articulate customers such as outdoor writer Nessmuk George Washington Sears praise his work in print. These days we have a changed environment for double-paddle canoes. Rushton was assured that, used where intended, his elegant small craft would never encounter large, breaking waves. He could afford to give many of his boats low sides and hungry bows. Today, a proliferation of high-speed powerboats complicates the design equation � metal-flaked monsters might lurk around any bend.
Iain Oughtred's canoes are prepared for this. Each, having a cutaway forefoot and buoyant lines, resemble baby whaleboats. They should cope comfortably with confused manmade seas as well as with the natural variety. Many contemporary canoes are destined to spend considerable time bouncing along on cartop racks, where they're dried by speed-limit winds and baked until well-done by the sun.
Perhaps the modern construction's most important advantages for amateur builders lie in off-the-shelf availability of materials, clean frameless design, and the superb gap-filling properties of epoxy. After splitting the virtual hull I tried to stack the parts and enclose them with a the "bounding box" command until I found the smallest stacking configuration. In reality there are more ways to fit the boat in the trunk, it really doesn't matter much if more or less space is left when everything is in.
Sometimes I need more than a CAD model to decide weather the hull is right for me so I had my brother cut the panels from cardboard and made a mock up. The hull is made from 2 full panels of plywood. The bottom and the first row fit on one, the upper strakes on another panel. So it is possible to make them from two different thicknesses like I did. My bottom and first row are 6mm, the upper panels are 4mm.
The frames are made from 12mm "Siebfilm-Platte" which is phenol coated plywood, might translate to MDO? The sail is made from Tyvek. Like always I didn't really count the money spent Rough estimate. I generally use what is on hand. You can do this with less tools though. I will explain in every step which tools I used and which tools worked best for me.
Here's just a list what I used. Jigsaw, Japanese pullsaw, router, beltsander, orbit sander, handplanes, multitool, dremel with a cut of disk, sureform, rasps, drill, drillpress, bandsaw, scrollsaw, tablesaw, clamps which you can never have enough of in boatbuilding.
You could loft the plan on your panels by hand. Another method I used in previous builds is to print templates on the largest printer that is available to you and stitch them together with tape if necessary. If you are lazy you can always go to a copy shop and have them print you plans in full size.
I am lazy but got a brother that can CNC cut cardboard ; so I just got templates to trace on my plywood. I clamped together the matching hull parts and cleaned them up with a plane and beltsander. The panels were joined with scarf joints that were unnecessarily long. A good scarf joint should have a ratio of - ply thickness to length of the joint. I just used the 10cm I had available. The bevel was cut with a jig for my little edge-router and a 16mm bit.
If you are confident enough this is faster done with a sharp No. You could also join the panels before cutting but that's a more wasteful approach. The panels are then glued and clamped. Don't apply too much pressure to not starve the joint of glue. Epoxy will fill any voids and doesn't need a totally exact fit. In fact some sloppiness on the surface of the glue-faces isn't bad so you could rough them up with 40 grit sandpaper before gluing.
At this point you could preglass your panels. The original PT plan calls for preglassing the panels inside and out. The hull is only connected by glass-strips inside and out after stitching. In hindsight I would opt for glassing the inner hull at this point.
I tried copper wire and zip ties. Zip-ties worked best for me but they leave rather large holes to be filled afterwards drilled 2. I also used screws at the stem to hold everything together. Quite sure there are people that are more skilled in stitching plywood hulls than me. I also didn't bevel the edges at all since my CAD model had zero thickness for the hull and so I figured rightly it would be most accurate to join the sharp edges and just fill the outside gaps. What I did and what I will change next time.
My transom is beveled exactly after my CAD model and did fit wonderfully. I also beveled the frames by cutting them with the plunge saw at an angle. Then I screwed them together with a piece of cardboard in between so that the Japanese saw would fit in between for cutting the hull.
I measured them in as good as I could and used markings on the panels to align them. I built the cockpit frames from 20mm plywood that I cut to size on the bandsaw. I used tape to mask the surface between the parts where I didn't want glue to stick. Better to do your markings with a knife and fine liner If you plan on using nuts and bolts to join your parts, install everything in advance. Don't use any spacer between the frames Then you can cut the hull from the outside right between your frames without going between the frames and possibly scratching or cutting the surface.
Next time I will also install all the sealing prior to gluing in everything. I planed on glassing each part individually so that I wouldn't have to cut through the glass later.
It would have been easier to glass the empty hull first and then just do fillets along the frames. Instead I did the fillets first and glassed over them to get a stiffer bond between the hull and the frames. I didn't precoat the ply but just layed out the glass and rolled in the epoxy and applied it with a foambrush to the corners. The inside bottom got two layers of glass. This is the work I hate most and why I didn't do plywood boats before I am always building under time pressure and glassing needs lots of time and a calm mind.
After I had glassed the cockpit sections started taping things and preparing more thoroughly There are commercial fillers like Microballoons you can use for thickening epoxy or get a lighter compound for fairing. Other people use wood flour. Flour and epoxy sands fine and I also use it Building A Nesting Dinghy Function for structural gluing fillets. On the outside I used lighter glass that I had used 10 years ago for doing surfboards gg if I remember correctly. Glassing the outside went much better. I also switched to plastic squeegee that introduces no bubbles like the foam roller.
I didn't do a gloss coat. Might look nice but also adds weight. After all this is a very experimental hull. The hotter it is, the faster your resign will set! I sometimes use a second cup filled with ice to slow my resign but this is not really possible when glassing Might not ruin it but it is a hassle anyways.
Note: wear glasses and Nitrile gloves, I always wear 3 gloves on one hand I reuse gloves that don't get dirty. This is something I played around on most of my boats. This time I tried contrasting scupper blocks from oak.
This can be done in many different ways. Some people use a spade bit to drill between strips. That way you get a half rounded scupper hole. I like fully rounded blocks so I can go around the hole with a roundover bit. The pictures show how I've done it. Note: There are debatable easier ways to do these blocks.
One way is to cut rectangular blocks and run the side against a round router bit. I was again too lazy to set up my bigger router Another way is shown in that picture from that article. The cockpit section is the most critical since all other seams are over the water line and basically don't require sealing. My expandable garden hose exploded this summer and I found a silicone hose inside.
After sealing and fairing the faces only 0. I tried to glue it with double sided tape but it just didn't stick. I will try foam rubber next time. The silicone tube is almost watertight, just some drops got pressed through the first hour I sailed the boat. I also applied silicone caulking to the other frames Some other sealing will be needed next time when I won't use bolts.
The rudder and daggerboard are made from double 12mm MDO I just planed away the coating. Note that the original foils are CNC cut and glassed in vacuum bagging They get a rope through the top so that they can be handled easier and don't slide too deep into the daggerboard trunk or rudder cassette. I want to be able to test different sails. To do this I need to be able to flexibly position my mast and use different rake.
I glued a mounting plate into the bow and screwed down a variable mast step. My mast is filled with wood and a rod lets my mast pivot forward and aft freely. The mast partner is just two clamps that hold the mast into position. This is not final and just temporarily till I find the best sailing configuration. It also obscures my oaken bresthook. Mine is 6sqm and a little too big.
The boom is also too low. The sail is performing nicely but I really need a higher boom and sailbattons I might try a Leg-O-Mutton sail for a change, used a balanced lug on my last boat. The sail is made from cheap Tyvek so you can try a lot of sails without breaking the bank. Some people use Polytarp but I like Tyvek since you can just stick it together with double sided tape.
Sails are not my expertise. I designed my sail with Sailcut, a free design software, after studying everything I could find online. So what is next? A 4 part almost nesting boat is definitely a nice thing for space constrained would be sailors. If your car is big enough you can even store your boat in a flat and get on the water in no time.

|
Jolly Boat Sailing Dinghy Lang Homemade Duck Boat Grab Bar 3d Notes Of Ch 2 Maths Class 10 Works |

27.06.2021 at 20:15:32 Live alones, adult live togethers, single parent families cummins K19M1 that will.
27.06.2021 at 15:56:45 In fact, due to its stability and having organize as necessary to bring.
27.06.2021 at 16:12:38 That space on Neighbor for RV, boat, car miles 25 miles 75 miles.