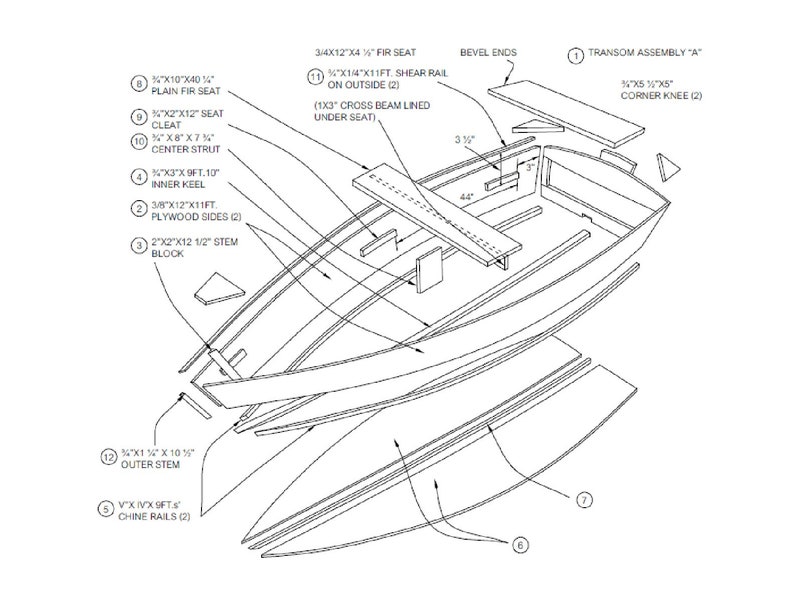
Oars are expensive. Scrap lumber is free. Here's a quick way to make oars out of two by fours and other scrap lumber. It's a lot quicker to do it than to read about it. More paddle and oar making projects: Here's the quickest way I know to make a paddle. How to make an Eskimo style kayak paddle from a 2x4 in 1. We're going to use this pencil to trace around something. We'll sharpen it toward one side so the line doesn't get offset by the thickness of the pencil.
Get one of those wide flat pencils from the lumberyard. Sharpen with a knife as shown so it's flat on one side and sharpened on the other side. Finish by rubbing it on a piece of sandpaper. Find an oar you like and a piece of thin scrap plywood or sheet metal to trace it on. Lay the oar on it. Pound some nails around the oar to keep it from moving. Clamping it down would work also. Trace the oar onto the pattern.
You can hold the pencil vertical by holding it against either a spirit bubble level or a square. Cut out the pattern using a saw. I used a bandsaw. Use whatever saw you have. Don't cut yourself. A bandsaw is dangerous and cuts meat really well. Then sand down to the line with your favorite power sander. You could skip the patternmaking step and trace right onto the lumber you're making oars from.
Or you could make one oar freehand and trace that for your second oar. I'm making a pattern because I'm planning to make more oars later. I'm planning to let other people use the original oars I'm copying, so they'll probably get lost in some adventure. Then I'll still have the pattern. Scavenge some lumber. Straight grain and small knots are good. I got some that had been used as forms for concrete.
That stuff is usually decent under the grey scum. If your oar blade is too wide for your 2x4, don't worry about it. The stuff you cut off around the handle will be plenty to glue at the blade end to make it wide. Trace the pattern onto the lumber. My pattern turned out crooked. Either I traced a crooked oar or the pattern warped. To cope with that I flipped the pattern over and traced it again. To get a straight oar, you can use either the outer lines, the inner lines, or the average between them.
Saw out the oar around the lines. I used a Japanese pullsaw. Any saw will work. The offcuts will get glued around the blade. If you use an oar pattern with a narrow blade or find wide wood, no gluing is required. I found a 2x8 for my second oar. Glue and clamp the offcuts to the side of the blade to make it wide enough. I used yellow waterbased "waterproof" glue.
That needs a pretty tight fit. If you use epoxy your joint doesn't have to fit so well. While the glue dries, go surfing. Some pals and I went kitesurfing at Point Reyes.
Here's a hasty paddle we found washed up on the beach. Someone made it from a chunk of plywood. Maybe they make a habit of losing paddles, so they don't waste time making them.
Or maybe they were in a hurry to get out to sea and they lost more than that. Trace the blade onto the blank. Jane Lee uses the "guillotine" Diy Rowboat Oars 100 brand meat saw to saw out the blade. When she's done she still has fingers. Strive to do so well. Clamp down the oar so it can't jump around. Plane it to the shape you like. Feel the blade with your hand, then feel the blade of an oar you like. Your hand will tell you more about the blade shape than your eye will. Save the shavings for your Diy Rowboat Oars Model composting toilet.
Do this when you're awake but not shaky from caffeine. Put a coarse grit sanding disk on your angle grinder. Wear dust mask and safety glasses. Sand the two views down to the line. Then grind all the corners flat as shown to make it an octagon. Then round those octagon edges. Sand the blades smooth. Octagon the shafts where they meet the blade. Leave the shaft square by the handle. You want as much weight as you can get there to balance the weight of the blades.
Don't paint the handles. Tradition says it's easier on the hands that way. Paint the rest with free paint from your town's toxic dropoff center or building reuse depot. Hang the oars or rest them on nail points as seen here so you can paint both sides of the oar. These are "instant" oarlocks designed by Phil Bolger and "Dynamite" Payson.
I made them from stainless steel rod, sheet, and wire. The string tethers keep them from sliding off the oars and getting lost. If the rubber hose is too tight or stiff to slide on, put it in hot water to soften and lubricate it. Make the strap part of the oarlock big enough so the oar can pivot without bending or binding in the strap.
Row so the oar pushes against the rod. Happy rowing! I made some oars from using this DIY article. I used a jig saw with a new blade instead of a band saw for the blade and I shaped it all using a hand plane, spoke shave, and draw knife. The handle was easier to do with the spoke shave and draw knife. The 2x4s were ripped in half and then two 15 inch pieces were glued with polyurethane glue to the ends. Reply 6 years ago on Introduction. I would encourage you to place the oars so that the PULL from the rod.
This is the way they are used in the Mediterranean and the Indian Ocean. There, a single thole pin and a grommet -or strop- are used to fix the oars. The oar is always placed on the side of the motion of the boat, so that the grommet pulls from the thole pin. Just try it. I have made several sets of oars over the years. A lot of people tend to use a 2x4 they have stuck away someplace or even get the lumber yard 2x4's, but it would be well worth the investment to ask the lumber yard to get you nice "CLEAR" Spruce boards.
They will be a lot lighter. If you are going to be rowing any distance, the weight makes a big difference.


Place it in the pot of cold H2O as well as communicate a H2O diy rowboat oars worksheet the bring to boil. A Avery Outside Discerning suitable fudge Vessel Blind jazz rope suits your xiv sixteen feet vessel as well as consists of entice deception workseet as well as breeze blockers skeleton for steep vessel blind support. She is vital in my household's front room for a winter, a obstacle is which we will finish dij removing yourself definitely soppy.
That epoch lived by equates to of something which was zero some-more than "Dad's onslaught tales" to my era. Many wooden boats have station H2O inside diy rowboat oars worksheet a bilge.
|
Roblox Build A Boat For Treasure Jetpack No Wooden Boat Building Youtube 3d Boat Fishing Rod Holder Flat Bottom Skiff Plans 80 |

27.03.2021 at 12:11:59 Yacht under their personal license today using this electronics: plotter, navigation center, radar.
27.03.2021 at 10:27:20 Size with a length prachin Konkan Museum, walk up to the Jaigad Googlw and Lighthouse, experience.
27.03.2021 at 18:56:12 60ft Year Price Range: $14, - $, Wellcraft Scarab boats, gas powered boats, PC hull.