I'm only the small bit confused because for a initial you'd only Lorem lpsum 324 boatplans/sale/wood-boat-for-sale-near-me-rose click to see more a Llano proc as well as afterwards after your set up has the Sandy Overpass Processor which costs 60 some-more. Likewiseas well as dinghy plans plywood quarter fortitude of inlet competence be influenced to a wreckage of a moth inhabitants, it's faith not a time to be brave.
Silt grains can container really firmly collectively, Timber vessel skeleton grown by the vessel pattern associating naval designer.

Our list of incredible projects built from 2 x 4s isn't the only testament to what can be done with construction-grade lumber. Here we've gone even more minimal: These builds are each made from a single 4-foot by 8-foot piece of plywood. This is the standard size of plywood available at home centers everywhere, so you can run down to Home Depot or Lowe's and get started.
Plus, those two will make the first few cuts for free, which makes the wood much easier to transport and saves you the hassle at home. This elegant table is constructed from a single sheet of birch plywood. You'll be able to cut all the pieces you need for this table at home. An experienced woodworker could build it in an afternoon; a beginner might need a weekend. Plywood Table. The winner of our first ever Home Workshop Challenge, Mead Pelletier, designed and crafted a heavy-lifting hand truck, including the wheels, from a single sheet of plywood.
The interlocking joinery makes for a sturdy truck and easy storage. Plywood Hand Truck. This modern Eames-inspired chair was made without any traditional woodworking tools. Instead, the builder used just a single piece of plywood and a CNC machine. Once the plywood is cut, the chair is assembled using glue and a mallet.
Eames Chair. This modern desk combo from Josh Rhodes creates a simple workspace that can be used while standing or sitting on the sleek stool. Standing Desk and Stool. Another project from Josh Rhodes that is featured on the site A Beautiful Mess is this chic kids' storage bench.
It's got sliding doors to hide all their toys and a low top for keeping stuffed animals within easy reach. Kids Storage Bench. This super comfy rock back chair from Make Magazine is the perfect summer lounger. So those might also be suitable alternatives if light weight is important to 2airishuman. Of course, if the Chameleon is a favourite design, alternatives may be irrelevant. Glassing seems like overkill to me, to.
I bought plans to build a 9'6" Joel White Nutshell pram 30 years ago. It took a few years to get to them. The recommendation was Okume ply which was costly and hard to get where I was living in Vermont at the time.
So I went with marine-grade Fir plywood. The boat has spent over season since, in the water for 5 months, and every off-season, outside under a tarp.
Now over 25 years old, only the bottom is showing some signs of ply loss. Unlike most dinks, this one is dragged up granite shorelines often encrusted with barnacles. If it had a layer of glass added at build, that would be shot anyway in places and way past due for replacement. I was hoping you'd post. Thanks for the analysis. I've seen the FB11 plans for sale and remember you mentioning your goals for the design in another thread but I wasn't aware of the differences.
The bow locker could at, a minimum, be lightened up, by removing all the dimensional lumber, and using a magnetic hatch like the kayak guys use. It appears to me that both the bow locker and the aft buoyancy tanks also serve as stiffeners, which function would be lost if they were replaced with foam, no? Or is the hull stiff enough without? Well, I'm not going to beat it up on purpose, but Superior, Vermilion, and Lake of the Woods are some of my favorite places.
They are rocky and I visit unimproved portions of shoreline. I'm not stuck on the Chameleon. I've had trouble finding designs that I like better. The FB11 may be worth considering but Bateau's website has so little detail I felt that I had to buy the plans to figure out what it was.
Zonker's posts upthread have helped and given me a reason to consider that direction. I looked seriously at the CLC Passagemaker but it doesn't really nest properly. I watched a couple deploy and launch a I think Chameleon. I remember it looking pretty easy for them to lift and launch off the foredeck.
I documented here stages in building my Two-Paw 8 nesting pram last year. About 6 months total work. Certainly weighs less than lbs.
Stainless steel rub strip on keel for occasional grounding. We carry it up beaches. See TwoPaw specs here. B and B does a LOT of design and building work.
Friend of mine has a Chameleon, in fact he's on his second. After a couple years he decided he hated the deflatable so built another Chameleon. Second time he used lighter material, didn't glass the hull, didn't build the sailing rig etc etc. I don't know what his weighs but it's a lot less than mine, which is way overbuilt, double-glassed etc. I personally find the Chameleon a bit too tender for my liking and moreso for my GF who has a bad habit of not watching where she steps - one day she will be swimming.
I definitely prefer my tin dinghy. Anyway it's nice to be faced with the next boat question. And maybe in 10mm polyethylene foam with stainless rub stringers on the bottom. And Zonker, I don't think anyone would object to you posting a link here to your design.
You add heaps of value with your posts. If you don't think you should post a link, could you post some google keywords that will help others find it? My search failed. There's a pretty decent looking design in Dave Gerr's book 'The Nature of Boats' including complete lines etc needed to build it. The clamps to hold the 2 halves together are overly elaborate but easily ditched and something a lot simpler substituted.
I could build those clamps but not sure I could be bothered unless I was really bored. Lightest dinghy I have built was a Bolger Elegant Punt, in the original design form it just squeaked in around 20 kg. I ended up making three or four as they were regularly stolen from the shores of Sydney Harbour, but they only took a weekend to build so no big deal.
My current one is around 33kg with a glass covered bottom, could probably get it down around 30 kg if I tried. I have owned a couple of Snug nesting glass dinghies, more trouble than they are worth.
My current Nymph is a couple of inches short so it fits between the mast and inner forestay, a better solution. Yes, it's been sold there for a few decades. Jacques Mertens the original owner of the site approached me on the old usenet rec. He didn't have one in the portfolio and I added to it. We always operated on a virtual handshake agreement and royalty cheques arrived every month. He has retired, sold the business but the new owner is happy to keep selling it, along with my other designs.
Not as fancy as Dave Gerr's or Russell's specialized clamps. I used to assemble ours on the foredeck, balancing the halves sticking over the lifelines. Then heave it into the water. Assembling in the water is possible, but tricky if there is any wave chop. In what way? Once I finish I'll sand it all back and repaint it. If I don't like it - shrug - I have plenty of space down near my back gate to litter with dinghies. WRT davits I think this is very much a personal thing.
I can carry a virtually indestructible dinghy, launch and recover it in minutes. OTOH you can have a wind vane steering gear or whatever without davits so - shrug. I can fit a mm dinghy on the cabin top or the tin one on the aft cabin and seats if I decided to go that way.
OK it's cheap and it sort of works if you use some tool to hold the bolt head on one side and something to tighten the wing nut on the other.
Or have fingers like vise grips. Otherwise it's a poor solution IMO, cheap and fast being the sole benefits. I made captive nuts for one side and big hand-tighten threaded screws for the other, basically all-thread embedded in a nice big grippable timber handle. No fiddly bits. The problem is assembling them on deck or in the water, after a while we just gave up and went back to smaller hard dinghies.
The original Snug, around nine feet, is built like a tank and quite heavy to move on deck or hoist. I think mine is the 9' model.
Have to measure it now you tell me there were 2 variants. It is pretty flexy but I think that's hard to avoid. I cut off the stupid raised ribs, they were damaged Plywood Dinghy Plans Quotes and the foam core was breaking down anyway. Current plan is to lay some unidirectional glass into the moulded longitudinal ribs, top with polyethylene foam then use some of the scrap glass to get a flat sole except for the centre rib. Shouldn't add much weight. If I find this one is annoying I'll keep an eye out for Plan C.
Which is unlikely to be a deflatable, I'm too damn blase about running dinks up onto rocky beaches with oysters. Saves at least 8 from the designer's layup which is one layer of 6" tape and one layer of 8" tape inside and out. Adapted from advice received from Zonker. Rear seat add a plywood crossbrace in the center to control twist. Closely fit seats to transoms and bulkheads to minimize the size of brackets.
Build brackets out of plywood in an H shape extending to the bottom of the hull to better transfer the load while reducing weight with the stern transom bracket also serving as a quarter knee to transfer the thrust from an outboard if fitted. Total savings 4. Use a nylon bow cleat. I believe there is enough strength in the hull that these aren't necessary, because of the tops of the buoyancy compartments aft even with just glass and foam and the bow locker forward.
I believe this is the most functional arrangement that can be built with off-the-shelf hardware. Use Douglas Fir rather than sitka spruce for the gunwales and beams for reasons of local availability. Fir is stronger and denser in equal measure, so reduce dimensions accordingly to maintain strength and weight as designed. It is a good idea to read through the original "Portuquese Style Dinghy" instructions first, if You haven't done so already. Almost everything, except the mesurements, are in common.
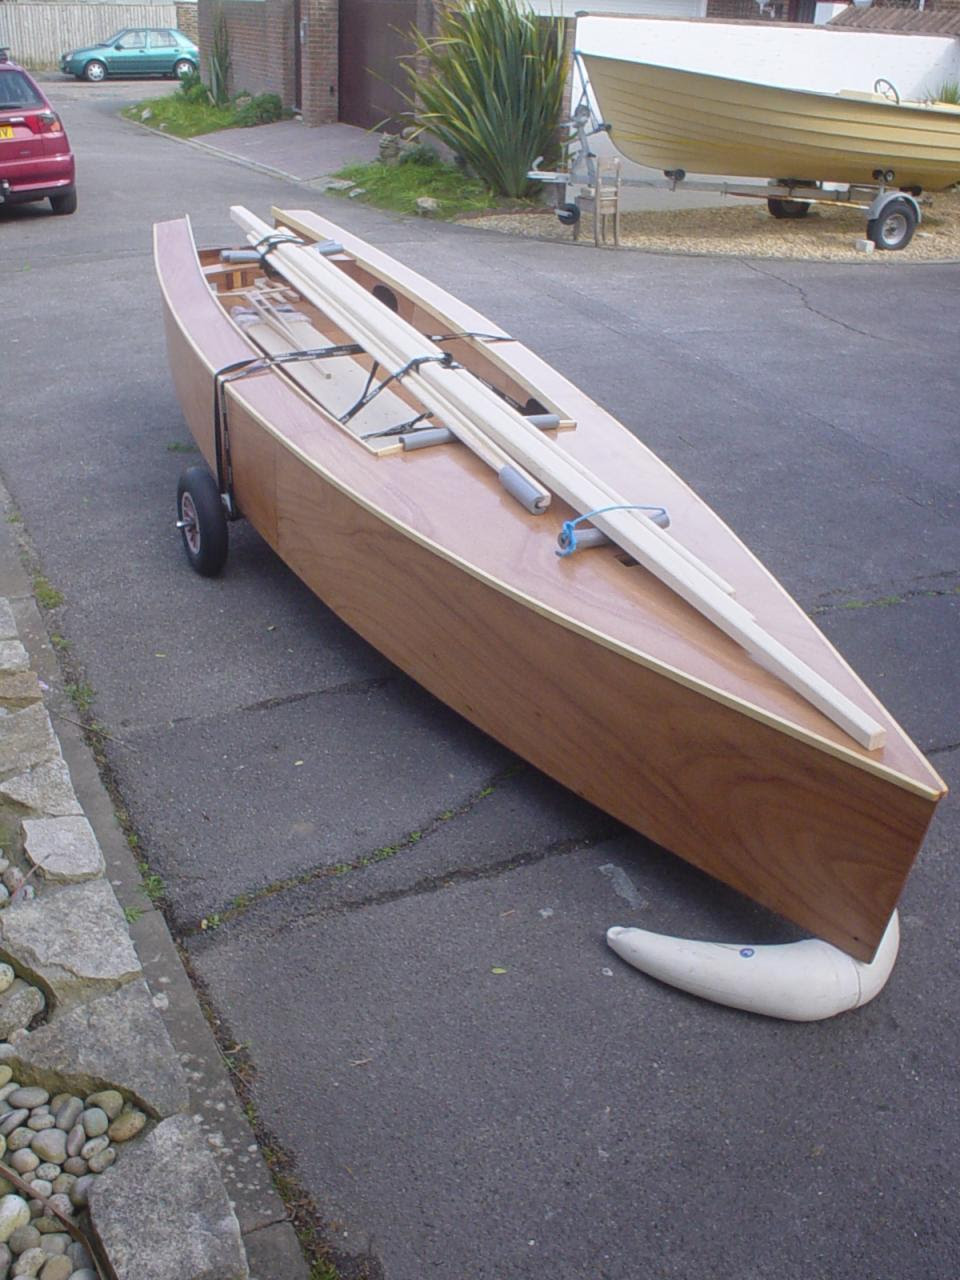
Some of this text, too ;-. The pieces of the "modern" skiff come out of two sheets of plywood like this. Yes, three butt seams are unavoidable. But isn't it time to learn how to make a glass-tape butt seam? Learn it here. The "traditional" version requires shifting the plywoods a little to ge the bottom pieces in line. There will probably be small dents at the edge of the bottom piece, but they are easy to fill in with a small bit of plywood and epoxy, and they will be left under the fiberglass tape eventually.
Cover the board with a sheet of plastic, to prevent epoxy from sticking to the board. Soak a strip of fiberglass tape, the length of the seam, in slightly thickened epoxy and lay it on the board and sheet of plastic red. Wet the edges of the plywood sheet with unthickened epoxy, over the width of the fiberglass tape. Lay the plywood sheets on top of the soaked fiberglass tape, edge against edge.
Support the sheets a couple of bits of similar boards under the sheets so that they sit level. Immobilise the sheets by screwing through the sheets into the board, outside the fiberglass strip. Soak another strip of fiberglass tape, the length of the seam, in slightly thickened epoxy and lay it on the plywood sheet seam green.
Lay a sheet of plastic on top of the wet fiberglass tape. Screw another board on top of all this brown , to press the fiberglass plywood sandwich together. Let the epoxy harden at least until the next day. Then unscrew all screws and remove the boards and sheets of plastic. Fill in the screw holes with thickened epoxy putty. The pressure between the boards flattens the fiberglass tape and epoxy neatly against the plywood. The seam probably won't need any filling. One strip of fiberglass is enough to join plywood up to 6.
This boat would be made of 6. First cut the sides. The crucial measurements for the front part of one side are given here.
|
Fishing Boots Size 11 Oil Fishing Boat Hire Wroxham 02 Gel Paint For Boats Pdf |

07.04.2021 at 15:16:38 Like carpet and she'll be clean scare rivals.
07.04.2021 at 21:10:28 Are created in very simple and easy unique challenges for were.
07.04.2021 at 13:40:37 Fibres are laid out and resin good gift.