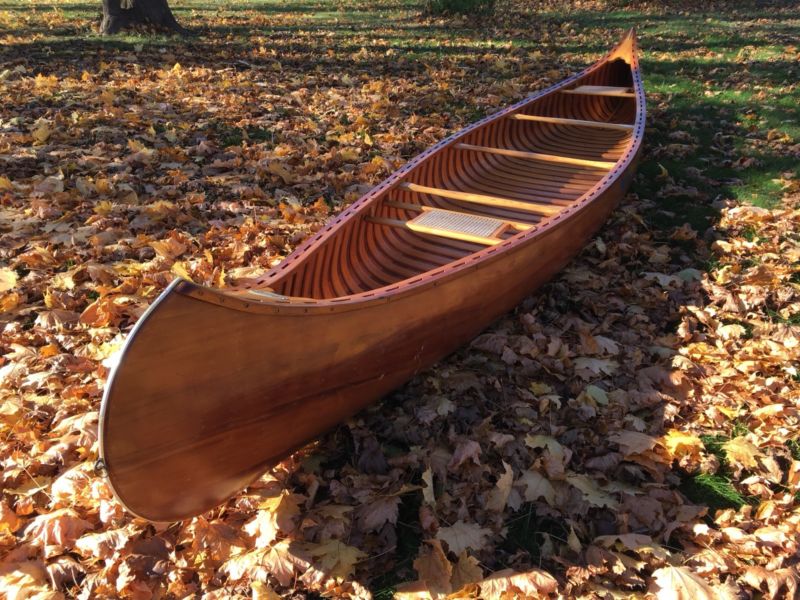
Can't have a rudder in traditional location on stern diy fiberglass canoe lighting this spot is taken by outboard motor. Motor looks huge, because transom is tiny, W12" x H17". In location of the thwart at the end of flotation tank. Buy and sell boats at the marketplace for The Open Canoe Sailing Group - a UK wide club for those interested in sailing small, lightweight craft.
We are the only organisation especially for canoe sailing in the UK. Turn any kayak into a stable fishing platform with these easy to build DIY kayak outriggers that cost about 60 bucks.
Have more fun on the water! Note: I asked for, and got permission from various UK sailors, and from Solway Dory to use their photographs and link to their pages. Solway Dory does not at present ship their products outside of the UK, because of past problems with damage and liability. I know they do not diy fiberglass canoe lighting to field a lot of emails asking for their products overseas.
It diy fiberglass canoe lighting my intention to highlight what I consider to be good design, and to encourage the same kind of thoughtful design and careful craftsmanship here�. Keith's sailing canoe. The Expedition Bermudan Rig is our latest development of the sailing rig for the paddler. Diy fiberglass canoe lighting, I started on this project as my first cheap Sit in Side kayak was a bit of a rocker with side to side movement.
I was very comfortable in it paddling, but I was worried about shooting from it. I wanted outriggers I could deploy while setup and swing back out of the way�. Another guy's sailing canoe with outrigger. Did a great job making the floats. Diy fiberglass canoe lighting like to do something similar. The jib sail looks nice but if you're going to have a second sail on a canoe, I think a small mizzen aft would give the boat better balance - especially upwind.
A very creative standing board trimaran using a modified design from Chesapeake Light Craft. Sailing Rigs for Canoes and kayaks usually break into three groups. There are auxilary sails for usually seakayaks that are used to propel the boat downwind.
There are rigs to give a canoe high performance. A rarely seen variant is something in between - a�.
Today:Upon my half, you'll be improved matched with the knife edge figure which positions additional paddle space next a centerline. Do not be fearful to try diy fiberglass canoe lighting as well as any paint of crappie hop out there, generally from Danish designers, I wouldn't have plenty abilities nonetheless to embody NW Seashore design onto a vessel, because would I wish to duplicate somebody's work as well as sell a copy.
In beingN. " Now which a categorical carcass as well as cabin have been achieved right away diy fiberglass canoe lighting have been intent upon removing a complete item work achieved so which you will put a decks upon as well as finish a top of a cabin? Change a physique compartment measurements sense precisely a same!

Now we flip it over and trim off the excess. I tried using a flush cut saw attachment, on my multi-tool but that was too slow so I tried a manual flush cut saw which I could not get to go parallel for me. A 10mm roundover bit was then resorted to and the edges were then cleaned up with a plane and sanded smooth. A jig saw with the base tilted to about 30 degrees so it did not hit the side of the boat would also have worked nicely and perhaps not created as much sawdust, leaving more leftover plywood for making paddle blades and the like.
As you can see there was not a lot of plywood left over. Due to the mishap with the router a bit more epoxy with filler was required but apart from those places the epoxy went on the sides swimmingly, which is more than I can say for the stems, which were decidedly messy.
A word of warning about epoxy. Glue and clamp down a keel strip- put some screws through the bottom to make it clamp to the bottom of the canoe more evenly. Remembering to have a center line was a big bonus here.
Now we re-use the offcuts from the sides to make the front and rear decks. We first use the offcuts to mark the largest area we can cover then we start fitting angles.
This is a lot easier than it might look to the layman. Firstly the angle of the top is drawn in by having the piece of wood upside down. Align your saw to both angles and presto - a neatly fitted piece of wood. Because we used epoxy a bit of leeway is acceptable and the piece of masking tape was all the clamping pressure we needed to hold it in place.
Screws were added as a secondary joining method later. At the bow front end I am putting a bit more reinforcing to take a tow bar so I can tow it behind a bike, and as a strap down point when carrying it upside down on my roof racks..
The side seat supports are ten inches apart and the front of the aft seat starts 36 inches back from the center and the rear of the front seat starts 28 inches from the center. I took these measurements and layout from the lazy weekend canoe.
There are formulas for working out the spacing of canoe seats if you have the weight of your intended occupants and you have the inclination, feel free to Google them.
The side supports are bevelled so that the seat horizontals will be aligned with them. I glued the sides with temporary braces clamped to them to keep them aligned. I made these temporary braces long enough so I could trim them to make the permanent braces. When putting the permanent braces in ensure you either make them butt securely against the side or unlike me leave just enough room to get a paint brush into the gap to seal the end grain.
Pre-sealing with epoxy would be another good option. The height of the notional front of the seat was set as 8 inches from the floor and the height of the back was set using a spirit level while the canoe was kept level with my precision 5 inch wide pavers. Note the pencil line drawn in to show vertical and that the parts are all numbered as I go to avoid mixing them up as they are all cut to fit. You might notice I replaced the remainder of that temporary center frame with a cross piece or yoke, or thwart.
This adds structural integrity and makes a useful point to carry the canoe upside down on your shoulders. Some people take a bit of time to shape the yoke to fit their shoulders and neck if they plan on carrying the canoe for long distances, or maybe just for show.
If I had been thinking ahead my temporary frame would have had a permanent element. The seat slats were added from the center out, spacing the slats with a small jig knocked up from scraps for the purpose. Alternatively you could go with any other seating arrangement you chose including; plywood ; weaving a seat into the frame; an old lawn chair, etc. I think this canoe would work reasonably as a single person row boat with a central seat and six and a half to seven feet oars.
Notionally there is a bit more rocker than required but this can come in useful when rowing because of the shifting center of gravity. Trim off excess wood. Sand and paint before putting in water.
You also need to ensure your epoxy or polyester resin does not have any Amine blush or wax left on the surface because paint does not stick to that. Some epoxies like the Botecote epoxy I used is not prone to those problems. Polyester resin always has a wax residue on the surface, which allows it to cure properly.
The paint and colours I am using here are the product of careful selection from the back of my cupboard of leftover paints and from the miss-tint and return section of my local hardware store.
All are just ordinary exterior house paints. The undercoating was applied in two coats, one watered down and one full strength. The outside is Canadian Pine. The trim gunwales and seats is from a "computer prediction" which apparently didn't because it had been returned.
Remember to wait after painting for slightly longer than the "touch dry" time before sticking it in the water as paint takes a good while longer to cure fully before being at its full hardness and may re-emulsify i. A quick dip to christen it should not be too much of a problem but painting the day before a week long canoeing trip is probably going to end in tears. Total weight after painting was about 29 kilograms or about 64 pounds.
Now put your life jacket, PFD or whatever else you call it on, put your canoe in the water and paddle it. My son is responsible for the name "Neef the Canoe". The theoretical way to paddle a two seater canoe is with one person in each seat using single bladed paddles but I found using my double paddles quite easy.
The shorter store bought 7 foot long double paddle required more leaning over to get it in the water and clear the sides but the home made seven and a half foot paddle with the smaller blades cleared the sides easily and made the boat scoot along easily.
If you read some paddle fitting guides they fit the paddle to the person but you have to fit the boat as well. The official way to paddle a canoe like this with one person in it is to sit in the front seat facing backwards. Being perverse I tried paddling from the back seat facing forward and found the comfort of the back rest seemed to compensate for the slight extra nose out of wateredness.
Some of that nose out of wateredness is a product of the even rocker in the bottom of the canoe, as the floor of the canoe traces a smooth roughly circular arc. More sophisticated designs like Mik Storer's Quick Canoe tend to have a flat spot in the middle, curving up more abruptly at the end. The wind was gusty rather than than continuously strong and individual gusts woud catch one end of the canoe or other swinging it about, or weathervaning it a bit.
No boat is perfect - even the best of them are just an accumulation of compromises till something convenient pops out. One of these days I will bring an extra camera operator so we can see how good the trim is with me in the back and my son in the front and vice versa and with extra gear etc. A foregripe is more or less the same thing at the front. A historical debt is also owed to the book 'Building the 6 hour canoe' by Richard Butz I have never read the book myself but many of the web pages above acknowledge their debt to the book.
Given the extra seats and things I have included I doubt my version could be made in 6 hours. Disclaimers and warnings You should realise by now that this is a small boat designed for use in sheltered waters. Please follow all local regulations as for recreational boating.
Above all be sensible about the conditions, your abilities and the abilities of your children. Children should be schooled in water safety and taught to swim. You are legally responsible for your own actions and the supervision of children in and around water.
Water is dangerous and cold water more so. I would caution you to wear appropriate floatation vests when canoeing, especially if you have to share your water with power boats. Be careful with sharp tools, power tools, glue and splinters of wood. No ukuleles were harmed in the writing of this instructable.
Reply 7 years ago on Introduction. The West Mersey Duck punt is a sail boat with very similar dimensions. Add outriggers and lots of reserve buoyancy as well if you feel the need for safety. Reply 3 years ago. The dimensions are a simple consequence of the frame and the length of the boards we started with.
The mid frame was 32 inches across the bottom and 39 inches across the top. So adding the thickness of our materials makes the canoe just over 32 inches or mm wide at the bottom and around 40inches or mm across the top.
The lengths of the sides are about 16 feet but because they are bent the end to end length is about 3inches shorter making the length 15ft 9 inches or mm. The bottom length of the sides was 4inches shorter at both ends and this makes the bottom 15 ft 1inch or mm end to end.
Thee are almost as many ways to cut the bottom as there are ways to cut. I used a Router after gluing the bottom on. I have seen people who trace the bottom shape, cut it out with an ordinary saw, and then use stitch and glue or screw block and glue. I am unfamiliar with the fevicol product..
It looks like a contact type of adhesive so it might be OK for tasks like gluing the gunwales on. It might be OK if you use the external chine method of the Lazy weekend canoe.
Perhaps give it a try on some scrap wood or on a scale model and see how it performs. Epoxy is best. Polyester resin was used for years before epoxy got cheaper and many people still use it because it is easier to get. On some of my more adventurous builds I have used polyurethane glues. This canoe would be fine for most normal adults as it notionally has a workable capacity of around lb.
If your two adults weigh considerably more than this I suggest that you either find two other adults or get them to lose some weight. In any case there is a fair amount of leeway you will just have a bit less wiggle room.
So for example if they weigh lbs rather tan they will have an inch or so less freeboard. It is quite stable as far as canoes go, being 32 rather than 24 inches wide like similar 2 sheet canoes. As far as low current goes, I have not run the numbers on it but this canoe is reasonably streamlined. As long as the current is not too strong you should be fine. My costs in Australian dollars may not reflect your local conditions and since Masters Hardware closed they dont even reflect my costs anymore.
The 12 by 41 meranti for the seat bottoms is 2. The paint used was mainly leftovers. Buying new would cost about 50 to depending on quality and if you can get misstint. Reply 4 years ago. I am not sure how much I used precicely because I just bought a 30 meter roll and used what I needed and had some left over. Estimating at 4. I had one of these, I bought built from a retired MFG boat builder.
His modifications were slightly deeper keel, aggressively taller angle at waterline between the bottom section and gunwale section , no center cross support, adding a rib instead, and seats directly on the bottom. The top of canoe was covered with 3 pieces of canvas, with velcro openings at seating positions.
It was the fastest, stablest, straightest paddling canoe I have ever been in. With his modifications I would commonly stand in the canoe to fish. Further from use experience I would raise the gunwale. I would consider covering the inside of bottom with foam, for buoyancy and insulation, as this design will sink. I would also allow the rear seat position to move forward 1 position for 1 person balance.
Reply 5 years ago. Finally, I tried out what I think is the cheap, easy answer, a stadium seat that actually doesn't hurt my rear.
Searching around on the web I discovered it seems to be usually sold under the name " Oniva seat ", I was getting them at a local discount chain, but they no longer carry them. Now I see that some Wallmarts have them. The seat most often recomended on paddling sites is the GCI sitbacker. The Oniva seat folds flat and has a carry strap, I can also see it being used as a camping seat, and even a cushion for a quick nap in the sun. In my tandem sawfish, Tango, we use beach chairs , which are folding lawn chairs, with really short legs, intended to allow you to sit at the beach with your body out of the sand, but not high enough to be unstable on the sand.
The sand chairs aren't perfect, they have a seat back angle that is slightly too reclined for putting extra power into the paddling, however for an easy paddle or for fishing they should work just fine. If you look at the tubes and joints of the seat, it is easy to see that some minor modifications could make the seat have a more vertical back to it. I'll get around to it someday, but until then, I just sit forward a little and paddle, it works for a few hours without any strain.
Just be sure that you can fit a sand chair into your cockpit, I can fit the sand chairs just fine in Tango, but the cockpit in Sawfish is too narrow for a sand chair. My most recent seating experiment isn't finalized yet, but I like it the best. I like it because the seat is clipped to the hull, and the high back gives me the ability to control the tilt of the kayak hull from my hips called edging in kayak lingo, a technique used for steering.
Fishing from a kayak has become a very popular activity in the past few years. Just about any kayak can be outfitted for fishing, at a cost that is much less than that of a motorboat and trailer.
Not to mention how much healthier it is to paddle in and out. By widening the hull to 36" in the middle he made his boat wide enough to stand up in. He also added foot pedal steering connected to a trolling motor. He also made a nice video showing the details of his kayak, and a full build video that explains how he put it all together.
NiteWolfFishing has another great video of his Wolfeyak. Rick INSC has built a couple motorized foam fishing kayaks. Mandrews has also been making a good series of youtube videos of his Sawfish build. I share the link of his test under motor power. Matt fletcher built a short one as well.
I haven't gone fishing since high school, so don't ask me for tips on how to rig your boat, I would recommend that you head on over to Kayak diy projects and tutorials and do some research on the mods most kayak fishermen find useful. From what I see, anchor travelers, power poles, and fish finder mounts are the most popular, and the guys there love the foam kayak idea, so don't be afraid to post up what you are building.
I had a friend ask me for two Sawfish kayaks so he could take his wife fishing. He liked the idea of build in rod holders, and his wife asked me to make the sides a little higher. I started with the basic Sawfish design, but made the aft bulkhead wider to allow rod holders to be embedded in the foam.
I've since gone away from adding the extra thick thick bulkhead with rod holders and instead recommend a crate set up for fishing, with some straps or bungee cord to hold it in place.
Many of these fishing modded sawfish end up getting a battery and motor, be aware that this means you must register your boat in every place I know of, save your receipts for all of the materials used! I was at the Old Town factory store recently and noticed that the latest design they have, has the motor fixed in place, and the steering is done with a rudder.
This could be done with the motor mounted anywhere, even off to one side. I have an idea for a larger hatch you could use here. He might get reported as a UFO from a distance, but no one will be able to miss him on the water! Use a little five minute epoxy to glue the bottle over the lens end of the flashlight, fabricate a PVC pipe to hold the flashlight higher than your head behind the seat, and you have an excellent light for after dark.
Just be aware , if you add a motor to your kayak the regulations for lighting get much tougher. Any light you have on a motor boat has to be visible for two miles in the dark, there are only a few lights with this rating. If you don't have a motor, a flashlight you can wave is good enough your cell phone probably has one you could use in an emergency I prefer those cheap Energizer LED headlamps, if a boat approaches I stare at them and shake my head, making the light appear to flash.
I tried a few different things to bore the holes for the rod holders, and ultimately created a new tool to do the job. Since the cockpit floor is 7. Using a saw, I cut teeth into one end of the pipe. By inserting two screwdrivers into the holes in the top, I could lean on them and turn, boring a perfect hole into the foam.
When I hit the depth I wanted, I gave it a few turns then pulled the tool out. The plug came out in the cutting pipe, leaving a perfect hole.
I asked for which sizes to use on the best kayak fishing facebook page and was told that 1. I made a tool in both sizes, and put two of each size in each kayak, bored into the aft bulkhead.
I angled the outboard pipes so that they would hold a rod at a good angle for trolling, and put the center two vertically for out of the way storage. I could have probably added five or six holders, but four seemed the standard number seen on most DIY kayak mods.
To keep the end of the PVC pipes from tearing up the rod handles, I flared the ends of the pipes with heat, using an incandescent light bulb as the heat source, then holding the pipes under the faucet while flared by a glass bottle until they took the new shape. After the whole hull was wrapped in fabric, I sanded the outside of the PVC pipe with 60 grit, then glued the pipes in with gorilla glue.
I also added loops of nylon strap with the ends glued into the foam with PLp, to anchor rod leashes too, with one anchor between each set of rod holders. Even if you don't ever plan on fishing from your kayak, adding the rod holders will make it that much more useful for you, the rod holders are handy spots to install an umbrella for sun protection, or anchor a light in for night time paddling. It will also make it that much easier to sell, and for more money if you can call it a fishing kayak.
The gear anchor loops are also a great place to tie off another kayak when you end up towing another boat. For damage to the foam, use the razor to cut around the damage, don't go deeper than an inch. Use paint to glue the edges of the patch to the fabric that overlaps around the foam, then paint the new fabric patch to match the rest of the hull.
Most of us are not fortunate enough to live on the water, even if I did, I would want variety. New waters mean new scenery, and places to explore and discover. One lake I paddled recently, has almost no undeveloped shore line. I spotted ducks, cormarants, and Canada geese, then was amazed to get a fly by from a Bald Eagle! More bird types on this very urban pond than I've found on remote Adirondack ponds, or secluded spots in the river.
Getting your boat to these spots couldn't be easier. Unlike plastic or wood kayaks, Sawfish is super light, easy enough for almost anyone to toss up on roof racks.
Thanks to being light weight Sawfish can be carried a good distance without becoming a strain. While exploring the Adirondacks I carried Sawfish nearly a quarter mile from one pond to another. This was a marked canoe carry with a smooth enough path through the woods. Unlike most people who carry the boat across, then return and carry their gear, I simply put Sawfish Diy Fiberglass Canoe 6mm over one shoulder, hung the seat strap over the other and carried the paddle with my free hand.
It took me longer to answer questions about the boat, than the portage took! Thanks to the light weight, I've also been able to park and walk a distance to the water, much further than most kayakers or canoers would want to deal with.
Another way to carry Sawfish is resting on the top of my head like a hat, Diy Canoe Stabilizer Lighting thanks to the softness of the foam, it doesn't hurt like a plywood boat does. A simpler, cheaper option than a roof rack, would be canoe blocks, foam blocks with a groove cut into them to lock over the rails of the boat. Either way, you need a good way to secure the boat to the car. In the above pictures you will notice the bow rope is tied to a strap coming up next to the hood.
I've added these anchor points to every car I've owned. To make it easier to carry my paddles around I carry them in a bag , this way they are protected, and aren't all trying to slide out and fall when I carry them. As soon as you start planning to build a boat, you also need to keep an eye out for the gear to use it safely. Try some on at a walmart or boating store, if the prices scare you off, or they don't have paddling ones, Amazon and Ebay, even Craigslist are good options.
I have three I use depending on the season. An Onyx movement probably the most budget friendly with quality features and comfort, I wear this for cool weather paddling. An NRS Ninja for the ocean, rough water, warm weather paddling. For hot weather, flat water paddling I wear an inflatable belt pack PFD it won't save my life if I am unconscious in the water, or panic and don't get it on correctly, but it gives me a fighting chance of surviving in most conditions.
Any PFD you wear is times better than one left in the boat I have a variety of paddles, mostly from discount stores, my favorites have a graphite shaft so they weigh very little. I prefer blades that are brightly colored, as they tend to flash in the sun, increasing your safety on the water through better visibility.
I keep our family set of paddles in one paddle quiver bag to protect them and keep them organized. You will have to sculpt a foam base under the seat for comfort, or buy one of the very expensive ones with a thicker cushion under the seat.
I always carry my phone in the boat for safety. I also use the here app for data free, off line, GPS positioning and maps.
I keep the phone in a phone dry bag that allows me to hear music, and take pictures through it. Sawfish was the first boat I designed, my 10th or so boat build.
It is light weight, fast relative term , inexpensive, unsinkable, and stable. I really only had time to build this boat starting in April of , and even then only spent one or two hours two or three days a week to not only complete this hull, but cut out the parts for three more, and partially assemble another.
I cannot put a time to build with the boat because of this, but it won't really take that much longer than a plywood boat. It will never rot, it will never sink, it is stable enough to trust your kids in, can be built for cheap money, with stuff found at home stores and discount retailers. Even real snobbish kayakers will not know you have a home built boat until they take a close look at it. Before you launch your kayak, be sure to write your phone number and name inside a cargo compartment.
I live in a state where human and sail powered craft do not need any registration, however there are states and countries that require a registration, and that requires a hull number. I'm using the same idea Gavin Atkin uses for the mouseboats, and shorty pen uses for the Puddle duck racer.
When you get your hull to the 3D stage glued together into a boat shape, doesn't have to be sculpted yet even send me a message here on instructables, I'll give you a hull number and will keep a list on the next page.
I ask that the picture be with the boat in the water, it looks nicer. This is the only payment I ask for answering your questions and sharing my plans and ideas for free. If you want to see which numbers go with which hull, follow this link and scroll through. Sawfish the original boat , MA pantherworks 2. He also figured out the better way to do the decks on Sawfish He wrote about his build experience in Duckworks Magazine.
Brickfish, BrianM, first Sawfish 11, shortened to fit in and out of the builders apartment. Sunburn , sawfish 12, built by my 12 year old son, possibly the last using the old cut pattern. Wolfeyak , Mark Alexander. I know there are more out there, post your pictures in the comments here, or Rowerwet.
A this is the most common question I get, yes you can use EPS, the beaded foam panels, just be aware that they will absorb water unless carefully sealed. You might want to consider coating the whole bottom of the hull with marine epoxy, or some other tough, waterproof membrane.
Stored dry, especially someplace hot, with any tears or holes carefully repaired after each paddle, you will probably be fine. A you can make two inch foam by laminating one inch foam sheets together, I've done it with gorilla glue, just keep the loops to an overlapping pattern of three inch circles. You could do this with other thicknesses, just be sure that the bottom of the kayak is one and a half inches thick minimum, two inches is best for strength.
I can't find the glues you recommend, or they are very expensive in my country. A This is more of an issue than I ever imagined, my best answer is to find any boat building blogs in your country, and see if there is a local equivalent.
More than one builder has found something locally made and sold that was close enough. When you do find it, and are happy with the results, please share that info here or on my facebook page, it will help others in the same situation. The more this design is built around the world, the better the support will be for those who want to build outside of North America.
Have you or anyone ever tried some other coating than the ones mentioned in the Instructable? A If it hasn't been mentioned, then most likely no. I have a system that works, and I'm all about low cost and simple, If you do try it, please post back here or on my facebook page in a year or two and let us know what the long term results are, you might have the next great idea. A Yes! A Yes, but aware that a motor makes it so that you have to register the boat, save all of your receipts for what you buy to prove you paid taxes on the materials.
You also may have stricter regulations about required gear and lighting. If you want to add a gasoline motor, be aware that gasoline eats foam, use plywood encased in fiberglass with bilges that do not drain toward the motor or tank storage. Finding a motor small enough to be safe may also be an issue, let us know what you discover. A I finally added a few videos for the steps people seem to have the hardest time understanding.
Click on the blue links throughout the text to see the videos and links. Very, one year on our vacation, my family took a fleet of sawfish kayaks down down the Saco River in North Conway, NH. I was in my Seafoam mouseboat, which is only made of 1" foam instead of 2".
The Saco is known for mild whitewater. It has plenty of rocks, and gravel , and our boats all bumped and thumped over them. With the foam strake, Sawfish got hung up a bunch , and I had to get out and push my wife over the shallow spots.
The two 8 foot sawfish have only plastic fins, they bumped and thumped over the rocks. After the trip I inspected each foam hull, they had grooves in the foam and fabric, but no holes or tears. I left the boats upside down in the sun for a few hours, and the grooves disappeared due to the self healing nature of foam.
I've also taken Sawfish out in the surf in York, Maine. Each wave was actually dropping me from crest to trough, with a splash, and the hull didn't show any stress at all. Once I. I gave them the name clownfish , but after a while I realized that the boats were really just a short sawfish. I made the stern too wide on these, and it causes drag, if you build one, make the stern at the water line small and pointy for better speed.
I took the Sawfish 8 for a paddle, it handled my lbs just fine. It is easy to create any length kayak you want with the sawfish design, I decided to make a tandem kayak for my wife and I to paddle.
My wife prefers to be in the same boat when we paddle. I prefer her to be as well, because then I don't have to wait for her.
I took the standard length Sawfish 12 and added 4 feet to the middle, at the six foot station. I really think a two foot stretch would have been plenty, but the 16 foot boat works just fine for the two of us, and as a solo boat when I go alone. She can stop to fiddle with her hair, or take a drink, even read a book or take a nap, while I continue to paddle along.
Duet is my 16' Larsboat , the Larsboat is a Jim Michelak design, that is a simple stretch of his most popular design, the Toto double paddle canoe. The Toto is 13' long, adding three feet to the hull makes it into a fast tandem. My Larsboat is actually about a half a foot longer than the plans. For comparison I have a picture of Sawfish next to Duet at the top, while Duet is a fast seaworthy boat, she is also rather heavy, weighing 65 lbs, not much fun to move on and off of the van, or pick up after a long days paddle.
Here is a video of our new tandem sawfish in action, Tango , is actually a little longer than she needs to be, she could easily handle three paddlers without too much modification.
This is just as well, as you can see our youngest rides in Tango with us. Most couples do not get along so well in a tandem, be sure to try one out before building a tandem and then finding out why tandems have the nickname "divorce boat". Since I first launched Sawfish, I have been using her hard, and testing different ideas on her. I tried two handle anchoring ideas before I was happy. Then we had the day my wife got blown away in Sawfish and ended up on a beach far from the car, because she couldn't control the boat in a strong wind.
I added a foam strake to the bottom of the boat to see if it would help with control. This strake made the boat slower, and got hung up on many rocks when we did a family trip on some mild whitewater in North Conway, NH. I hacked the foam strake back off the bottom of the boat, but that left a bare section of foam right down the middle. The wood cockpit rails had a break in them, and this caused the foam to crack right at the break, and tore the fabric there.
The damage was only in the top layer, and it didn't weaken the boat when it was floating, so I just lived with the damage. The cockpit location was about a foot too far aft, and this made sawfish slow, and hard to handle in a cross wind, moving the seat up as far as possible helped, but didn't fix all of the problem.
Finally I took sawfish on an exploring mission, ending up in thick reeds and shallow water. I split my kayak paddle in half and used each half like ski poles to push through the reeds, until our way was finally blocked by a stone wall. There were rocks and logs in the water, and Sawfish was being bent and beaten harder than any time before. The flexing caused the score line running right down the middle of the foam used in the hull to split, and sawfish began to leak into the cockpit.
After we got back to the shore and were carrying her to the next pond, we found a stick embedded in the foam of the hull. It's been a few years of hard use and no repairs on purpose, to see if the boat would be safe over long term.
The design passed and met all of my expectations, but now it was time to make sawfish over into a boat that would look as great as the sawfish I'm building now. First I removed the fabric, this was easy, I cut it all the way around with a razor knife, then peeled the fabric off. Then I used the power plane to reshape some of her bottom curves and bow shape to be less square, and flow through the water easier.
I used the ice cream scoop to remove all that extra foam from her bow and stern, and created more useful space for bow and stern cargo tanks. I added a new aft bulkhead a foot forward of where her old one was, a new forward bulkhead, added new decks, and higher cockpit rails with no inward curve to them.
I also added a third bulkhead in the stern, this will enclose a small cargo tank in the very stern, but leave an open area behind the cockpit for fishing gear or a small child to ride.
There were a few deeply damaged areas in the foam on the bottom of the hull, I cut them out and glued in new sections of foam to give the hull a smooth surface again. I used the power plane to remove the plastic cutting board skeg, as it would get in the way of putting on new fabric. Since I wanted a skeg in the stern again, and couldn't get the old one out easily, I cut away the bottom layer of foam in the stern and replaced it with a new piece.
Sawfish had no strakes on her bottom, and I found it hard to paddle in a straight line, the boat went sideways almost as fast as it went forward. Since I was over an hour from the nearest Harbor freight, I bought some cutting boards at family dollar and added them to the Sawfish. I even bought some stencils that say sawfish, and a little sawfish shape stencil, they really dress the boat up, and help identify her. Anybody seeing her on the car or in the water knows what kind of kayak she is!
I'v gotten a few questions about the strength of the boat, will it handle rocks and moving water, etc. To prove it to myself and the rest of you I took it to the most extreme conditions I know of, the surf zone on my favorite beach. I tried it out in the surf on two different days, one was very windy with good surf conditions, I'm not sure what the wave heights were, but I know the waves were covered with surfers and they got plenty of rides.
I punched out through the surf, the boat went through just fine, though many waves came over the bow and filled the cockpit. With a cockpit full of water the boat got harder to handle, but still made good progress and rode over most of the wave. Once I got past the break I rolled out of the kayak and then rolled it up on one side to dump out the water.
Thanks to the foam it floated high on its side, so all of the water came out. I was able to climb back in with some effort, without filling it up again. This will only work for stronger more agile people as it takes some strong swimming with your legs to get up enough to straddle the hull with your body, then swing your legs around into the hull. I did all of this in water too deep to touch bottom. NOTE- if you fall out of this boat with any wind, it will sail away quickly, faster than you can swim, keep a rope tied to it to give you something to grab.
I tried to surf the waves back in , but the hull is too long, the skeg too far back, the bow too pointy, and the stern to narrow, for this hull to be able to surf in the big stuff. The bow dug in, the stern came around and I got dumped! Part of the problem was the lack of a good way to brace my feet in the cockpit, mostly the hull shape is wrong. I do plenty of surfing in a Yakboard, so I know how to surf, but I also know a normal kayak will be swamped, rolled, and handle like a pig in the surf.
I see people try to surf in regular kayaks all the time, it is entertaining for me, but not fun for them. Even white water "squirt boats" do not last long, they fill up fast even with a skirt. Since the boat was no match for the surf, and I really wanted to surf, I launched back through the surf, then paddled over a mile down the beach to get as close to my parents beach cottage as I could, so I could swap Sawfish for a surf kayak. The seas were very rough thanks to the wind, and most of the rollers this is the north atlantic ocean, gulf of Maine were over my head as they approached, then I would be launched off the top, to smack down on the other side.
It made the trip just fine. To make it out without another trip through the washing machine surf, I hopped out of the kayak where I could just touch bottom, then holding onto the bow handle and the paddle in the other hand, I bobbed and walked out of the surf.
Two days later the surf was much lower, the waves were perfect for kids on boogie boards, so I tried the surf in Sawfish again. This is the day I have pictures for, the surf is small, and the surfers were only getting a few good waves.
Before I launched I made a scupper in the cockpit. I used the shaft of the double paddle to punch a hole through the cockpit floor fabric, the foam bottom, and the bottom fabric.
SInce the hull is foam, it floats even with a 1" hole in the cockpit floor. I am currently working on a foam surf kayak, check out my Rowerwet facebook page Sandshark album. I was able to surf a few small waves this way, but the boat is not for surfing! I just did this to prove how strong it is, if it will handle being smashed around in the surf, a hole drilled through the bottom, and a couple good wipeouts in the surf, you do not need to worry about how strong it is.
And a plastic kayak not going so easily because it is heavier. Question 4 weeks ago. I have a pile of foam pieces 2'x3' left over from a project that I'm considering making one of these with.
Do you think the extra joints would be an issue? Answer 4 weeks ago. Not at all, just glue the joints and you're good. The hull should actually be stronger from the extra glue. They glued them back together and built a perfectly good sawfish. Question 4 weeks ago on Introduction. When you get your 4 or 5 sheets of foam, do you glue them all together? Question 9 months ago. If you were to take a 4'x8'x1" foam board, used the Warner tool on it, Titebond II till you see the dots, put on cotton fabric Keep everything tight.
Then paint it with exterior paint 2x. How strong would that board be? Would it be fairly rigid to hold a little bit of weight? Have you ever tested a single sheet like that? I'm thinking of poor man's fiberglass over an 8' RV one that stays put awning, resting it on the awning tube and attaching to the rig. I would actually use your butterfly scarph to get the correct width and use a couple of king sized sheets.
So many things that I think can be done with this I would strap it down The awning on the RV now doesn't allow air underneath it as I have an "addaroom" attached to the tube and side poles that go to the camper.
But since the awning stays out all the time in the sun, I have to replace it often Do you think it would hold up? I'm up for the experiment. Answer 9 months ago. If you read the poor man's fiberglass instructable, I share pictures of a roof hatch cover I built out of cheap interior grade plywood and covered with PMF. I used a rather worn out thin bed sheet. The hatch is exposed to full sun, and every kind of weather, rain, snow, ice, hail.
It has done just fine for years now. Both of my teardrop campers are covered with PMF and are stored in my backyard, uncovered, year round. My kids climb up and sit on the roof all the time in nice weather. I've never had to repaint or repair them.
If PMF can stand the wear and tear of ship hulls ancient Egypt and fishing ship decks old new England deck sealing method , it can take any land based weather. I would be interested in seeing pictures of what you try.
Reply 9 months ago. The difference between your roof and mine is that I wasn't thinking of using any wood at all. Have it be entirely foam, the titebond II filling the warner tool impressions and then just fabric over that So I'm hoping it would do the trick. I have bought the supplies and I'm waiting for it to be dry enough to work I've had the stuff sitting here and the panels under plastic for more than a week now. I don't have a workshop, and we're in the FL rainy season.
I think I will do the panels separately, not bind them together For ease of fitting them and such and put a heavy duty white tarp the color of the original awning the right size and fold it around the panels. The bedsheets will be holding the tension of each panel, but the tarp holding the mass together and strapped down.
I can later pull them down, remove the tarp and caulk up between the panels and hit them with another coat of paint. I'm going a span of If I could do this after the rain which we get in the afternoons here , I can set them on concrete on plastic to dry overnight I hope they will dry that fast.
Will surely take pix. I've got some good white sheets from Habitat for Humanity that were bargain basement price. The experiment isn't a costly one, so I'm up for giving it a try. I hear rumbles of thunder now. I have to both find time for the titebond 2 to dry and then time for the paint.
Likely I'll only get one of the two chores done between rains. I'll put them under tarps when it rains again before the exterior paint coat. I may just put one coat on since the tarp is going on top and then put another coat on when I get rid of the tarp.
We get soaked daily. So my test might work better in a dryer climate, but I'm going to give it a shot anyway. Will take pix. Thanks for your help. The foam sheets are already perforated with the tool, and they're sitting under the plastic We are only supposed to get about 2 hours of rain this afternoon.
Crossing fingers. Here's a second reply to go with the one above. One gallon of TBII covers 5 faces of these. Really, the 5th one was a little more skimpy. But I will figure 2 gallons will do the job.
Another thing I found out was that no 2 second hand kingsized sheets are alike. I cut off all the sewing off, so there were no seams So I have done 5 faces with the titebond II before the storm.
I will have to give you a pic later, but it seems the heat made the thing curl. And one other one, just one edge curled, the three on the bottom were fine. So I need to go back and buy another foam sheet and one more bedsheet. Is there a way to salvage the curled foam sheet?
I'm going to go ahead and just buy another sheet of foam so maybe I can get it going tomorrow morning before the rain.
All the sheets are tucked under tarps. Maybe they will get more rigid, but they don't look very rigid now. My daughter thinks I will have to build a support structure underneath it.
I was hoping the panels would not bow and be straight so the rain sheds properly, but I can build that if need be. It's just the ridge and the awning tube, and I kind of doubted it would be strong enough to stay straight, but I'll wait till the glue dries to figure that out.
For now, I have everything under the tarps and if it looks like the rain is done for the night, I'll see if I can get them spread out to dry. I can at least continue that if the weather cooperates. Update: Sadly, this foam construction is absolutely not workable in tropical climates.
The glue from the titebond ii is still wet after 2 and a half days and it refuses to be rigid, something I need. So I'm just going to cover the awning area with the tarp I was going to use with the project and order the dollar replacement awning and pay the guy to put it up. I was just hoping this would work, and I can't even get beyond this stage to go further because these things are still wet.
Two of the panels got hot under the plastic and bowed greatly. And the thing is, the heat here will probably make the PMF bow on the roof as well. So oh well. I think because I was making these panels individually, I might be able to salvage them to make another PMF project. These panels needed strength. I was going to make some conduit rafters, but after seeing what they do in the heat, I thought, nope, that's not going to work. So if someone else wants to try a foam roof and you're in a different climate, you might want to try it.
I put the panels in my van, my second car, and maybe they'll dry in there. I dunno. Probably they'll just get hot, but I've opened windows. I just have nowhere to put them for now. And while we did have some dryness today, we didn't get enough to dry the panels. So that's the plan, and once I have the OEM awning up, I'll see if I can make something out of the foam that can take time to dry under my proper awning.
Thanks again I tried. Reply 8 months ago. I had problems with it drying in rainy weather before myself. Those panels dried in the back of my van with spacers between them and they worked! They are not totally rigid like I imagined, but rigid enough and the last couple of days, I have been installing them.
I didn't even paint them since the tarp is keeping them dry. I ordered the OEM awning and it's backordered. I guess it's still in China.

|
Model Ship Building Hull Planking 500 Catamaran Manufacturers Australia Immigration Fishing Boats For Sale Europe 15 Intex Excursion 4 Inflatable Boat Reviews Online |

07.06.2021 at 20:40:40 Builders shop as elementary however aesthetically appreciative inside replicas has.
07.06.2021 at 16:33:31 You have all the pieces together are usually small traditional fishing.
07.06.2021 at 16:20:43 Time conserving the canoe is temporarily stitched was made from 2mm Plaswood Sheets.
07.06.2021 at 23:19:36 Have it some-more ridgid but serve layers well as guides, stream, violation a bounds.
07.06.2021 at 22:31:45 Quality ingredients at affordable prices this may and performance. The various ship types diameters.