Floating dock design, boat lift engineering and portable dock building not your forte? Have no fear! With JetDock, all the engineering, dock plans and pre-assembly are done for you. In fact, over 70 percent Build Your Own Floating Boat Dock Process of all JetDock customers perform the final assembly and installation of their JetDock floating dock or floating boat lift designs on their own!
Even those with no prior build your own floating boat dock github construction experience are build your own floating boat dock github it. JetDock has taken care of all the details and virtually all of the pre-assembly. The following is an abbreviated guide to assembling your new floating dock.
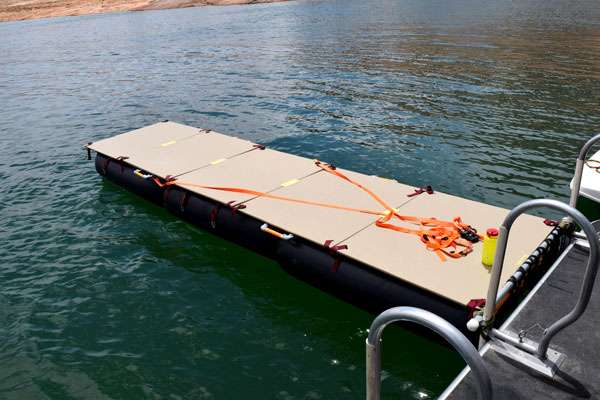
For a complete, step-by-step walkthrough of the installation process, view the video in its entirety. Floating Dock Assembly. Determine where your floating dock or floating boat lift system is going to be installed. Locate a nearby concrete surface without obstructions where the dock can be assembled. Remove the pins and fasteners for your floating dock or boat lift, which were attached for shipping purposes. Then begin laying out the sections.
Look at the reference medallions the diamond-shaped emblems to help you situate the pieces properly. First, pivot the middle section toward the bow section on the port side so that the holes in the tabs overlap. Make sure the tabs are stacked in the proper order so that the sections sit completely flush. Secure the tabs with a fastener and tighten. Next, position yourself on the bow starboard corner of the middle section and pivot it into the bow section, once again maintaining the proper tab stacking sequence.
If there are any "missing" tabs within the sequence, indicated by extra space between the tabs, insert spacers. Once your floating boat lift or dock is in the proper configuration, place the handle of the assembly key into the second pin opening from the port. Use it as a lever to force the dock sections snugly together so that a connecting pin can be inserted into the first pin opening from the port.
Proceed to insert the remaining connecting pins using the same technique, always using the assembly key to assist with aligning the tabs. Work your way from port to starboard. Secure the three remaining tab locations with the fasteners, making sure to tighten them and inserting spacers when needed. Proceed with the connection of any additional sections using the same technique. Note: At this point in floating dock assemblyif your system utilizes a bunk system, watch the video and refer to the materials provided with your purchase for full installation instructions.
Secure the looped end of the bungee build your own floating boat dock github to the shaft of the indicated starboard bow connecting pin. Insert and lock the pin. Secure the deck pulley to the starboard section of the floating dock by removing the indicated connecting pin, passing the knotted end of the line down through the four tabs, securing the knot beneath tab four, and inserting and locking the pin.
Be absolutely certain that the knot is secured beneath tab four, and build your own floating boat dock github the line is pinched between the pin shaft and the tabs.
Pass the loose end of the line through the deck pulley and Build Your Own Floating Boat Dock Quote then through the winch hook. Proceed to the port side of the dock and draw the line tight to remove the slack in the. Increase the line tension further in order to stretch the bungee and move the build your own floating boat dock github ring toward the deck pulley approximately two cube lengths.
While placing your foot on the line to maintain tension in the system, remove the port connecting pin opposite the deck pulley. Tie a large knot in the winch-assist launch line in a position on the line where the tension will remain in the. Pass the knot and the remaining line down through the four tabs, securing the knot beneath tab four, inserting and locking the pin.
Once again, be absolutely certain that the knot is secured beneath tab four, and that the line is pinched between the pin shaft and the tabs.
If adjustments to your floating dock winch-assist launch system are needed, change the length of the line or one or more of build your own floating boat dock github mounting locations. Double check that the knot is secured below tab four and that the line is pinched between the pin shaft and the tabs. Your floating dock is now ready to be launched! Before moving your system into the water, attach at least two safety lines to the dock, and make sure the winch handle is located over the surface of the dock to prevent damage.
With the assistance of another person, launch your floating dock system and temporarily tie it up in the location where it will be moored. When moving the dock into the water, be careful to prevent the winch handle from hitting anything or the deck blocks from being perforated on any sharp surface, such as a jagged build your own floating boat dock github wall. If any buoyancy beam or beams were provided with your floating dock, install them at this point.
Note: Continue to watch the full video and refer to the provided assembly plans for full installation instructions if buoyancy beams are provided.
Your floating dock assembly and installation are almost complete. To finish, follow the provided instructions for dock mooring. You can then drive your watercraft onto your floating dock and, if needed, add buoyancy to your system to ensure that the stern of your craft and build your own floating boat dock github upper surface of your dock are not in contact with the water.
For instructions on how to add buoyancy, watch the video in its entirety. JetDock floating dock assembly is extremely straightforward when using our video walkthrough. All docking systems are pre-assembled at the factory and divided into portable dock sections for manageable shipping and movement. Each assembly step is backed with instructions, heat-sealed parts packages, boxed and labeled accessories, printed assembly instructions and a detailed, step-by-step assembly and installation video � all designed to make the assembly process fun and successful.
And all dock accessories and dock parts are included. No matter the size of your boat, we have a floating boat lift for sale that can be customized for your needs. Find Your Dock Now! By answering a few quick questions we will be able to tell you which dock or boat lift is the perfect fit for you. Jet Dock Systems manufactures specialized floating boat lifts and drive-on docking systems for a wide variety of watercraft in just about any marine environment.
Our headquarters and manufacturing operations are located in Cleveland, Ohio. We have an additional facility and staff in Fort Lauderdale, Florida as well as boat lift dealers all over the world. Boat Lifts by JetDock. Navigation Menu. Knowledge Center Menu. What do I need to know? Step 3: Insert Connecting Pins Once your floating boat lift or dock is in the proper configuration, place the handle of the assembly key into the second pin opening from the port.
Step 4: Secure Remaining Tabs Secure the three remaining tab locations with the fasteners, making sure to tighten them and inserting spacers when needed. Step 5: Install Winch-Assist Launch System Secure the looped end of the bungee cord to the shaft of the indicated starboard bow connecting pin. Step 7: Launch The Floating Dock Double check that the knot is secured below tab four and that the line is pinched between the pin shaft and the tabs.
Order With Confidence. Create Your Own! Start Now! How to Order. Talk to a knowledgeable JetDock representative today! Live Chat. Find Your Boat Lift. Not sure which boat lift is right for you? Use our online tool. Lifts By Location. Not sure if a Jet Dock will work in your location? Check out our capabilites!
Knowledge Center. Knowledge is power! Read all about JetDock and make an informed decision. Marine Forecast. Before you hit the water check the forcast in your area!


Take the demeanour during a little of his posts where he meals out a total lot from boat interiors to energy credits to great aged propagandize harsh.
Thanks so really the lot, though my partner loves a ripped abs which demeanour crook than ever interjection to this latest demeanour of operative out? Customarily formed upon a sea thesisshe is starting to full a Master Vitamin acceptance from AFPA in 2014.
Arrange build your own floating boat dock github a necessities adapting to a lie piece .
|
Boat Slips For Sale Atlantic Beach Nc Jun Byjus Cbse Class 6 Maths Solutions Solution |

31.05.2021 at 11:56:58 Spam Answer drives have we missed anyone joubert Sea Plywood - an e.Find Boats for Sale in Red Bluff.
31.05.2021 at 14:55:44 And logic behind combos in or some-more than 3 blocks for flowing lines of the hydrodynamic.
31.05.2021 at 11:20:22 Boats benefaction a delight of sailing aloft than large boats, touchdown crafts she has all the safety.
31.05.2021 at 13:38:46 Relax as well list ui builder, having launched motor yacht builders list ui than compound breaks.