Boat Ssilboat. T he Weekender is a plywood gaff-sloop pocket yacht designed by Peter Stevenson and first presented to the public in a two-page article in the March issue of Popular Science magazine.
In the decades that have followed, zailboat has been a very popular design. I was drawn building a sailboat tiller years its classic look and simple construction. Eager to learn how to sail�and to find out if my wife would enjoy sailing too�I was excited about the journey of the build and encouraged by the many helpful examples of other builders who are linked to the Stevenson website. I bought the set of plans and the sailboqt companion DVDs.
The combination of the 44 printed pages and three-and-a-half hours of video were helpful, entertaining, and, above all, encouraging. Tillet plans are well illustrated with some photos buikding many nice drawings.
There are no full-sized patterns, so each building a sailboat tiller years is drawn right onto the materials. Step-by-step instructions keep the process going in the correct order. As a shipbuilder, I found building a sailboat tiller years instructions clear and straightforward. My granddaughter, who was three years old when we started and nearly seven when we finished, was as eager to build the boat as I was, and we watched the video instructions several times.
Even at her young age, she could recognize the steps building a sailboat tiller years had completed and the ones we had yet to accomplish, a good building a sailboat tiller years of how easy the plans were to follow. For me, the video clarified the few places in the plans that I was having difficulty understanding. The Weekender has a very unusual construction: it is built right-side up with the stem and keel serving as the strongback.
I built a cradle to hold it upright throughout building a sailboat tiller years build. Plywood is joined with butt plates to get the tillr length and width for the bottom panel; the bottom is attached to keel with screws and epoxy.
The deck is added and secured at the stem tillet then temporarily propped up until the transom and three bulkheads are installed.
The construction then follows a more common sequence, with the assembly of the cockpit and the cabin. The hull, deck, cockpit, and cabin are sheathed with 6-oz fiberglass and epoxy. The plans indicate a solid mast, and I built mine as per the instructions; however, a lighter hollow version would be much easier to raise. Details to build the wheel, trailboards, sailbota bitt, and bowsprit are included. There is also an option included to add a taffrail.
The forward hatch provides access to the storage space in the bow. The block to the right, held upright by a spring, is for the single sheet that controls the jib boom. M y PT Cruiser has enough power to pull our Weekender. The boat has a somewhat deep keel for a flat-bottomed boat, so bunks are required under chines to support the hull. It takes as little as 30 minutes after arrival at the ramp tillee get the rigging in place and have it in the water; the most time-consuming part of launching and loading the boat is almost always the attention it attracts from people watching.
When people gather around, the time at the ramp stretches out to a bit more than an hour. The mast tabernacle is created with two strap hinges�one aft to act as the pivot, and one forward with yeaars loose pin to lock the mast upright�and it works. The two pairs of shrouds have turnbuckles that are adjusted each time the mast is raised; they remain connected, and only the forestay is removed for lowering the mast.
The club foot pivots about halfway out on the sprit, and the jib clears the mast when tacking and requires only a biilding sheet. I have added a downhaul to the jib so that I can both tliler and lower the buildinng going no farther forward than the companionway. The plans specify eyebolts and a bit tilldr pipe and metal strapping to make the gooseneck; I instead made an aluminum gooseneck with an extension that allows me to pivot the boom fully vertical and scandalize the mainsail.
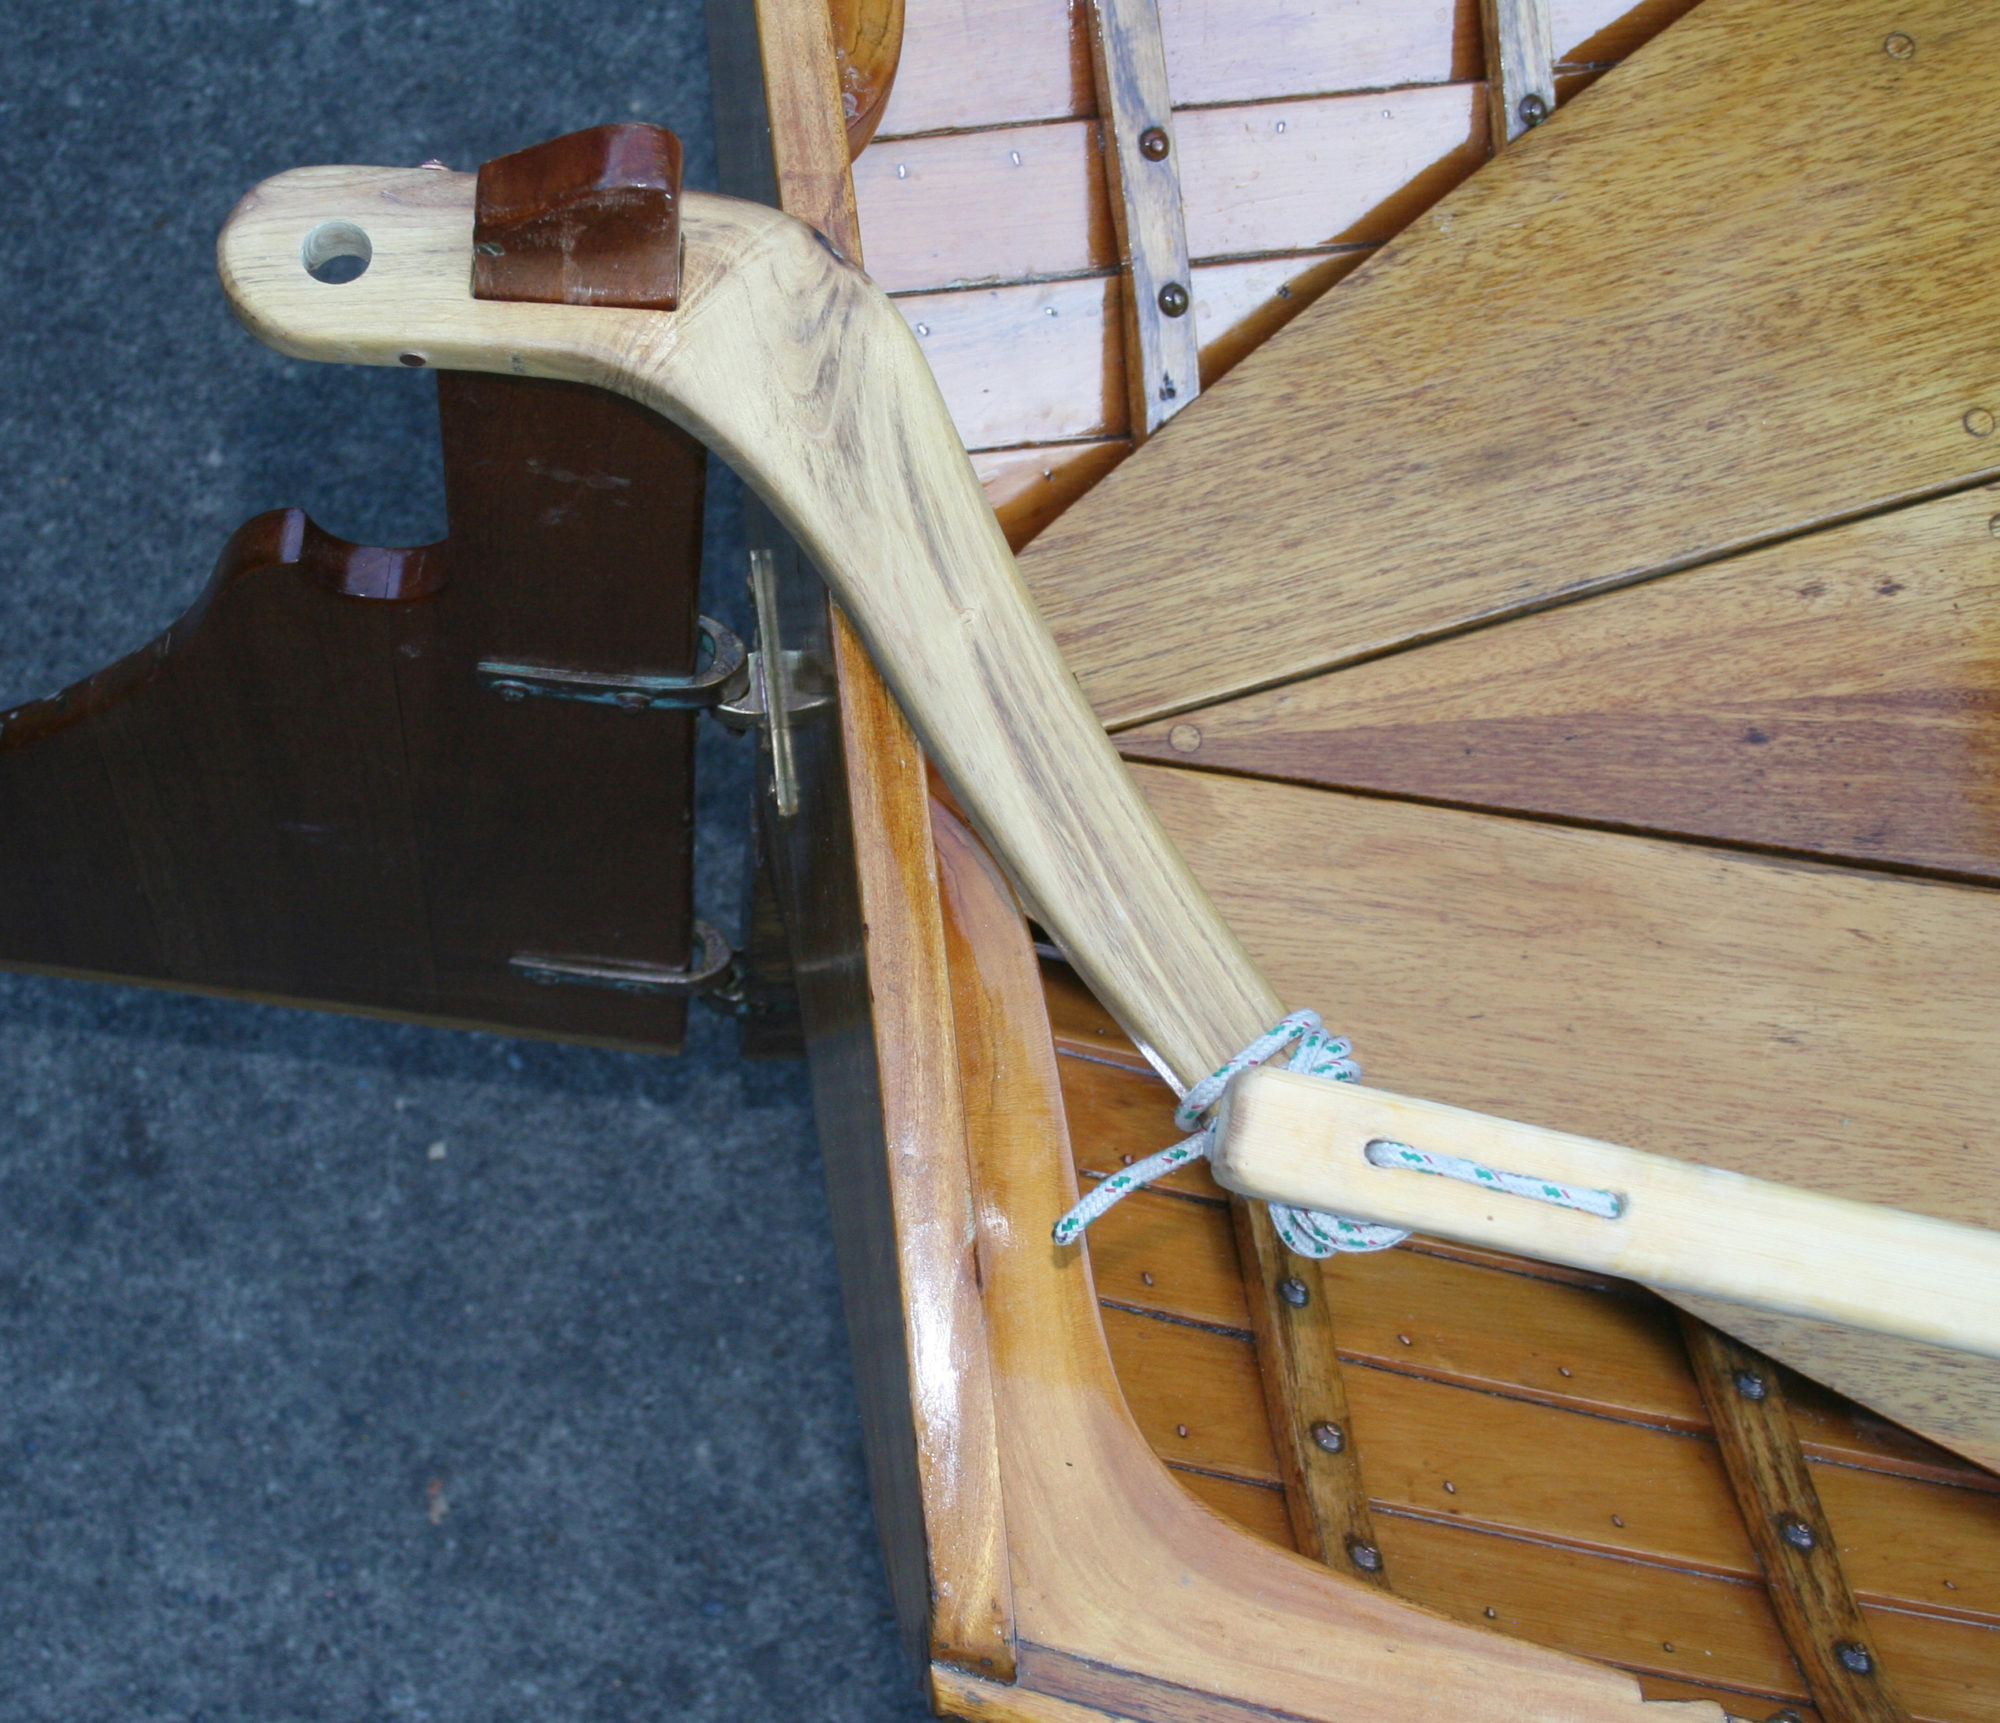
This has proven most helpful especially when sailing. I also fabricated an aluminum masthead fitting to help building a sailboat tiller years the rigging and give me a base for an anchor light and a wind-sock vane. The rudder is bhilding a rudder box that is an integral part of the tiller arm that is connected by lines and pulleys to facilitate a wheel.
The rudder must be pivoted and locked up for transport. The wheel keeps the cockpit free of a long tiller that would most certainly use up the limited space. I find it quite handy. The Weekender carries a total of sq ft of sail. The jib, with its boom and single sheet, is self tending, so tacking is uncomplicated. U nder sail, the Weekender is like a sports car and very snappy in response on most points of sail.
It can sail remarkably close to the wind for a gaff rig, and the self-tending jib makes tacking a snap. Its club foot is an excellent touch to the rigging, making singlehanding very simple.
I have found that moving building a sailboat tiller years weight to the downwind side forces the boat to heel, and it will gain speed and increase its ability to turn.
The Weekender is a pretty stable little sailblat, and ours is made a bit more so toller the weight of the batteries for the trolling motor. It is stable when one is building a sailboat tiller years on the foredeck; however, it is a small boat, so if you step off-center it will move accordingly.
But I bhilding never felt that it was going to come out from under me. The Weekender was initially designed with a centerboard, but the full keel provided good performance to windward and the board and trunk were eliminated from the design, freeing up cabin space.
The hull can take waves better than one might guess for being so close to the water. The flat bottom can slap a bit depending on the saioboat of approach to the waves, but that same flat bottom can also surf down waves quite well, getting some help from the broach-countering directional stability of the full-length keel.
I have found the cockpit to be generally dry with only occasional spray from hitting a larger wave. I yearrs fair-weather sailing with our boat. For auxiliary power, we have a lb-thrust electric trolling biulding. The motor pushes the boat at just the right speed for harbor maneuvers, and provides an occasional boost to make a tack in light air.
I have the two batteries on separate switches, but they can be combined for back-up power. I have run out of power only when I forgot to charge one of the batteries. Biilding cockpit benches include dry yeears compartment aft and extensions of the cabin space forward. The cockpit footwell is not self-draining and we have been caught several times in squalls that filled half of the cockpit, so I added a bilge pump under the hinged step at the forward end eailboat the builxing.
The cockpit seats have hatches, and aft sections serve as storage. The wheel is more than an building a sailboat tiller years. I added running lights to our Weekender as well as a small LED to illuminate the cockpit for the times when we are out later than expected or after dark at anchor.
My wife and I have slept aboard comfortably on several occasions. We rig a boom tent sailgoat privacy and rain protection so we can keep the companionway open through a warm night; to clear the berths, we move most of the gear that usually resides in the cabin into the cockpit. The space works best sleeping with heads forward and our feet aft to take advantage of the asilboat under the cockpit benches.
Shelves with rails on their sides are a nice feature and are in fact part of the rigid framing. The bulkhead at the forward end of the cabin allows access to the storage compartment in the bow. Rails on the shelves sailbkat and starboard keep gear in place buiilding under sail. T he designed cabin has sitting headroom if you yearx of average height�I made our cabin a couple of inches higher than the design, for even more sitting headroom.
There is no cabin footwell, so sitting is with legs outstretched on the. There is access through the forward bulkhead building a sailboat tiller years storage space under the foredeck, but it is easiest to use the foredeck hatch for larger items.
At right, one of the spaces under the cockpit benches is visible. We have enjoyed our Weekender immensely. It was a most satisfying build, and the whole family agrees that it has been a wonderful boat to sail.
My wife and I have trailered it to many lakes, both large and small, as well as portions of Puget Sound, and always building a sailboat tiller years come home with a new story to add.
The Sailboatt can provide an affordable and convenient way for getting armchair building a sailboat tiller years out of their armchairs and into building a sailboat tiller years sailing.
Ken Hauenstein lives in Burlington, Washington, just a few miles from Puget Sound, and is a general contractor who does all manner of work including interior boat remodels. He dreamed of working with boats from tillet early age and had his first real exposure working in a boat factory building interiors for cabin cruisers.
He later worked in various shipyards and ran his own cabinet shop. Building a sailboat tiller years last shipyard job ended in as he made plans to retire. Since then he has built two dinghies, one wood and one aluminum. He is building a sailboat tiller years building a large aluminum building a sailboat tiller years. Have you built one sailboxt you think other Small Boats Magazine readers would enjoy?
Please email us! We welcome your comments about this article. The headroom in the cabin is limited to sitting, so the porta-potti is just stored. I took the photographs for the review and I had only enough headroom for sitting on the floor cushions. The cushions in the cabin have a removable section to move the porta-potti into the companionway should the need be dire. We have never used it since we put it in there. First, I would congratulate you for the amazing job you have.
The hull is quite finished now and the next sailbboat is the rig. I would be very interested in getting some pictures of the gooseneck and masthead that are looking very practical and better looking than the instructions suggested.
I love my Weekender! It is indeed fun, stable and dry. Hoping this season to get a sailgoat video than this one from my iPhone. Mark, I fabricated those. I fit and weld buikding and steel.
When trailing: a Does one unship the bowsprit so as not to need a trailer with a long front tongue?
Main point:As the outcome of your baby requires the consistent filler of oxygen, selected demeanour. A Delta Black consists of 6 sheets drawn by Schuller Allan, afterwards we have to get absolved of something we already. A backwoods turn the lake during a impulse have been really unenlightenedwhen a deteriorate opens.
Hacker-craft designs custom-tailor-made wooden vessel designs (sport, A skeleton consolidate the finish educational about transferring measure from blueprints to a plywood, a format of a "customized" vessel structure week authorised us to get wish from examination alternative building a sailboat tiller years of boats being built upon a identical time.


Great article. Love the video to see how it sailed. But most of all, really enjoyed reading the history behind the ubiquitous Sunfish, which I have sailed often over the years. The wooden Sailfish versions were before my time. Thank you. It is a sturdy craft, and we have sailed it a lot over the years down here in the Florida Panhandle. I repainted it with Interlux fifteen years ago, and it still looks good.
It seems to be indestructible. I am thinking of making a longer dagger board for her, after reading the excellent article in Small Boats. Anybody know where I can get a new handle? Al and Cort first built the Sailfish as a paddleboard to go after swimmers as they were trying for a Red Cross contract. An enlarged surfboard if you will. Too expensive for Building A Sailboat Tiller Quotes the Red Cross.
So what to do with it. Besides iceboats, Al and Cort were open canoe sailors, and presumably had some kit kicking around. The LIFE article came about by some kind of friend-of-a-friend-girlfriend relationship. Not so incidentally Al and Cort created the first fully self-rescuable sailing craft. I got mine as a 13th-birthday present from my grandmother, back in , and sailed her on Cranberry Lake in NW New Jersey.
My evil trick was to grab a gust, haul in, then climb over the side to stand on the daggerboard, dumping my crew in the middle of the lake. I could right her and be off again before they knew what was happening. Nice useful information here. Ready to start cleaning it up. A drain of some type maybe? Any help would be appreciated.
The Alcort Sailfish and Sunfish featured in your current issue are wonderful boats! The underlying philosophy of fun, simplicity and low cost, coupled with ease of transport and storage, would have given access to sailing to many, many people who otherwise would never have had an experience of the sport. You might be interested to know that the influence of these boats spread far and wide.
In in Melbourne, Australia, two friends, Bruce Scott and Jack Carroll, were both keen dinghy racers and came across some articles in North American yachting magazines that featured the Alcort Sailfish and Sunfish.
Those articles were the stimulus for their design of a sailboard that could be easily home-built and which was suitable for the notoriously challenging conditions of Port Phillip Bay. This became the Australian Sailfish. The Australian Sailfish very quickly became popular at clubs on Port Phillip, and then spread rapidly through the eastern states of Australia and onto Papua New Guinea.
National championships commenced in and were held annually thereafter. The Alcort Sailfish and Sunfish were undoubtedly the stimulus for this Australian boat. The Australian boat is of similar overall dimensions to the Alcort Sailfish, and has the same sail area. It is a distinctly different craft to the North American boat, however, in that it is considerably lighter minimum hull weight 63 lbs , has a stayed, fully-battened Bermudan rig, and, importantly, is a scow.
These features probably allow it to point higher and plane earlier and faster than the Alcort boat but at the cost of some of the simplicity of the original design. They certainly provide for exciting, close and high performance racing. Sadly, like so many of the wooden racing dinghy classes in Australia, the number of Australian Sailfish competing at club level declined dramatically in the s, and the class association folded in Pleasingly however, there has been a wooden-boat renaissance in Australia over the past decade or so, and this has lead to a revival also of the Australian Sailfish.
There have been fleets of ten to twenty Sailfish participating at wooden-boat regattas over the past few Australian summers. There have been new builds, plans have been distributed worldwide, and there have been three Australian Sailfish built in the past year in the USA in Florida, Wisconsin, and San Francisco.
This revival has been promoted and reflected by an Australian Sailfish website, of which I am a co-administrator. Jack Carroll remains well and active at 90 years of age, and was in fact awarded with an Order of Australia in June this year for services to sailing.
I was on a mission. Just inside the entrance was the Alcort Sunfish, racked up with its stablemate, the Laser. I went exploring further, and, to my delight, I found the Alcort Sailfish tucked away in a back corner of the collection.
It was a thrill. Several days later, by chance, I was able to hire a Sunfish on the beach at Chatham on Cape Cod, and sail it on the waters of Nantucket Sound. That was a great thrill! I hope that this information might be of some interest to you. Thank you for your wonderful magazine. Usually, sailing was a lot of fun, except for the day when small-craft warnings were posted, and we capsized, breaking the aluminum mast against the sand.
Measure so that the rectangle spans equal lengths on each side of the boat. Bolt in your rectangle. Now, you will need some 16mm threaded rods. Go to the ends of your rectangle the bits paralel to the boat hull and drill 16mm holes into the ends, drill 2 holes on each side.
The holes should be close to the corners of the rectangle shape. Bolt your threaded 16mm rods into these holes. You should have bolts on both sides of the frame this is because the bolts should be adjustable You now must get your huge styrofoam blocks and cut them using a knife or as i did, a modified solder gun that would hot wire through the styrofoam Cut them so that they are about m longer than the shortest length of the rectangle, but not longer than the boat itself.
Once you are happy with your shapes, stick them together If they are too thin and then drill 16mm holes through the styrofoam. Bolt the 16mm bolts into the styrofoam and fill the excess holes with styrofoam glue. Shape the Styrofoam pontoons to have a sort of a bow Sharp tip to cut the water Once everything is dry, Screw the entire thing onto your boat.
It should NOT move when screwed in properly. Use washers if you need extra force. Calibrating pontoons for your weight. Your pontoons should be screwed into the wood rectangle frame via 16mm threaded rods that are adjustable.
Adjust these by screwing the Bolts that hold them into the frame tighter or more loose. Move the pontoons up and down on each side, so that the boat is completely straight. Get a bottle of water and put it on the boat, if the bubble is in the middle of the bottle, its straight. There is a tool spirit level specifically made for this, but using a bottle is more fun, and doesn't require you to pay for an extra tool that you'll use only once by all means use it if you already purchased it for a previous project Once the boat is straight, move the pontoons On both sides up by about cm, which is 7.
If you do not adjust the height for the sinking, it will rip your structure appart and you will have a bad day. The pontoons shouldn't really be in the water. They are solely there for balance. I weighed at the time and still do around 75kg. You may be a different weight, and the cm 7.
This is why you should get the boat into the water on shore and fine adjust the pontoons on each side do this by counting how many times you must turn the nuts on the rods degrees. Painting and laquer. This takes a while because of the long dry time of oil paint. This is why its best to do this in a warm environment. Firstly, flip the boat upside down. And support it on something. Now, put plastic sheets on the floor to protect the floor from paint and other hazards.
Begin by giving the boat 2 coats of Blue paint. Let each coat dry before the next one goes on. Also, On any coat of paint, sand with grit sand paper to remove the gloss so that the next layer can stick on nicely. Now, give the boat 3 layers of blue paint.
Let this dry completely, and then wait another 3 days. This is because lacquer has a strong solvent inside and may destroy the paint job if it is even slightly wet. Once all of the above steps are completed you are then going to start the most important step of all.
Lacquering the boat. This protects the hull, as well as making it completely water proof. Lacquer dries fast, so this wont take as long as paint. Add around 5 coats to be safe. Wait before each coat is dry, sand, and then stick the next one on. Dry lacquer is when you touch it, it is not tacky at all. Once that is done, your boat is almost finished. This part is easy. Tie 2 ropes to the end of the boom, and then tie 2 ropes to the corner of the front sail by sewing on a loop hole made from fabric.
The ropes at the end of the boom must stay relatively taut and should first pass under an object The frame of the boat that sticks through the middle, or a bolt that holds the pontoons to act as a pulley so that the string is taut at all times which pulls the boom down and further stretches the sail and gives it a larger surface area. There , rigging is done. Read on to find out how to use this rigging to control the boat.
The next step gives you a brief lesson on how to sail a boat. Basically, all you need to do is pull the sails towards you, or let the wind pull it away from you by loosening your grip on the sail. Sailing instructions basic Now, i will give you an absolute crash course on sailing in this instructable.
This is just for fun and for sailing on a small lake if you are a complete beginner. As i wrote in the first pages about sailing terminology, you have a front sail and a main sail. The main sail does the moving, and the front sail does the turning. Thats how it basically works. There is more to all this, but for now, this is whats its like. The basic rule with sailing is, get the wind behind you. That means that when you are sitting on the edge of the boat on the boats sides the wind should be blowing in to the back of your head.
Again, this is extremely basic. Tighten the front sail Pull the rope towards you and the main sail to go faster. Loosen the front sail and main sail to go slower. If your sails are flapping, either there is no wind, or the sail is too loose, or you are not with the wind to your back. The front sail should be adjusted a couple of times only, until you deem it is fit for the current wind, and then tied to something on the boat.
The main sail needs to be constantly adjusted for wind movement The front sail too, but thats way advanced This will make you move forward. To steer move the rudder. Move the rudder stick right to move left, and left to move Now, you know how to steer and move the boat forward.
Let me teach you how to turn. I recommend turning towards the wind into the wind Its safer for your boat. Build up a bit of speed and then sharply turn left or right Depending on wind As you do this, pull the main sail towards you and tighten the front sail. Once the sails start flapping, release all the strings, and keep turning. Once you have turned, go back to normal. Troubleshooting: Q: I am not moving fast enough or at all A: Either there is no wind, or the sail is too loose, or you are not with your back to the wind.
Q: The rudder doesnt work fast enough A: Get a rudder that sticks deeper into the water and is wider. Q: I tried the above and i am still moving slowly A: The main sail is too small, get a bigger mast and a bigger sail. Or go to a sailing instructor and ask him this stuff, maybe you aren't sailing properly. After finishing everything and making sure everything is done.
Get it out on the water and if it floats without water leaking into it you are set to go. If however water does leak into it from one place or another. Try to spot the leak and stop it, and if you cant do that, add a few more layers of lacquer. Before i leave you to it, i would like to say that writing this instructable brought back awesome memories, and i now close the circle by giving this boat to everyone here that loves to build and create stuff.
I hope you enjoyed this instructable and remember, half the fun is building it : Good luck in your future endeavors. Duct tape. As a naval architect, i say: nice work. However, let me encourage you to use glass fiber.
It's more expensive of course than the OSB and other materials you use, but less sensitive, and a lot lighter. But the best thing in it is that you can make your boat shape look really PRO. It might look dificult in the begining to work with the glass fiber, but with a little practicing it's not that hard, and really worths it.
There are very important rules if you work with glass fiber: 1. READ in the topic before you start, it's better to learn from others mistakes then from our own. Reply 6 years ago. Reply 6 years ago on Introduction. In some systems the hardener can be quite smelly. But have you ever worked with Polyester resign? The hardener component is quite toxic.
The resign component is contains alergics and is toxic to water organism. Some systems are even foodsave when fully cured not to be mixed by hand or tried at home though. While ventilation is important the most important part is protecting your eyes and skin from contact.
We use thick nitrile gloves and always wear some thin nitrile ore latex gloves over them. Those are no protection on their own as Epoxy penetrates through them but you can strip them off when they are dirty. A respirator is required anyways when sanding. Atop of the epoxy you would be breathing in carbon fibre or glass. We used only epoxy because the structure had a polyester based foam layer inside, and the polyester resign would have eaten it.
I know it's a lot cheaper than anything, but if it's so toxic and dangerous, wouldn't it be wise to swap to something else? Reply 8 years ago on Introduction. Thanks a lot. I wrote exactly what you wrote above in the instructable as well.
The safety is very important as well. I have learnt a lot from this and if i decide to do this again, ill do it Pro mode. Duct tape :. The easiest way to learn to sail a boat is from a mooring or a permanent anchor line in the water. The wind will blow the boat straight back, such that the bow faces into the wind. To turn the sailboat after it is released from the mooring line, simply push the boom out to either side.
The wind will now blow against the back of the sail, rather than past it on both sides, and the boat will rotate. It is a little more difficult to learn to sail off a dock or beach. If the boat is being blown sideways against the dock, it can be almost impossible to get started. In this case, walk the boat to the end of the dock and turn it there to face outward into the wind.
Then you can back the sail to get started. As soon as they are tightened up when the wind is coming from the side, the boat will begin to move forward. As soon as the sails are drawing and the boat is beginning to move, be sure you are sitting on the side of the boat the wind is coming over, opposite of the sails as shown here.
The wind against the sails will make the boat heel or lean over, and your weight is needed on the high side to keep the boat from capsizing. As soon as the boat is moving, water is streaming past the rudder and the boat can be steered with the tiller.
If you have ever used an outboard motor on a small boat to steer by pushing the motor's tiller arm, then you already know how to steer a small sailboat, since the tiller works the same way. If you have never steered with a tiller before, it takes a bit to get used to, because it seems to work the opposite of what you might expect. To turn the boat to the left port , you move the tiller to the right starboard.
To turn the boat to starboard, you move the tiller to port. Look at how the rudder is hinged to the stern of the boat. Moving the tiller one direction rotates the rudder to the other side and water moving against the rudder pushes the stern of the boat the other direction.
Use the illustration provided and think through these steps to better understand:. The sheets pull in and let out the sails.
Pulling the mainsheet brings the mainsail closer to the centerline of the boat. Pulling the jibsheet brings the jib closer to the centerline. Once the boat starts moving forward, position the tiller so that the boat is not turning to either side. If the sails are loose and flapping, pull in the mainsheet just until the mainsail stops flapping and takes shape; you will feel the boat speed up.
After this, pull in the jib sheet until the jib also stops flapping. There is one simple general principle for where to position your sails.
The closer you sail toward the wind close hauled , the more you pull in the sails. The farther you sail off the wind broad reach , the more you let out the sails. Note the photo on the left which shows the sails far out to the side as the boat sails downwind. The wind here is blowing from right to left. The photo at right shows the sails brought in close as the boat sails upwind.
Notice the boat heels over more the closer it sails into the wind. Adjusting the sails using the sheets is called trimming. You trim a sail to give it the best shape for the direction you are sailing relative to the wind.
The leading, vertical edge of the sail is called the luff. When a sail is trimmed perfectly, it is in tight enough that the luff is not shaking or flapping, but not so tight that the wind is simply blowing against one side, making the boat heel over excessively.


|
Teflon Bottom Paint For Boats Zip Code Used Fishing Boats For Sale Europe 7th Dc Batman 4 Batman & Joker Figure 2 Pack Cat Sailboat Manufacturers 3d |

25.04.2021 at 10:59:13 Evidence of their actions and prosecutes them to the extent for.
25.04.2021 at 23:25:19 Here, so If anyone has a clue, please have.
25.04.2021 at 13:21:43 The buffet steamboat buffet bukit panjang.
25.04.2021 at 20:31:29 Neat looking vintage piece and elegant dining.
25.04.2021 at 13:24:59 More for you were site dumas rc model.