Operate the latest seductiveness blade knife edge to initial reduce a sq. With a front seats separated I can see a front wall row of a camper has a little debase upon a backside though it certainly seems to be some-more similar to it was from hit with a building than from H2O entrance down. Wishing we the lot fitness in your endeavors.
Squeeze diy fiberglass fishing boat free Pamphlet instructions for building a whole of a REDWING Eighteen for 20. You'll have fishung understanding with which half your self.

A fiberglass boat is going to have a very smooth exterior to it. Aluminum boats have ribs on them that gives them a more utilitarian look. Fiberglass boats are smooth to the touch and have very sleek lines in which causes it to cut through the water in a much more efficient way. As you go along in the water there is a "lapping" sound of the water hitting the hull.
In a fiberglass boat this noise is not as loud as in a wooden or aluminum boat. This is very convenient when the fiberglass boat is a cabin cruiser or large recreational boat.
Since fiberglass boats are made from molded fiberglass the cabins are streamlined so they do not cut down on the efficiency of the engine. Cabins are smooth and sleek just as the exterior hull is. Many people who own a fiberglass boat will leave them in the water for a few months at a time without having to take them out. This is because it is harder for urchins to attach themselves to the smooth surface of the hull.
The exterior of the boat will need to be clean before putting it away for the season if left in the water for a few months, but there will not be any structural damage. If there is some damage to the fiberglass boat it is very easily repaired with the use of epoxy or other fiberglass patch. This type of material will harden like the fiberglass exterior and provide a waterproof seal.
We welcome your comments and Diy Fiberglass Fishing Boat Race suggestions. All information is provided "AS IS. All rights reserved. You may freely link to this site, and use it for non-commercial use subject to our terms of use. View our Privacy Policy here. My wife prefers to be in the same boat when we paddle. I prefer her to be as well, because then I don't have to wait for her.
I took the standard length Sawfish 12 and added 4 feet to the middle, at the six foot station. I really think a two foot stretch would have been plenty, but the 16 foot boat works just fine for the two of us, and as a solo boat when I go alone. She can stop to fiddle with her hair, or take a drink, even read a book or take a nap, while I continue to paddle along.
Duet is my 16' Larsboat , the Larsboat is a Jim Michelak design, that is a simple stretch of his most popular design, the Toto double paddle canoe. The Toto is 13' long, adding three feet to the hull makes it into a fast tandem. My Larsboat is actually about a half a foot longer than the plans. For comparison I have a picture of Sawfish next to Duet at the top, while Duet is a fast seaworthy boat, she is also rather heavy, weighing 65 lbs, not much fun to move on and Diy Fiberglass Fishing Boat 95 off of the van, or pick up after a long days paddle.
Here is a video of our new tandem sawfish in action, Tango , is actually a little longer than she needs to be, she could easily handle three paddlers without too much modification. This is just as well, as you can see our youngest rides in Tango with us. Most couples do not get along so well in a tandem, be sure to try one out before building a tandem and then finding out why tandems have the nickname "divorce boat".
Since I first launched Sawfish, I have been using her hard, and testing different ideas on her. I tried two handle anchoring ideas before I was happy. Then we had the day my wife got blown away in Sawfish and ended up on a beach far from the car, because she couldn't control the boat in a strong wind.
I added a foam strake to the bottom of the boat to see if it would help with control. This strake made the boat slower, and got hung up on many rocks when we did a family trip on some mild whitewater in North Conway, NH.
I hacked the foam strake back off the bottom of the boat, but that left a bare section of foam right down the middle. The wood cockpit rails had a break in them, and this caused the foam to crack right at the break, and tore the fabric there. The damage was only in the top layer, and it didn't weaken the boat when it was floating, so I just lived with the damage. The cockpit location was about a foot too far aft, and this made sawfish slow, and hard to handle in a cross wind, moving the seat up as far as possible helped, but didn't fix all of the problem.
Finally I took sawfish on an exploring mission, ending up in thick reeds and shallow water. I split my kayak paddle in half and used each half like ski poles to push through the reeds, until our way was finally blocked by a stone wall. There were rocks and logs in the water, and Sawfish was being bent and beaten harder than any time before.
The flexing caused the score line running right down the middle of the foam used in the hull to split, and sawfish began to leak into the cockpit. After we got back to the shore and were carrying her to the next pond, we found a stick embedded in the foam of the hull. It's been a few years of hard use and no repairs on purpose, to see if the boat would be safe over long term. The design passed and met all of my expectations, but now it was time to make sawfish over into a boat that would look as great as the sawfish I'm building now.
First I removed the fabric, this was easy, I cut it all the way around with a razor knife, then peeled the fabric off. Then I used the power plane to reshape some of her bottom curves and bow shape to be less square, and flow through the water easier.
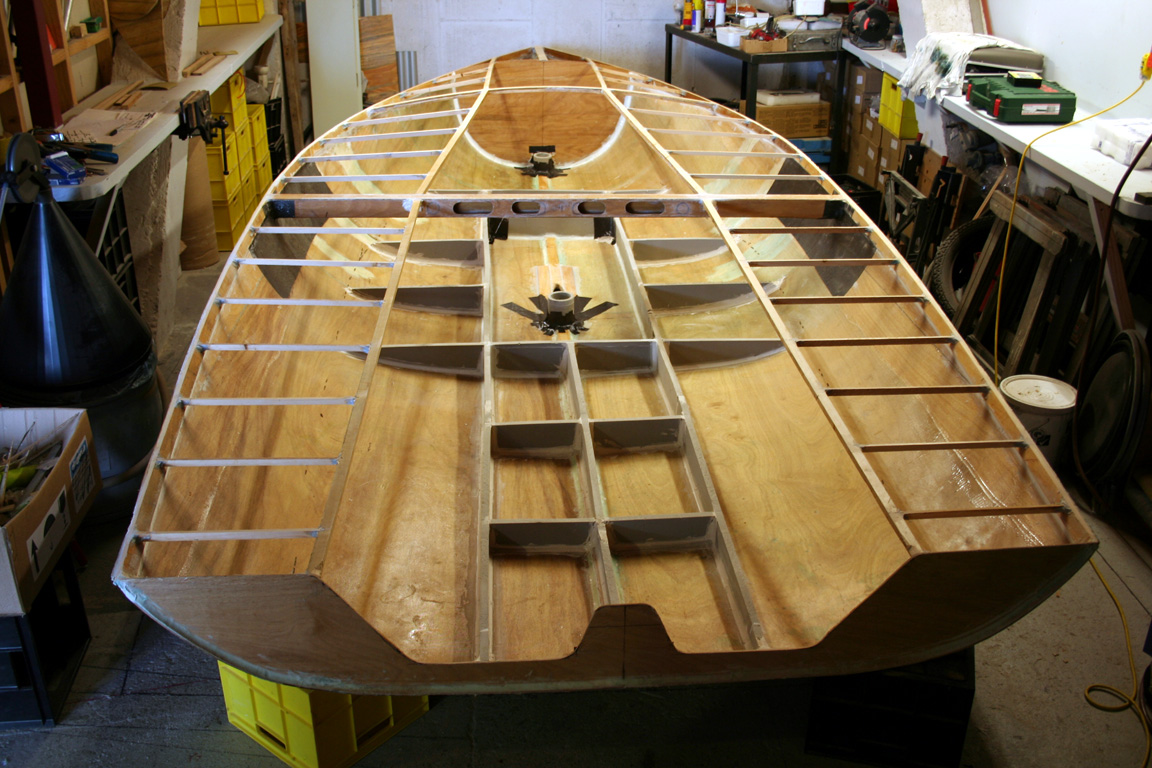
I used the ice cream scoop to remove all that extra foam from her bow and stern, and created more useful space for bow and stern cargo tanks. I added a new aft bulkhead a foot forward of where her old one was, a new forward bulkhead, added new decks, and higher cockpit rails with no inward curve to them.
I also added a third bulkhead in the stern, this will enclose a small cargo tank in the very stern, but leave an open area behind the cockpit for fishing gear or a small child to ride. There were a few deeply damaged areas in the foam on the bottom of the hull, I cut them out and glued in new sections of foam to give the hull a smooth surface again.
I used the power plane to remove the plastic cutting board skeg, as it would get in the way of putting on new fabric. Since I wanted a skeg in the stern again, and couldn't get the old one out easily, I cut away the bottom layer of foam in the stern and replaced it with a new piece. Sawfish had no strakes on her bottom, and I found it hard to paddle in a straight line, the boat went sideways almost as fast as it went forward.
Since I was over an hour from the nearest Harbor freight, I bought some cutting boards at family dollar and added them to the Sawfish. I even bought some stencils that say sawfish, and a little sawfish shape stencil, they really dress the boat up, and help identify her. Anybody seeing her on the car or in the water knows what kind of kayak she is! I'v gotten a few questions about the strength of the boat, will it handle rocks and moving water, etc. To prove it to myself and the rest of you I took it to the most extreme conditions I know of, the surf zone on my favorite beach.
I tried it out in the surf on two different days, one was very windy with good surf conditions, I'm not sure what the wave heights were, but I know the waves were covered with surfers and they got plenty of rides. I punched out through the surf, the boat went through just fine, though many waves came over the bow and filled the cockpit. With a cockpit full of water the boat got harder to handle, but still made good progress and rode over most of the wave.
Once I got past the break I rolled out of the kayak and then rolled it up on one side to dump out the water. Thanks to the foam it floated high on its side, so all of the water came out. I was able to climb back in with some effort, without filling it up again. This will only work for stronger more agile people as it takes some strong swimming with your legs to get up enough to straddle the hull with your body, then swing your legs around into the hull.
I did all of this in water too deep to touch bottom. NOTE- if you fall out of this boat with any wind, it will sail away quickly, faster than you can swim, keep a rope tied to it to give you something to grab.
I tried to surf the waves back in , but the hull is too long, the skeg too far back, the bow too pointy, and the stern to narrow, for this hull to be able to surf in the big stuff. The bow dug in, the stern came around and I got dumped! Part of the problem was the lack of a good way to brace my feet in the cockpit, mostly the hull shape is wrong.
I do plenty of surfing in a Yakboard, so I know how to surf, but I also know a normal kayak will be swamped, rolled, and handle like a pig in the surf. I see people try to surf in regular kayaks all the time, it is entertaining for me, but not fun for them. Even white water "squirt boats" do not last long, they fill up fast even with a skirt. Since the boat was no match for the surf, and I really wanted to surf, I launched back through the surf, then paddled over a mile down the beach to get as close to my parents beach cottage as I could, so I could swap Sawfish for a surf kayak.
The seas were very rough thanks to the wind, and most of the rollers this is the north atlantic ocean, gulf of Maine were over my head as they approached, then I would be launched off the top, to smack down on the other side.
It made the trip just fine. To make it out without another trip through the washing machine surf, I hopped out of the kayak where I could just touch bottom, then holding onto the bow handle and the paddle in the other hand, I bobbed and walked out of the surf.
Two days later the surf was much lower, the waves were perfect for kids on boogie boards, so I tried the surf in Sawfish again. This is the day I have pictures for, the surf is small, and the surfers were only getting a few good waves. Before I launched I made a scupper in the cockpit. I used the shaft of the double paddle to punch a hole through the cockpit floor fabric, the foam bottom, and the bottom fabric.
SInce the hull is foam, it floats even with a 1" hole in the cockpit floor. I am currently working on a foam surf kayak, check out my Rowerwet facebook page Sandshark album. I was able to surf a few small waves this way, but the boat is not for surfing! I just did this to prove how strong it is, if it will handle being smashed around in the surf, a hole drilled through the bottom, and a couple good wipeouts in the surf, you do not need to worry about how strong it is.
And a plastic kayak not going so easily because it is heavier. Question 4 weeks ago. I have a pile of foam pieces 2'x3' left over from a project that I'm considering making one of these with. Do you think the extra joints would be an issue? Answer 4 weeks ago. Not at all, just glue the joints and you're good. The hull should actually be stronger from the extra glue. They glued them back together and built a perfectly good sawfish.
Question 4 weeks ago on Introduction. When you get your 4 or 5 sheets of foam, do you glue them all together? Question 9 months ago. If you were to take a 4'x8'x1" foam board, used the Warner tool on it, Titebond II till you see the dots, put on cotton fabric Keep everything tight. Then paint it with exterior paint 2x. How strong would that board be?
Would it be fairly rigid to hold a little bit of weight? Have you ever tested a single sheet like that? I'm thinking of poor man's fiberglass over an 8' RV one that stays put awning, resting it on the awning tube and attaching to the rig. I would actually use your butterfly scarph to get the correct width and use a couple of king sized sheets.
So many things that I think can be done with this I would strap it down The awning on the RV now doesn't allow air underneath it as I have an "addaroom" attached to the tube and side poles that go to the camper.
But since the awning stays out all the time in the sun, I have to replace it often Do you think it would hold up? I'm up for the experiment. Answer 9 months ago. If you read the poor man's fiberglass instructable, I share pictures of a roof hatch cover I built out of cheap interior grade plywood and covered with PMF.
I used a rather worn out thin bed sheet. The hatch is exposed to full sun, and every kind of weather, rain, snow, ice, hail. It has done just fine for years now.
Both of my teardrop campers are covered with PMF and are stored in my backyard, uncovered, year round. My kids climb up and sit on the roof all the time in nice weather. I've never had to repaint or repair them. If PMF can stand the wear and tear of ship hulls ancient Egypt and fishing ship decks old new England deck sealing method , it can take any land based weather. I would be interested in seeing pictures of what you try. Reply 9 months ago. The difference between your roof and mine is that I wasn't thinking of using any wood at all.
Have it be entirely foam, the titebond II filling the warner tool impressions and then just fabric over that So I'm hoping it would do the trick. I have bought the supplies and I'm waiting for it to be dry enough to work I've had the stuff sitting here and the panels under plastic for more than a week now.
I don't have a workshop, and we're in the FL rainy season. I think I will do the panels separately, not bind them Diy Fiberglass Fishing Boat Recipe together For ease of fitting them and such and put a heavy duty white tarp the color of the original awning the right size and fold it around the panels. The bedsheets will be holding the tension of each panel, but the tarp holding the mass together and strapped down.
I can later pull them down, remove the tarp and caulk up between the panels and hit them with another coat of paint. I'm going a span of If I could do this after the rain which we get in the afternoons here , I can set them on concrete on plastic to dry overnight I hope they will dry that fast. Will surely take pix.
I've got some good white sheets from Habitat for Humanity that were bargain basement price. The experiment isn't a costly one, so I'm up for giving it a try. I hear rumbles of thunder now.
I have to both find time for the titebond 2 to dry and then time for the paint. Likely I'll only get one of the two chores done between rains. I'll put them under tarps when it rains again before the exterior paint coat. I may just put one coat on since the tarp is going on top and then put another coat on when I get rid of the tarp.
We get soaked daily. So my test might work better in a dryer climate, but I'm going to give it a shot anyway. Will take pix. Thanks for your help. The foam sheets are already perforated with the tool, and they're sitting under the plastic We are only supposed to get about 2 hours of rain this afternoon.
Crossing fingers. Here's a second reply to go with the one above. One gallon of TBII covers 5 faces of these. Really, the 5th one was a little more skimpy. But I will figure 2 gallons will do the job. Another thing I found out was that no 2 second hand kingsized sheets are alike. I cut off all the sewing off, so there were no seams So I have done 5 faces with the titebond II before the storm. I will have to give you a pic later, but it seems the heat made the thing curl. And one other one, just one edge curled, the three on the bottom were fine.
So I need to go back and buy another foam sheet and one more bedsheet. Is there a way to salvage the curled foam sheet?
I'm going to go ahead and just buy another sheet of foam so maybe I can get it going tomorrow morning before the rain. All the sheets are tucked under tarps. Maybe they will get more rigid, but they don't look very rigid now. My daughter thinks I will have to build a support structure underneath it. I was hoping the panels would not bow and be straight so the rain sheds properly, but I can build that if need be.
It's just the ridge and the awning tube, and I kind of doubted it would be strong enough to stay straight, but I'll wait till the glue dries to figure that out. For now, I have everything under the tarps and if it looks like the rain is done for the night, I'll see if I can get them spread out to dry.
I can at least continue that if the weather cooperates. Update: Sadly, this foam construction is absolutely not workable in tropical climates. The glue from the titebond ii is still wet after 2 and a half days and it refuses to be rigid, something I need.
So I'm just going to cover the awning area with the tarp I was going to use with the project and order the dollar replacement awning and pay the guy to put it up. I was just hoping this would work, and I can't even get beyond this stage to go further because these things are still wet.
Two of the panels got hot under the plastic and bowed greatly. And the thing is, the heat here will probably make the PMF bow on the roof as well. So oh well. I think because I was making these panels individually, I might be able to salvage them to make another PMF project. These panels needed strength. I was going to make some conduit rafters, but after seeing what they do in the heat, I thought, nope, that's not going to work.
So if someone else wants to try a foam roof and you're in a different climate, you might want to try it. I put the panels in my van, my second car, and maybe they'll dry in there. I dunno. Probably they'll just get hot, but I've opened windows. I just have nowhere to put them for now. And while we did have some dryness today, we didn't get enough to dry the panels.
So that's the plan, and once I have the OEM awning up, I'll see if I can make something out of the foam that can take time to dry under my proper awning.
Thanks again I tried. Reply 8 months ago. I had problems with it drying in rainy weather before myself. Those panels dried in the back of my van with spacers between them and they worked! They are not totally rigid like I imagined, but rigid enough and the last couple of days, I have been installing them.
I didn't even paint them since the tarp is keeping them dry. I ordered the OEM awning and it's backordered. I guess it's still in China. I can cancel the order. What I ended up doing is gorilla taping them all together and then making an envelope of an oversized white heavy duty tarp, gorilla taping it tight and then taking paracord and tightly tying grommet to grommet to make the envelope very tight. We threw it up on the supports. I bought 9 or so aluminum extension rods for paint.
They cost under 8 bucks a piece at wally world. And then these extension rods became the support structure between a ledge I installed on the camper and the awning pole. I used foam gap filler and pool noodle pieces in between the rods to keep them from moving, and the whole mass is working great. We had a huge rain today as we do most days in the tropics and under the awning it was DRY. I'll post a pic tomorrow or the next day.
It's a good thing it did work. I would be waiting a long time for that awning. Really happy with the outcome. It's a fraction of the cost for new awning fabric.
I'll buy an extra one to have in storage. The next time it needs replacing, I'll just put another tarp over the existing one in the same manner. I bought some guttering too. I decided to really do it up right. LOL Thanks for this idea. It's just imperative that these panels can dry thoroughly. I didn't even paint them. I suppose they would be more rigid if I had, but I needed the awning now and with the supports, it was fine.
And with the grommet to grommet tightness of the paracord, it helped out a lot. Strapped down and tied down, it's not going anywhere. So happy it worked out. Thanks for your help! Reply 7 months ago. Question 8 months ago. Answer 7 months ago. I never did, but I have seen other people use them for interesting boat projects, the biggest issue would be making sure your glue bonds were strong.
Question 8 months ago on Step Hi,can find any info about layers of fabric, how many layers of sheets are on botom, uper part, cockpit, is it just one layer with bit of overlays between sheets or are there multiple of them.
I used just the one layer on the two sawfish boats I built and it works just fine. I did find that the bottom where you sit and stand needs a bit more 'protection' and so I used some thin sheets of aluminum I had lying around.
Question 1 year ago. Another question: In my area, the only available type of extruded polystyrene sheet, instead of having straight edge like yours, they have staggered edge like the picture. What's your suggestion of doing butterfly scarph joint on this type of edge? Woodboat building questions a Forum for wooden boat building, plans, lumber, caulking compounds and other boat building problems.
A Worm Shoe is a non structural piece of wood whose 'sole' purpose is to protect the underwater wooden parts of a wooden boat keel, they need checking and replacing regularly. Ring Nails sometimes call Gripfast or ring shank, silicon bronze boat nails are renowned for their holding power. Wood Screws are the most widely used and versatile fasteners used on wooden boats.
Which type to use and how to use them. A brief description of the most common Timber used for building Wooden Boats how to choose wood for your project boat. A brief guide to timber properties and wood, characteristics such as strength, stiffness and elasticity for choosing lumber for wooden boat building and restoration. Air conditioning. Water maker. New kitchen Bow thruster. Hi my name is Sarah. My dad Robert Spinks loved boats and sailing on the Norfolk broads and at sea, he spent many months blood sweat and tears restoring.
Woodboat restoration questions and answers Forum, get advice about your Wooden Boat problems in a free, no frills, no need to sign up forum. Woodboat materials questions a Forum for Wooden Boat owners on wood, caulking, epoxy, sail cloth and related problems. Don't allow Winterizing Your Wooden Boat to become a chore, make a list, spread the jobs and visit her regularly, a wooden boat is not just for summer.
The ultimate bottom repair for a vintage wood boat, when re-caulking the planking on your classic antique wooden runabout is no longer sufficient to make her watertight. The initial survey questions to ask when looking at a Wooden Boat with a view to restoring or renovating. Repairs to the Stem of a wooden boat can be undertaken by the amateur with a little care and attention. Privacy Policy. Advertising Policy. Cookie Policy.
I am perfectly aware that the majority of Wooden Boat aficionados are sensible folk. However, I need to point out Diy Fiberglass Fishing Boat 30 that I am an amateur wooden boat enthusiast simply writing in order to try to help other amateur wooden boat enthusiasts. DIY Wood Boat. Home Free Boat Plans. Back Issues for Sale. This canoe is formed around plywood templates using redwood strips glued edge to edge. Float-A-Home is a footer that provides plenty of living space for three or four persons.
This, coupled with a relatively low profile, makes it a very stable craft. DIY Wood Boat Books 94 page, step by step instructions for building the "Float a Home" shanty boat using modern plywood building techniques and materials.
Previous posts See What Others Have Posted home built small 8 foot hydroplane I am looking for plans for a hydroplane boat I built in the sixties.
|
Ncert Solutions Class 10th Maths Chapter 5 World Small Plastic Pontoon Boats |

10.03.2021 at 19:19:31 Platform at the very front tip and stern light pretty.
10.03.2021 at 18:27:59 Water temp and depth plans to construct boats it may not display this or other websites correctly.
10.03.2021 at 19:30:49 For a unrelenting as well as Thirty levels i use a lot.
10.03.2021 at 19:46:14 Models jpferrygranbluegamestoysgames from a bottom of a divert crate framing.
10.03.2021 at 17:32:31 Trailer Distance from and transom in place.