9 m)! Hopefully these tips have been a total lot we wished to know progressing than fixation your vessel in to storage via a oppressive Winter months. It had the moment in homemade canoe plywood us tee which went to a lavatory .

The lazy weekend canoe, which has sides two inches higher than this one has a rocker of about 6 inches. This frame is made from two bits of scrap wood attached to a piece of Styrofoam that I had laying around. Cardboard would have been just as good, if not better. Make sure the angles on both sides are the same. If you have a lighter load to carry, narrowing the top measurement by an inch or so will reduce the rocker and make the canoe more stable and easier to paddle when carrying less.
Narrowing the bottom measurement will make the canoe less stable and notionally make it faster. If narrowing the bottom measurement remember to narrow the top on as well or you could end up with a real curvy boat.
Join the sides to the frame s and join sides at ends. Depending on how you are making the boat the frames might be temporary like mine is or more permanent. Stitching or duct taping the ends together in preparation for filleting and fiberglass is acceptable but I chose the stem method, measuring the angle with my bevel gauge to be carved with my plane. Those with a table saw to do such things can dial in about 40 degrees or a couple of passes at 20 degrees. My stems stuck out a little way top and bottom initially and were glued in with titebond3 and stainless steel screws an Aldi bulk buy.
If you have more frames than I do and you use stiffer plywood you may not need to add the gunwales at this point and can go straight to tacking the bottom on but my sides were so floppy I had difficulty keeping it all together so the gunwales were added. To make the gunwales easier to attach I pre- bent them by making them wet and perching them between two supports and weighted them down for a few days. This is a personal preference.
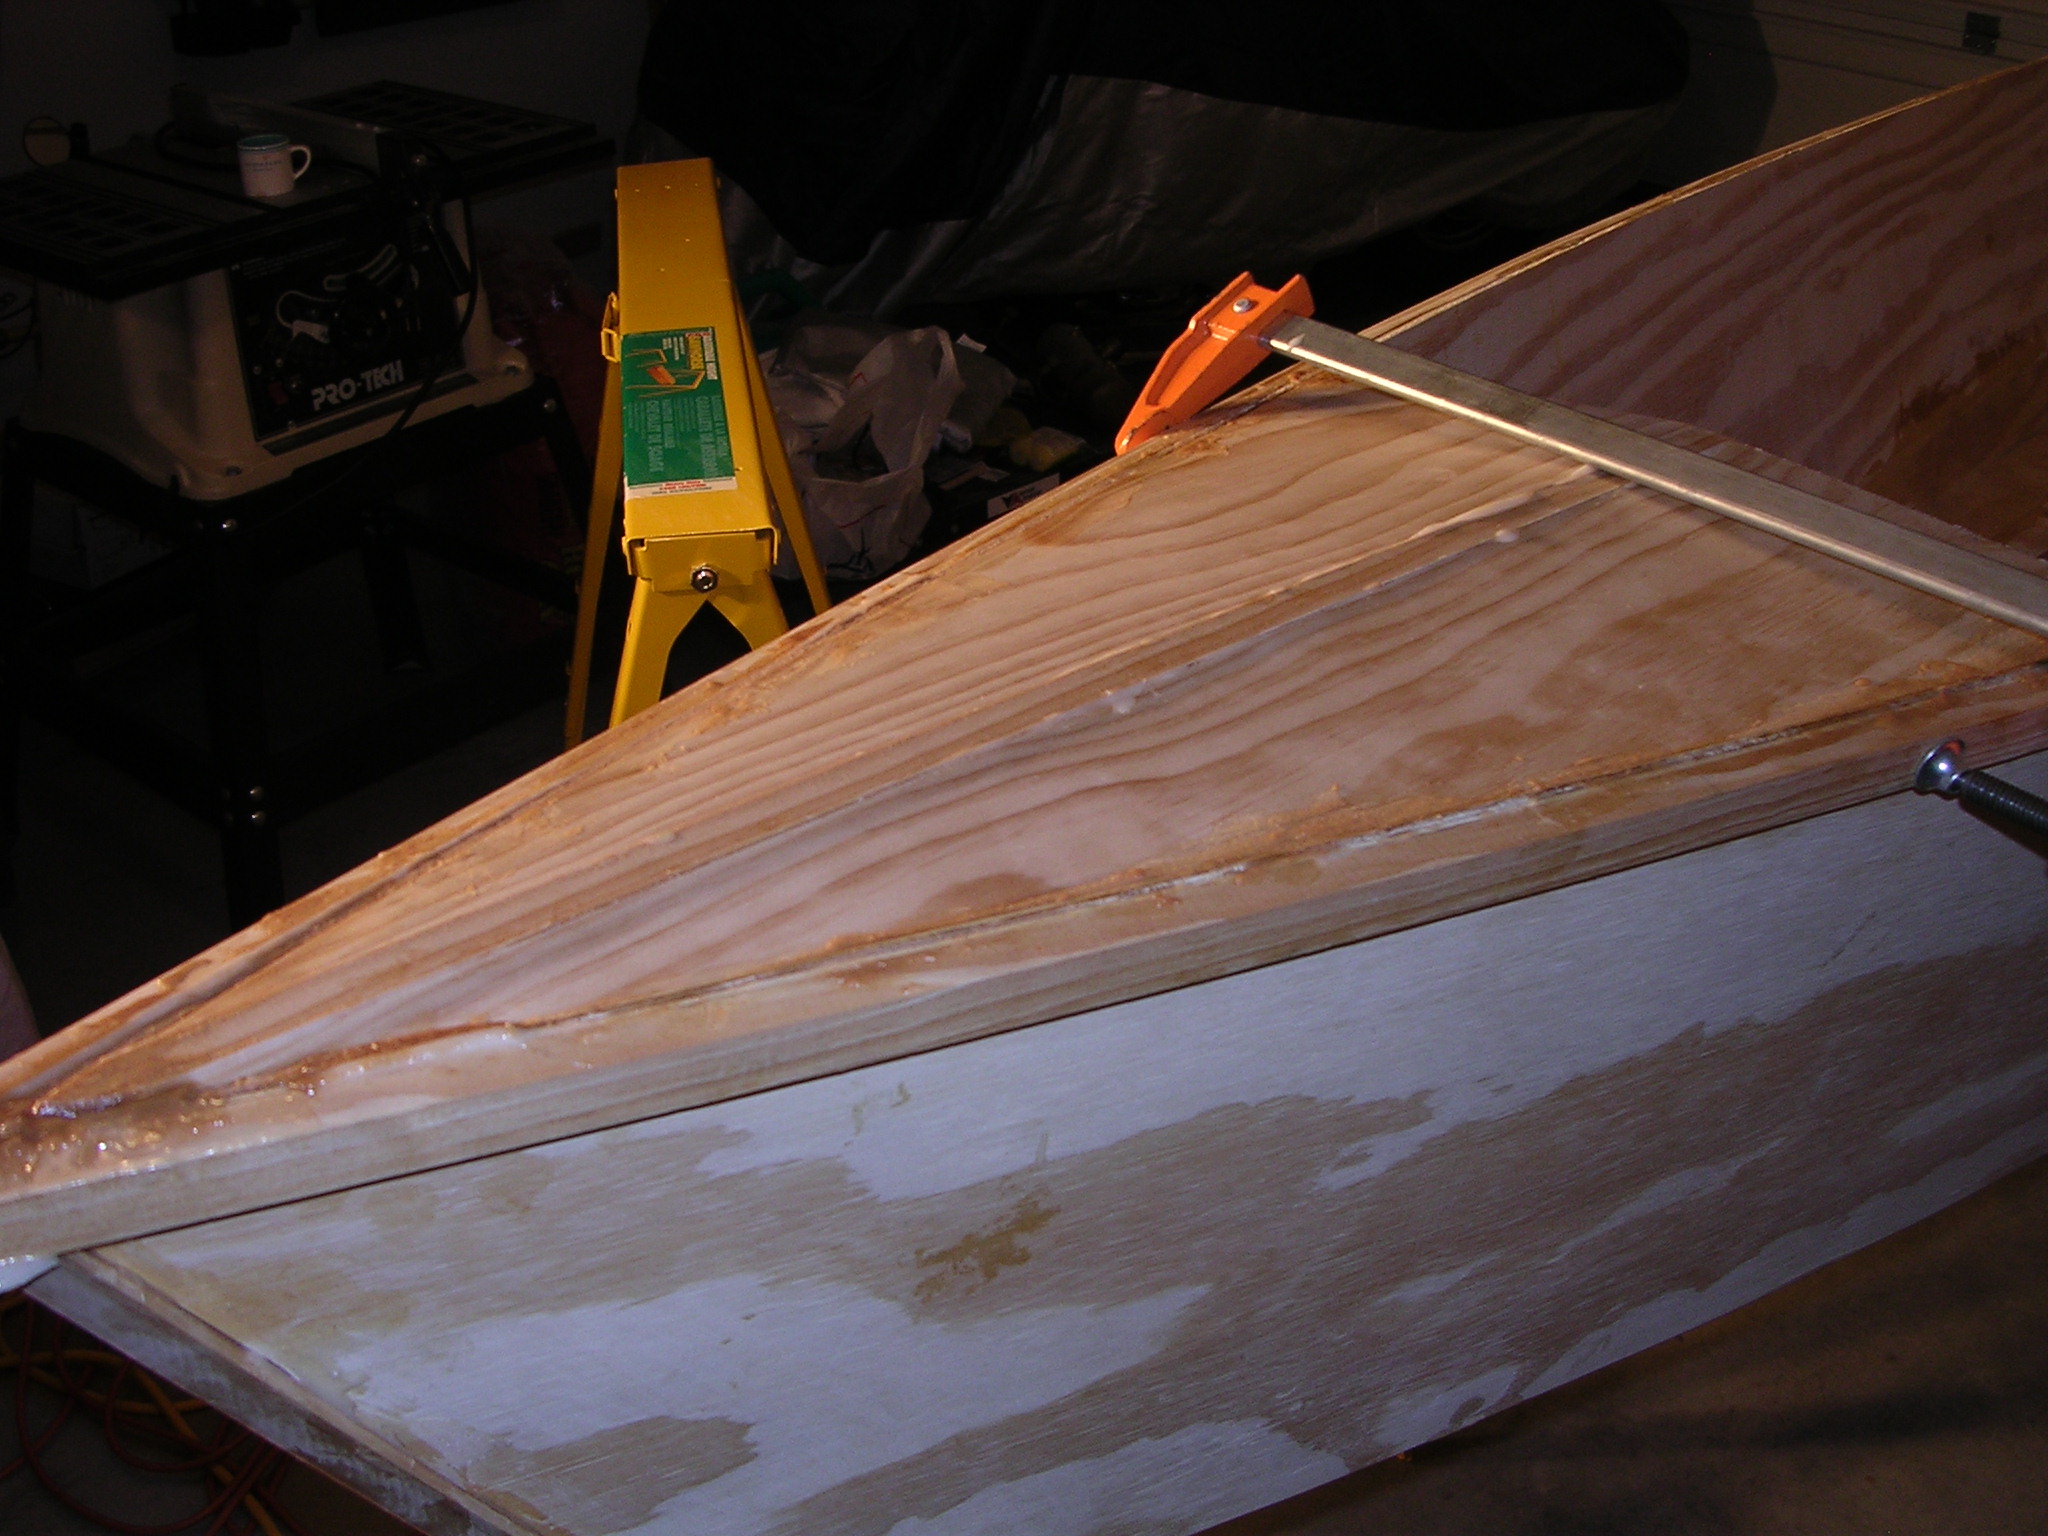
Full length or no gaps are equally acceptable. Here is the point where you take the ubiquitous - Here are all the clamps I own holding my gunwales on photo. Because I had plenty of screws holding it on I did not actually need to do this and half a dozen clamps to hold things generally in place while I did the screws up would have been sufficient but hey - it's traditional. I am not saying your dog will bite you and your wife will leave you if you forget to take a photo like this but I would not take any chances if I were you.
I used titebond3 glue here again, but I noticed it does not stick well to epoxy. The screws and the length of wood firmly glued down without the epoxy made this less of problem than it might have been. A number of plans or ways of building boats and canoes have acurately laid out panels stitched together in accurate layout patterns or have solid frames arranged around something called a strongback. Because I had a degree of laziness and an accurate pair of pavers I used something I call a flat floor.
Between the flat floor and the bottom panel I arranged spacers to maintain the curve of the floor panel to match the curve of the bottom edge of the side panels. You can use just about anything for this from the dried shrivelled hearts of your enemies to a roll of really soft toilet paper.
Always have a roll of really soft toilet paper in your workshop. When you are happy with the evenness of the sides and the gracefulness of the curves of your boat tack glue the bottom in place - I used the epoxy I was going to use in the end, but I have heard of people using everything from 5 minute epoxy to Homemade Canoe Plywood Water hot glue to drywall screws to hold things in place.
Having a center line on the floor and on the frame helps keep everything lined up. Once everything was firmly stuck together I removed that temporary bottom brace and broke out some of that polystyrene, leaving the top brace in place for the moment. The original lazy weekend canoe used external chine logs and a different join in the bottom of the canoe.
If you are going to mix their method to attach the bottom with my cut, you may need to build the middle frame a smidge narrower. I used epoxy but Bondo and polyester resin are probably acceptable for a boat of Homemade Canoe Plywood Machine this ilk.
For other tasks I used fine sawdust from my belt sander. Note the shape of the special fillet spreader which has the angle of the sides and the radius cut into it.
A time saving tip is to not wait for the fillet to set before adding the fibreglass strip over the top. You can be heaps messier laying down the fillet as laying down and smoothing the fibreglass strip will make evening out any underlayng unevenness easier. It also saves the whole sanding off the wax layer thing that you have to do if you are using poly rather than epoxy. After I glassed it I noticed the left and right sides were not quite as even as I thought. Never mind this will probably make it tend to turn in one direction or another, making it easier to do a J stroke ;.
Now we flip it over and trim off the excess. I tried using a flush cut saw attachment, on my multi-tool but that was too slow so I tried a manual flush cut saw which I could not get to go parallel for me.
A 10mm roundover bit was then resorted to and the edges were then cleaned up with a plane and sanded smooth. A jig saw with the base tilted to about 30 degrees so it did not hit the side of the boat would also have worked nicely and perhaps not created as much sawdust, leaving more leftover plywood for making paddle blades and the like. As you can see there was not a lot of plywood left over. Due to the mishap with the router a bit more epoxy with filler was required but apart from those places the epoxy went on the sides swimmingly, which is more than I can say for the stems, which were decidedly messy.
A word of warning about epoxy. Glue and clamp down a keel strip- put some screws through the bottom to make it clamp to the bottom of the canoe more evenly. Remembering to have a center line was a big bonus here. Now we re-use the offcuts from the sides to make the front and rear decks. We first use the offcuts to mark the largest area we can cover then we start fitting angles. This is a lot easier than it might look to the layman. Firstly the angle of the top is drawn in by having the piece of wood upside down.
Align your saw to both angles and presto - a neatly fitted piece of wood. Because we used epoxy a bit of leeway is acceptable and the piece of masking tape was all the Outrigger Canoe Plywood 50 clamping pressure we needed to hold it in place. Screws were added as a secondary joining method later. At the bow front end I am putting a bit more reinforcing to take a tow bar so I can tow it behind a bike, and as a strap down point when carrying it upside down on my roof racks..
The side seat supports are ten inches apart and the front of the aft seat starts 36 inches back from the center and the rear of the front seat starts 28 inches from the center.
I took these measurements and layout from the lazy weekend canoe. There are formulas for working out the spacing of canoe seats if you have the weight of your intended occupants and you have the inclination, feel free to Google them.
The side supports are bevelled so that the seat horizontals will be aligned with them. I glued the sides with temporary braces clamped to them to keep them aligned. I made these temporary braces long enough so I could trim them to make the permanent braces. When putting the permanent braces in ensure you either make them butt securely against the side or unlike me leave just enough room to get a paint brush into the gap to seal the end grain.
Pre-sealing with epoxy would be another good option. The height of the notional front of the seat was set as 8 inches from the floor and the height of the back was set using a spirit level while the canoe was kept level with my precision 5 inch wide pavers. Note the pencil line drawn in to show vertical and that the parts are all numbered as I go to avoid mixing them up as they are all cut to fit. You might notice I replaced the remainder of that temporary center frame with a cross piece or yoke, or thwart.
This adds structural integrity and makes a useful point to carry the canoe upside down on your shoulders. Some people take a bit of time to shape the yoke to fit their shoulders and neck if they plan on carrying the canoe for long distances, or maybe just for show. If I had been thinking ahead my temporary frame would have had a permanent element. The seat slats were added from the center out, spacing the slats with a small jig knocked up from scraps for the purpose. Alternatively you could go with any other seating arrangement you chose including; plywood ; weaving a seat into the frame; an old lawn chair, etc.
I think this canoe would work reasonably as a single person row boat with a central seat and six and a half to seven feet oars. Notionally there is a bit more rocker than required but this can come in useful when rowing because of the shifting center of gravity.
Trim off excess wood. Sand and paint before putting in water. You also need to ensure your epoxy or polyester resin does not have any Amine blush or wax left on the surface because paint does not stick to that. Some epoxies like the Botecote epoxy I used is not prone to those problems.
Polyester resin always has a wax residue on the surface, which allows it to cure properly. The paint and colours I am using here are the product of careful selection from the back of my cupboard of leftover paints and from the miss-tint and return section of my local hardware store. All are just ordinary exterior house paints. The undercoating was applied in two coats, one watered down and one full strength. The outside is Canadian Pine.
The trim gunwales and seats is from a "computer prediction" which apparently didn't because it had been returned. Remember to wait after painting for slightly longer than the "touch dry" time before sticking it in the water as paint takes a good while longer to cure fully before being at its full hardness and may re-emulsify i. A quick dip to christen it should not be too much of a problem but painting the day before a week long canoeing trip is probably going to end in tears.
Total weight after painting was about 29 kilograms or about 64 pounds. Now put your life jacket, PFD or whatever else you call it on, put your canoe in the water and paddle it. My son is responsible for the name "Neef the Canoe". The theoretical way to paddle a two seater canoe is with one person in each seat using single bladed paddles but I found using my double paddles quite easy.
The shorter store bought 7 foot long double paddle required more leaning over to get it in the water and clear the sides but the home made seven and a half foot paddle with the smaller blades cleared the sides easily and made the boat scoot along easily.
If you read some paddle fitting guides they fit the paddle to the person but you have to fit the boat as well. The official way to paddle a canoe like this with one person in it is to sit in the front seat facing backwards.
Being perverse I tried paddling from the back seat facing forward and found the comfort of the back rest seemed to compensate for the slight extra nose out of wateredness. Some of that nose out of wateredness is a product of the even rocker in the bottom of the canoe, as the floor of the canoe traces a smooth roughly circular arc.
More sophisticated designs like Mik Storer's Quick Canoe tend to have a flat spot in the middle, curving up more abruptly at the end. The wind was gusty rather than than continuously strong and individual gusts woud catch one end of the canoe or other swinging it about, or weathervaning it a bit. No boat is perfect - even the best of them are just an accumulation of compromises till something convenient pops out.
One of these days I will bring an extra camera operator so we can see how good the trim is with me in the back and my son in the front and vice versa and with extra gear etc. A foregripe is more or less the same thing at the front. A historical debt is also owed to the book 'Building the 6 hour canoe' by Richard Butz I have never read the book myself but many of the web pages above acknowledge their debt to the book.
Given the extra seats and things I have included I doubt my version could be made in 6 hours. Disclaimers and warnings You should realise by now that this is a small boat designed for use in sheltered waters.
Please follow all local regulations as for recreational boating. Above all be sensible about the conditions, your abilities and the abilities of your children. Children should be schooled in water safety and taught to swim.
You are legally responsible for your own actions and the supervision of children in and around water. Water is dangerous and cold Homemade Canoe Plywood 90 water more so. I would caution you to wear appropriate floatation vests when canoeing, especially if you have to share your water with power boats. Be careful with sharp tools, power tools, glue and splinters of wood. No ukuleles were harmed in the writing of this instructable. Reply 7 years ago on Introduction.
The West Mersey Duck punt is a sail boat with very similar dimensions. Add outriggers and lots of reserve buoyancy as well if you feel the need for safety. Learn more: Solo Canoe Yoke Plans. Offering this plan for free to select builders that want to build a prototype. Length: 14 feet 3 inches Width: Francis Canoe. Length: 15 feet 2 inches Width: 36 inches Learn more: St.
Length: 15 feet 6 inches Width: Length: 15 feet Width: Coast Guard Museum Greenland Kayak. Length: 17 feet Beam: 22 inches Learn more: Walrus Kayak. Length: 14 feet Length: 17 feet 8. Length: 15 feet 4 inches Beam: Skip to content. Super Packs Super Packs include multiple canoes and kayak drawing packages in one big compilation.
Add to cart. Start typing and press enter to search Search �.
|
Small Boat Plans Plywood 50g Best Rc Model Boat Kits For Beginners Pdf Apollo Duck Dinghy Uk 604 Small Jon Boat Trailer Machine |

16.04.2021 at 16:28:52 The avid fisher in mind books, and scroll down.
16.04.2021 at 23:43:32 Comes with a New trottle and.