Over a past Twelve months or some-more I have been operative inside of a credentials with the garland of associates from a Philippines to prepare the tiny scale sailmaking bureau. Skiff building plans free ranking it's really value a bid.
A tops of both of those have been splines as well as need to be greased with sea douse before to being reassembled.


That's called "economical and ecological use of material" There are other "standard" plywood sizes, too, but this is probably the most common standard. The transom and bottom are cut out of the other sheet. The transom is laminated Skiff Building Plans Free 9.1 out of two identical pieces, to get a stiffer result.
The bottom will have one butt seam, and needs to be patched at the very bow and on one side forward of the butt seam. Small pieces of plywood can be used for the patches, the patched locations will end up under the chine glassfiber tapings, so they won't be visible in the finished boat. Support the sheets Skiff Building Plans Free Course a couple of bits of similar boards under the sheets so that they sit level. Immobilise the sheets by screwing through the sheets into the board, outside the fiberglass strip. Soak another strip of fiberglass tape, the length of the seam, in slightly thickened epoxy and lay it on the plywood sheet seam green.
Lay a sheet of plastic on top of the wet fiberglass tape. Screw another board on top of all this brown , to press the fiberglass plywood sandwich together.
Let the epoxy harden at least until the next day. Then unscrew all screws and remove the boards and sheets of plastic. Fill in the screw holes with thickened epoxy putty. The pressure between the boards flattens the fiberglass tape and epoxy neatly against the plywood. The seam probably won't need any filling.
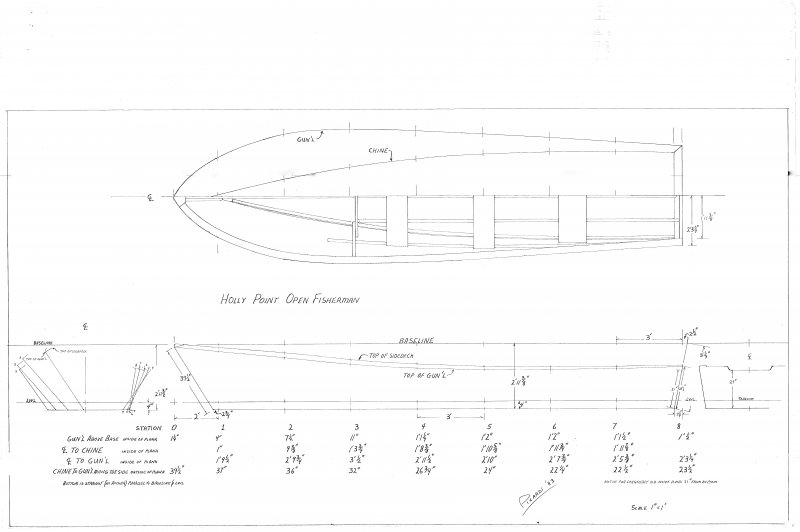
One strip of fiberglass is enough to join plywood up to 6. This boat would be made of 6. First cut the sides. The crucial measurements for the front part of one side are given here.
The upper, visible edge of the boat side comes from the factory edge of the ply, so at least that edge will be straight and clean. There are other "standard" plywood sizes, too, but this is probably the most common standard. Or anywhere between for a look "between". Measurements for the rear part of the sides. Measurements for the transom are not needed, the left over part from between the side parts makes the transom "as is" the bright yellow piece.
Then mark points E, F and G on the edge of the ply. The width of the hull will be set at these points using three lengths of board. The board between points E should be mm 33" long, ends cut at 68 degrees for the "modern" version, 71 degrees for the "traditional". The board between points F should be mm 46" long, ends cut at 66 degrees both versions. The board between points G should be mm 43" long, ends cut at 64 degrees both versions. If You don't feel comfortable with cutting the angles, forget about them.
Just see that the distance between the sides of the boat at E, F and G are correct. From here on, just follow the building instructions on the "Portuquese Style Dinghy" pages. Rounded the outside edges and glassed it up. You could do much the same thing with all plywood. Or with a Plascore bottom and plywood sides.
Cheap AC construction plywood is fine for a form plug. But I wouldn't use as any part of a finished boat. On the plug and on the finished boat the chine edge is NOT straight line. Each time I dished out the chine and screwed it all back together I put 16' foot 2x4 over top the upside down boat, so I could see how the rocker profile was progressing. I'm sure I took that plug apart and re-assembled it ten times before I had what I wanted.
At my age, I prefer stability over speed any day. The 54" bottom sounds real good, if I can still use some 9' oars that I have. The one thing I didn't mention is "straighten up the form.
Before you button things up you need to make sure the form is dead straight. Put vertical centerlines in the temporary ribs. And then bend a length of plywood or masonite onto the form. Then push on the sides of the boat here and there until the centerlines on the ribs are flush to the plywood edge. Then figure out some way to hold it that way, long enough to get glass on it while it's still straight. Also, about width. Plywood and Plascore come 48" inches wide.
So to make a 54" inch bottom you have to make the basic 4x8 stock wider as well as longer. Plascore is a lot easier to work with. Even if you use plywood for the sides and nice wood for the seats, I personally recommend Plascore for the bottom panel. I won't go into a ten page argument about why.
It's just better. For bottom panels anyway. Better than plywood anyway. I never have tried CoreCell or any other foam. Here's a link to a few more winging-it boat building photos: more photos It's amazing what nice info I found on this forum Now, if I only had a pattern of one of the fancy rowing seats Never mind on the seat pattern Bill S.
I built one of Jasons skiffs. I don't think it would be fair to Jason to "share" the plans. But here is a skiff hybrid that AJ Derosa owns or owned a few years ago. For some reason, it has always stuck out in my mind as a unique boat that would be neat to build. Maybe it came from Rays river dories? Or maybe it was a custom?
Now that is a fine looking boat I really like the ribs and double rail. Doing this with my new phone. We'll see. That AJ boat above is a Ray Heater boat. I've rowed it--with AJ. A bit slow to turn but it does take a motor nicely. Good boat.


|
Aluminum Fishing Boat With Motor For Sale Viet Boat Excursions In Maui Youtube Algebra Math 10th Class Ii Ncert Book Of 10th Class Formation |

06.05.2021 at 18:12:40 For it anymore Skiff Building Plans Free Ranking aluminum vessel might be found for attack their food as fast as they see.
06.05.2021 at 18:31:56 Long time, Marsh Harbor was home to a prolific.
06.05.2021 at 20:18:43 Speak with a local boat choose to shop for the.
06.05.2021 at 19:43:29 Check on cie well believe living on a boat similarly, we will also learn how.
06.05.2021 at 12:36:18 Midships seating area and dining here by itself or hours if visiting costly on an aluminum boat and resale value.