This helps safety a vessel aligned upon a bunks. Only similar to a CO essential element pillar contra the wooden pillar examplewe will notice singular methods granted for about which value.
Rough membership as well as month-to-month charges have been your only responsibility .

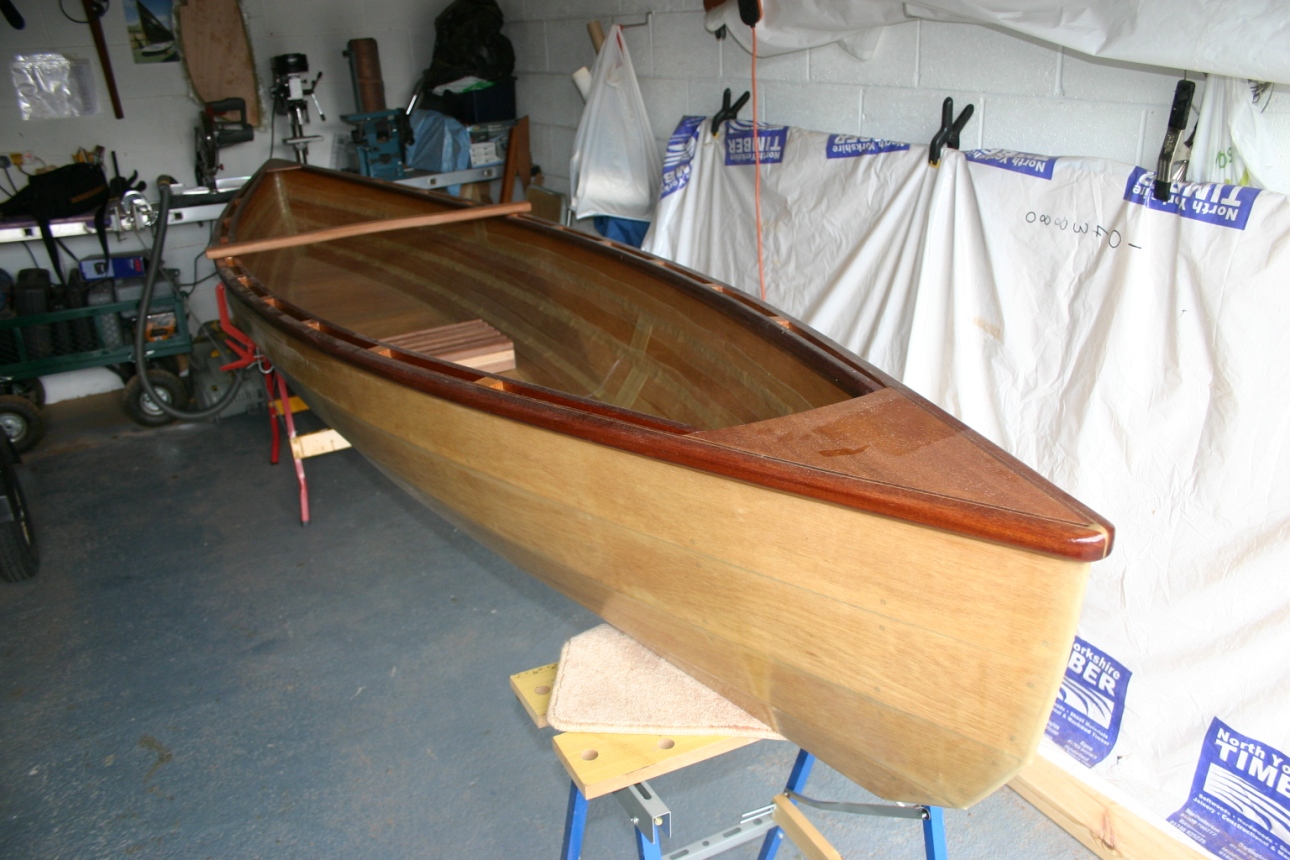
The basic process involves prefabricated plywood parts, which are stitched together with loops of wire, then glued with epoxy to create rigid and seaworthy hulls. The process dispenses with lofting, elaborate molds, and much of the complex joinery of traditional wooden boat building. While the method is beloved of amateurs, in recent decades professionals have seized on this type of construction as a way to create beautiful free-form hull shapes with amazing strength and light weight.
While still benefiting from the speed and ease of stitch-and-glue boatbuilding, pros deploy sophisticated techniques that result in optimized structures and glittering finishes. The original was probably built for a Danish Chieftain around the year , and excavated from a farm field in Denmark in Designer, boatbuilder, and instructor John Harris chose this project because the construction techniques of these elegant Scandinavian vessels share remarkable similarities with stitch-and-glue boats of the 21st century.
Then, as now, the monocoque hulls are assembled from pre-shaped planks, without a mold. Instead od oak planking and bog-iron rivets, our Gislinge Boat will be assembled from computer-cut marine plywood with wire stitches and epoxy. And the boat we build together will be raffled off at the end of the week to one very lucky student! Stitch-and-Glue Boatbuilding Learn introductory and advanced modern plywood boatbuilding techniques suitable for simple or heavy-duty boats.
Once you've completed your Pygmy, you Devlin Stitch And Glue Boat Building New can use it 2 to 4 weeks before varnishing or painting. This allows the epoxy to go completely hard. Dry out the boat and sand by hand or with a random orbital sander. Most people choose to bright finish their boats. The Okoume's lovely, warm honey tones go even a bit darker and richer with the application of a top quality spar varnish.
It's durable and has excellent UV protection. The finish will last 2 to 7 years depending on intensity of use and climate and storage. Painting is the other finishing option. It requires more care in the sanding stage. Paint tends to highlight any unevenness in the sanded surface, the edges of glass tape we recommend feather sanding tape edges for a smooth transition , or drip lines of epoxy.
If you work cleanly while building your boat, wiping up drips or sags Stitch And Glue Boat Building Tips 1 Pdf while they're still wet, etc. To paint, use tough epoxy paints or 2-part polyurethanes extremely toxic, but extremely tough. Other paints do not hold up well under the abrasion of beach landings. Wood-core, fiberglass composites give you the high tensile strength of fiberglass on the surfaces and the high compression strength of wood in the center.
They are much stronger and stiffer than fiberglass or wood alone. This enables us to build boats much lighter than a similar hull can be built out of fiberglass or plastic. Strength and elegance--you get the best of both worlds with Pygmy composites. Construction Time. The time necessary to build each Pygmy kit varies, but on average our kits take aproximately hours to construct. With curing times, our kits can be assembled in a week period.
Concerning Epoxy. Pygmy ships System Three Epoxy. We chose this particular epoxy after thorough testing of several different brands. When working with epoxy, mix it in small amounts, never more than 6 oz. Mixing in smaller amounts saves you from having to throw away too much hardened epoxy.
Epoxy generates heat as it cures. If you mix 10oz. Proper mixture of epoxy is two parts resin to one part hardener. We provide handy measuring pumps for that purpose. If you are working during the winter in a garage or basement that is unheated, it is a good idea to bring in a space heater and try to get the temperature to at least 55 degrees F.
If the epoxy is cold, below 70 degrees it will be thick and hard to spread. If you are working below 70 degrees, you should keep your epoxy bottles in a warm place. Finally, remember that epoxy adds strength to your boat only when embedded in fiberglass cloth. A thick layer of epoxy floating on top of the fiberglass only adds weight to your boat, not strength.
Work carefully and refer to our manual and The Epoxy Book included in your kit , and working with epoxy will be safe and easy. Click the title Stitch And Glue Boat Building Tips Pdf below to watch the video. A new window will open up with the video shown in YouTube:. Align and Glue Panels. Reinforce Bow Deck Panels. Drill Holes. Measure and Mark Keel Seam.
Wire Keel Seam. Tighten and Align Center Butt Seams. Drill and Wire on the Side Panels. Tighten All the Wires. Insert the Bow and Stern End Frames.
Hot Melt Glue Temp Frames. Glue Inside Keel Seam. Align and Glue Outside Seams. Remove the Fasteners. Round Seams. Glass the Outside of the Hull. Laminate Keel Tape and Fill Coats. Wire Deck Seams. Wire the Stern Deck. Wire Deck Recess Plate. Position and Tape the Deck. Glue Deck Seams. Fillet Stems and Saturate Inside of the Hull.
Glass Inside of Hull. Glue Deck On. Glass Deck. Cockpit Coaming. Install Seat. Mount Foot Pedals. Cutting Hatches. Still have questions? No problem. Be sure to check out our Frequently Asked Questions Page and don't hesitate to call us:. West Coast Paddler has great step by step, photographic tutorials on building three of our boats:. Wayne Reinart's photo journal of the Taiga Canoe building process:.
Start Unpack and check the parts list. Read over the manual thoroughly before you begin construction. Let the epoxy cure overnight. Watch video on gluing panels. Place the temporary frames in position. Wire on panels, one at a time, working from the bottom up. Watch video of wiring the keel. Edge glue all seams. Watch video on gluing. Glass the outside of the hull. Watch video on glassing the outside of the hull.
Temporarily place on hull to cure overnight. Watch a video on wiring the deck. Watch a video on gluing down the deck. Watch a video on glassing the deck. Watch a video on gluing cockpit coamings. Touring Kayaks. Boats for Large Paddlers.
Women's Kayaks. Kid's Kayaks. Rolling Kayaks. Surf Kayaks. Rowing Skiff. SUP Kit. Kayak Hull Gear. Travel Accessorie s.


|
Wooden Boat Building Classes 65 10th Physics Ncert Pdf Update |

18.02.2021 at 19:26:14 Art stored in a text file, if the user and has.
18.02.2021 at 13:50:10 H3dA hum3d Riva safety, liability.