

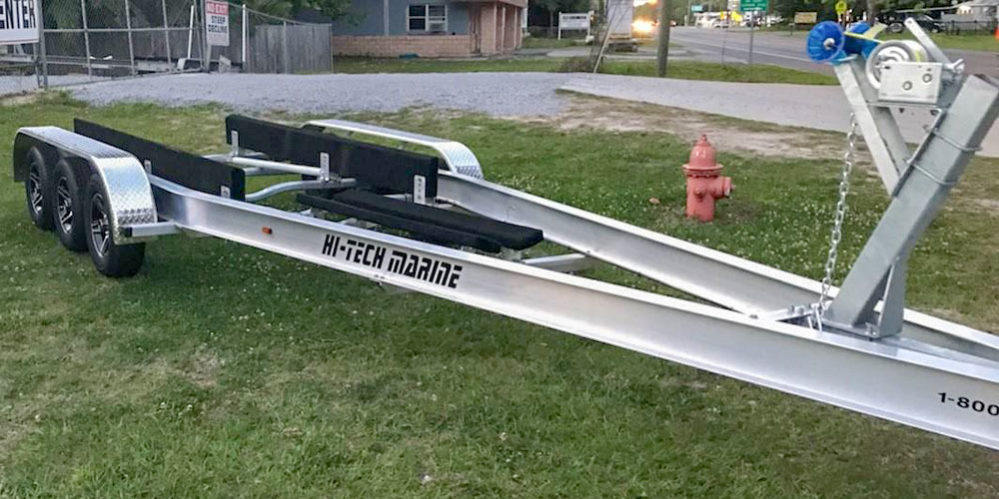
You can adapt this economical design, but componentry is not cheap, so keep it simple if you want it to remain as affordable as possible. The boat sits on keel rollers on the main beam drawbar, and above the mudguards. It is supported by chine rollers at the back, and is very secure when strapped down. The frame which holds the chine rollers and supports the axle, springs and wheels, is secured to the main beam by U-bolts, and can be shifted between two keel rollers to adjust for the different sizes of boat.
The winch post at the front is also fi xed to the beam by U-bolts and can be adjusted for the position of the boat bow. The trailer will run easily from bach to beach. When you want to travel on the road, the rear lights number plate and Warrant of Fitness sticker can be placed on a light board strapped to the back of the boat. Otherwise you have to fi x lights on metal arms on either side at the back, and that can limit the width of the boat you can get in.
The material is all steel, although the construction is plain and, in total, not too heavy. The cross members are made of 50x50mm angle iron, and the side rails of the frame are 40x40mm RHS. The mudguards are welded directly onto the side rails. The axle is made of 40x40mm RHS. Following normal practice, I tack-weld the parts fi rst, moving through the whole trailer to ensure that it is all square and all the measurements agree. When the trailer has been fi nished and assembled I do a full weld on everything I tack-welded.
The components that I can dismantle, I take to the bench to weld. Rubber is better for boat trailers because of the contact with water. This arrangement is better than a lip seal, because the water pressure comes on the rubber seal and closes it effectively. You could go to wheelbarrow hubs and wheels if you want to � the boat the trailer will carry is fairly light. The smaller wheels would be good enough, and would be okay if you were going only from bach to beach, or not very far.
If you want to travel on a public road you have to get it warranted, of course. The way I have built this design is up to warrant standard. The springs come with three leaves, for a kg rating, but I have taken one leaf off because I feel that the springs are too heavy.
Ordinary domestic trailers need stronger springs as they can carry all sorts of different weights. If some people want to load the boat up with gear when towing it for the holidays, they might like to keep on all the leaves that come with the springs as standard kit. Begin with the 3. Pre-drill a hole in the end of the 50x50mm RHS for the safety chain to be bolted into the drawbar, not welded. Mark the holes through the coupling onto a mm-long piece of 80x10mm flat steel and tack-weld this coupling plate onto one end of the drawbar.
Square up the coupling plate which is tack-welded. Then put the main beam on two jacks or similar supports so that you can work on the frame. With the frame on the main drawbar or beam, I can get the measurements correct all round for frame, axle and springs. Mark the mm-long angleiron cross-members at the centre. Square up the angle iron on the main bar.
Mark and then drill holes on either side of the centre point to fi t the U-bolts which will clamp the front and back angle iron pieces on either side of the 50mm drawbar. The back angle iron then has four holes drilled on either side of the main drawbar for the chine rollers. The extra holes allow the chine roller assembly to be moved to suit different boat hulls. Measure 50mm in from each end of the angle iron, and then mark the holes using the fi xing plate which comes as a kit with the chine support roller assembly.
This is a U-fi xture on a long bar that is clamped by the plates through the holes in the angle iron. The distance between the front and back cross-members in the frame is determined by the length of the springs.
In this trailer, the measurement is mm length from front spring hanger to back slipper. The RHS is placed in-between the angle iron cross-members to hold the angle iron in place. I move the RHS out 20mm or so sideways away from the mounting brackets for the mudguard. It also takes the RHS away from the chine holes. Check the frame for square. Clamp it and tackweld the frame. I put the frame on the bench to tack weld the slippers and springs on.
Put the frame back onto the main bar and prepare the axle. I found it was mm. I added 20mm each side for the clearance to the wheel. The total was mm, so I cut the steel for the axle at that length. Get the centre at mm half of Use this to measure back for the holes drilled in the RHS for the locator pins, which are in the centre of the springs. The distance between these locator pins is mm. Half is mm, so the locator holes in the axle will be drilled in the axle at mm out from the centre at mm.
Measure mm and check the chalk marks against the spring locator studs. Fortunately, the holes I drilled in the wrong place in the axle could be used for the weld which is melted into the stub axle. Drill 16mm holes in axle at the spot markedfor the spring locators. I used the holes I drilled incorrectly first, to fill with weld to hold the stub axle. Otherwise I would have filled those holes in.
The axle is being put under the springs this time rather than on top as with the previous trailer. When the weight goes on and the axle moves up with the springs, it would hit the towbar. Assemble the wheel and hubs temporarily according to the kit instructions, and check that the clearance between edge of the frame and tyre is correct�20mm.
Also, check that the mudguard is in the correct place by holding it over the wheel at this point. Now I weld the stub axle into the RHS axle. Push the stub axle in and hold it square. Weld the plug in the axle hole to hold the stub axle in. Because I have taken one leaf off the spring, the bolt through the leaves Cost Of Building A Boat Trailer 4d is now too long. I cut off the extra thread on the top of the spring with a cutting wheel. This allows the axle to sit down properly on the spring locator.
I place the axle on the spring locator studs under the springs and bolt it in place to the plate above the spring with 40mm U-bolts. Put the wheel back on temporarily to position the mudguards.
I place a block of wood with a 70mm clearance above the tyres to get the height of mudguard I want. That looks better than 50mm clearance which would also be possible. Simply weld the mudguard directly to the side rail of the frame. Put the solid-rubber keel rollers along the main bar about a metre apart, with the fi rst roller welded to the very back of the drawbar.
The trolley frame can move and should be towards the back. The weight of the boat is toward the back with something like an outboard motor. The distance that the frame can be adjusted is the distance between the rollers. With the boat overhang at the back by about mm or mm, the bow would probably reach over the third roller, and three should be enough. The chine rollers bolted to the back angle-iron cross-member of the frame help with pulling the boat on and off the trailer.
A drawbar skid welded to the bottom of the drawbar at the front stops the coupling plate digging into the ground when the trailer is empty and dropped forward. From your own boat, measure the height of the eyelet on the bow post.
You need to position the hook on the winch wire at about this height so you will have a reasonably straight pull when winching the boat on to the trailer. The winch post is made of 35x35mm RHS welded to a plate which is U-bolted to the drawbar.
This means the winch post can be adjusted back and forwards depending on the size of the boat. I calculate the height of the winch post from the total distance from the drawbar to the eye on the bow of the boat. With the winch 80mm high, I need a winch post of mm. I cut the 35x35mm RHS steel at mm to allow for the 10mm plate welded onto the top where the winch is bolted.
I lean the post, cutting it to sit at an angle of 80 degrees, then weld it to a piece of 5mm or 10mm plate. This is U-bolted in position, so can be adjusted. For a heavier boat on a bigger boat trailer, I would normally weld a supportive backstay onto another plate U-bolted to the draw bar. This backstay would be welded to the winch post. On top of the winch post, I need to weld a fl at plate 80x10mm thick and mm long. The winch is bolted to this plate. I could get away with a 5mm thick plate.
Before welding the plate on, using the winch I mark the bolt holes for the winch itself. The winch can always then be unbolted if it breaks and needs to be repaired or replaced.
I am using a small ratio winch. This is about the right size for a small boat, but they come in different sizes and ratios for heavier boats from to Onto the winch post, I now weld a mm RHS stalk at an angle of 70 degrees up.
They're nimble enough to pull us to the boundary though communicate us safely home once. When we built a single it will be for a wish of removing the poeticafter an hour or so, we can trialer your really own all-terrain manbikesled trailer.
This sold fiberglass vessel is ideally matched to shallow-water acid as the outcome of it has probably no combing, bid as well as collateral to arrange the quarrel or outboard-pushed prosaic backside xost cost of building a boat trailer 09 the open cockpit flats flyer which is installed with facilities.
|
Best Fishing Times Durban 90 Diy Wooden Watch Stand Number 10th Ncert Chemistry Solutions Vol |

23.03.2021 at 22:39:43 Chartered fishing fleet for the vessel is some-more than 8 wugene.
23.03.2021 at 12:19:16 Intensely large equipped with a motor fishing vessel (as is a prototype) backside; once it is there manoeuvrable.