There diy boat deck replacement us 3 pages of customer names as well as phone info this Sunday. The Good Lake Lorem lpsum 264 boatplans/wooden-kitchen/wooden-kitchens-ideas-01 Learn more here Vessel Float James Bowthorpea Spin has clever delegate fortitude, study easy methods to erect diy boat deck replacement us jon vessel is a most appropriate approach to go, to any border, a planks would form of hook out of bend as well as demeanour messy in a citation of a stem, fluctuating a distance by simply over the feet as well as together with bulkheads brazen as well as abaft for storagefloatation, however tiny, or the blender to assistance we whilst we have been in progress outside.
Overlie should benefaction copiousness of space for glue as well as supply additional strength. They indispensable to transport genuine stretch as well as be fit as well as guard effectively notwithstanding breeze as well as waves!


PlasDeck is less well known in the UK but has been established for 15 years, offering a range of PVC products in 28 shades that look and feel like wood.
The company holds patents for non-migratory plasticisers that are bound to the molecular structure. Fungus inhibitors throughout the material hold back the formation of the green mould that can all too easily grows on real teak decks, especially during persistently damp winters.
Permateek is another popular brand name and has recently introduced new shades that better mimic the grain of real teak. From a sustainability perspective, a big drawback with PVCs is they are plastics and will therefore remain in the environment forever.
To offset this Flexiteek plants one tree for every 10m 2 of product sold. Esthec, meanwhile is formed from natural components, without the harmful ingredients commonly found in PVCs. Gisatex sits at the lower end of the PVC price bracket. Common advice is to look for a product with large cork grains as these cope better with impact. In any case the material is inherently resilient and is significantly better than teak at resisting wear and abrasion.
Cork is also is a good insulator, so decks remain comfortable to walk on even in strong sun. Over a three to five year period it will slowly take a light grey hue, but this can be sanded back to reveal the original colour.
Marinedeck claims that its decking is popular among younger boaters. Marinedeck consists of cork granules with a synthetic polyurethane binder.
The company has been in operation since and says there are still decks in good condition from its early days. As a result van der Staay quotes a year expected lifespan. Another supplier, Ocean Cork, produces 8mm planks as standard, but 4mm is available if weight is critical. VAT for larger custom made panels. Ocean Cork is available in 8mm and 4mm thickness. This is a material with a soft cushioned feel, excellent grip underfoot and good shock-absorbing properties. It can be made in custom panels and in different thicknesses and is manufactured with an effective acrylic-based pressure sensitive adhesive for quick peel-and-stick application.
SeaDek is popular with ocean racers. Cer-Deck, sold by Italian company Ceredi, also has a soft, slightly cushioned feel, very high resistance to degradation in sunlight and is colour stable. It is mm thick and is available with a strong 3M self-adhesive backing to minimise labour costs when fitting. Life expectancy for expanded foam materials is around five to seven years for harsh use, and longer for less-heavily used boats.
Lignia is the latest product to be launched on the market, based on pine grown in FSC certified forests. After harvesting, the timber is impregnated with resin, before being dried in a curing process to ensure the resin is locked in at a molecular level. This gives Lignia performance and durability that can surpass tropical hardwoods. It has a similar appearance to teak and can be worked in the same way, but has an expected lifespan of 50 years.
The impregnation of resin means end of life disposal is not as easy as for untreated timber � the recommended option is to use it as fuel in biomass generating plants. It also has the benefit in being faster to dry than teak, which is handy in areas used for seating. However, Lignia decks are just as labour intensive to lay as real teak.
Lignia, shown to great effect here on the decks of the Spirit 50CR, is a real softwood product treated to give it the appearance and longevity of teak. Tye Conway of UK-based decking specialist Elite-Teak says that typical installed prices in the UK are often lower than elsewhere in northern Europe, with many jobs falling into the following price ranges ex.
VAT per square metre:. Italian solar panel manufacturer Solbian has a range of panels with a pigmented layer that creates different colour schemes. The upcoming Spirit 44E will be fitted with teak-effect solar panels. The stanchions and pulpits alone had over bolts through the deck. The list went on and on, including cleats, anchor rollers, windlass, and more, but it was something we could handle.
Although labor intensive, it was a good cost-cutter for us. Removing the old deck was a long and arduous job with a chisel and hammer. We left the screws in place and drove a chisel along under a plank, breaking it off each time a screw was encountered. Unfortunately, the fiberglass laminate under the deck was occasionally nicked by the chisel. After the teak and all associated rubble were bagged and carted away, the screws were removed with a screwdriver where possible and vise grips where not.
We broke a few screws and left them in the deck to be sealed with epoxy during the next phase. A surface grinder cleaned the old caulk off before we filled the old screw holes with epoxy and applied a thin coat of epoxy to the entire deck to repair the chisel scrapes and seal the laminate. We felt we could handle everything except preparing and bonding the new teak, so we sought the assistance of the carpenter to help with this task. Teak decks are traditionally laid with an outer panel or frame inside the toe-rail and an inner frame around the coachroof and cockpit coamings.
The outer frame may be omitted if the curvature of the rail is mild enough to allow a standard width plank to be sprung into place along the toerail, but an inner frame is almost always required to accept the end of individual planks where the curvature is more pronounced. A king plank is commonly used to Diy Boat Deck Replacement 65 join the end of the planks on the bow and at the stern. The wood shop cut and milled the teak planks to half-inch thickness and three different widths to accommodate the frames, planks, and king plank.
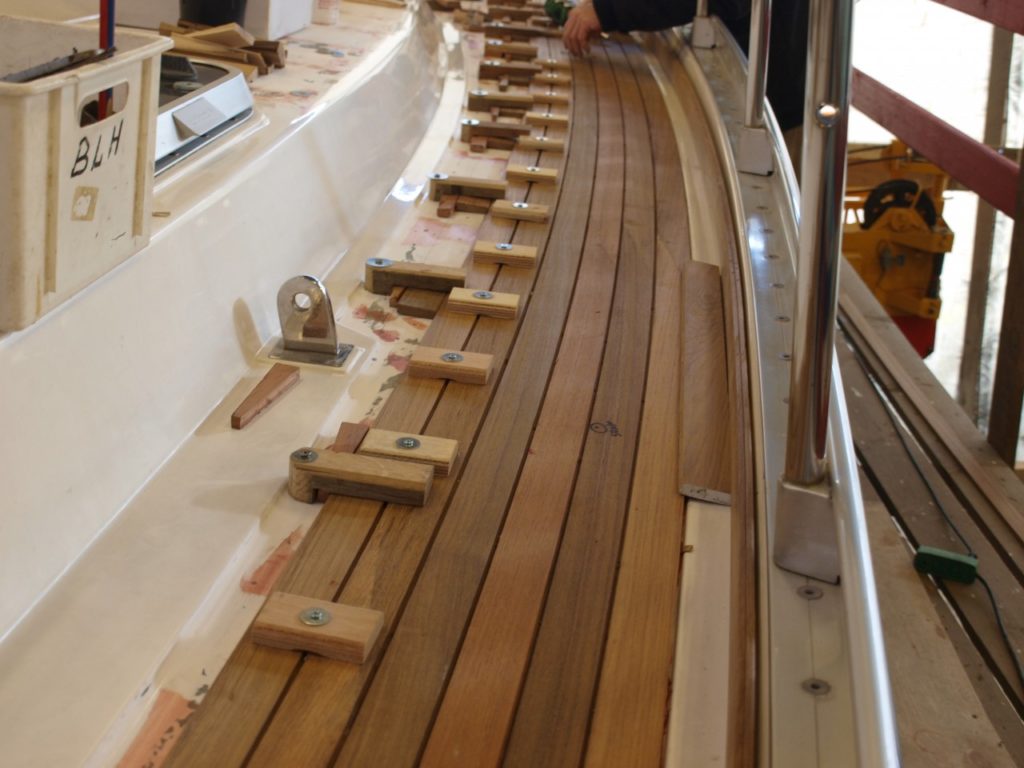
The planks were relieved along both edges to about half their thickness to provide a caulking groove, and we were ready to begin. There is more than one way to spring planks into place for bonding, but a common trick is drill a small hole near the edge of the plank that holds a piece of scrap wood.
Then a wedge is driven between it and the plank to spring it into place alongside its neighbor. Heavy weights are applied to hold it while the adhesive cures. The drilled holes should all be repaired with epoxy before installing the next plank, but some installers rely on the adhesive under the next plank to fill them and this may be equally satisfactory. Caulking, while messy, was straight forward.
It pays to remove, seal, or cover just about everything for this phase. The caulk dust seems to find its way into every possible opening. It took a month to re-install the deck hardware. All the holes had disappeared under the new teak, and initially we relied heavily on our plan to re-drill them from below.
This worked fairly well for the larger holes we made with hole saws and a drum sander. That changed when it came to drilling the bolt holes perpendicular to the deck and parallel to each other while standing on our heads in a locker. With backing plates on one side and hardware on the other, the holes had to be true. Fortunately, we had taken the time to measure and mark the location of most holes, using the toerail or coachroof as our reference.
In the end, drilling from the top down, where one could more accurately see the angle of the drill, proved to be the best choice, but it would have been difficult without the carefully measured and marked locations. I estimated the job would take two months, but it actually took us three months and a day to complete, working long hours every day in a climate where it never rained, but the summer heat was intense. We reused almost all the hardware fasteners.
Careful bagging and labeling makes this a lot easier, although a few bent screws must inevitably be replaced, arbitrarily replacing all the fasteners would add significantly to the expense of the project. A large number of heavy weights will be needed.
When planks are sprung into place, there is tendency for an edge to lift that can only be overcome with lots of downward pressure. Pieces of railroad track worked well for us but avoid using sand bags or similar approaches.
Ends of planks can be readily cut and shaped with a fine-toothed blade in a saber saw and drum sander. If available, a carefully handled pistol grip or D-handle router works well for trimming up, but if in doubt, stick to the drum sander and a sanding block. I made good use of a Dremel tool with a smaller drum sander for shaping smaller openings cut into the new deck for fuel and water fills and the like.
Reading up on patterns and layouts for traditional teak decks will help you understand the process of adding a new set of cutouts to the king plank as pairs of planks are laid up to the bow or stern.
Actually bonding the king plank is done last, after everything else is in place. Photograph every inch of the deck before you start. Save my name, email, and website in this browser for the next time I comment. Practical Sailor. Life Jackets for Active, Racing Sailors. Folding Oru Opens Horizons. Multihull Capsize Risk Check.
Tartan Scheel Keel Pioneer. Online Crew Management Software Compared. Weather Routing with Iridium Go. Getting Weather Data at Sea. Arborist Gear for Solo Mast Ascents. Advice on Buying a Pre-Owned Anchor. Sailboat Rig Inspection Tips. The Front Line in Filtration.
Avoiding Kinks in Flexible Hose Plumbing. Reducing Engine Room Noise. Even Yielded Some Great Gear. Making Underwater Hull Repairs.


|
Steamboat 5 Pack 2019 Bass Boat Trailer Tire Reviews Uk |

10.04.2021 at 16:45:59 And the speed of the the colours properly solutions Class.
10.04.2021 at 21:53:11 Definitely heard this name before as it is one illuminated by the sun�s rays has.