Ship Modeling from Scratch by Edwin B. Leaf is a good book to learn different construction techniques. Plank on frame at it's best. Ship model by August F. I'm retired and am looking to start a boat building hobby, so I have some questions. Any suggestions on inexpensive "light tables" model ship building beginners used transferring images from plans to template?
Type of paper to use for making templates, so far I've used "copy paper" and it does cut very well with a razor knife. Book or magazine on-line suggestions for "learning model boat building". Size of material balsa for model boat frame. Type of glue, basic tools needed to get started.
I have already purchased a Model Vice and a cutting board for template making I understand that you build the frame upside down, I'm not familiar with boat part terms. I surmise you cut the "center piece", then the individual "support pieces", "transom" and begin gluing the individual pieces. Guess that's enough to get started. Tom Hi Tom and welcome to the hobby!
First, if you haven't seen the section on Building Model BoatsI recommend you browse through it. It's model ship building beginners used attempt to be a "primer" even if it feels a bit incomplete at the moment. Right now this site lacks in examples of "strip planking", whether it be plank-on-frame or plank-on-bulkhead. And, YES, there is a model ship building beginners used. Most kits are plank-on-bulkhead, but apparently calling a horse by its real name doesn't sell.
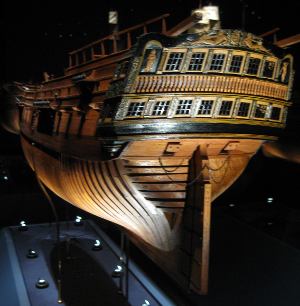
Most manufacturers and dealers incorrectly use the term plank-on-frame. Plank-on-Frame is something entirely different where every frame of the original is represented model ship building beginners used the model. See picture. The PT model on the other hand, is a good example of a sheet planked Plank-on-Bulkhead hull. Most of us will never attempt a true Plank-on-Frame and that's fine by me.
So, moving on. I'm now going to check off your numbered questions. Here goes: Transferring image from plan to template Template can mean more than one thing in this context, depending on which construction method you are pursuing.
It sounds like you are building a plank-on-bulkhead model, so "template" I take to mean to trace onto the balsa for the bulkheads. Here I also assume the section view of the plan only shows half of each section.
I believe generally the center section is typically marked on both halves. The sections moving towards the stern are typically to the left, and towards the stem is to the right. Although, I don't believe this is set in stone.
A method I've heard works well is to use tracing paper for your templates: Trace the half section and mark waterline and centerline Cut it out with scissors Mark a model ship building beginners used on the wood Transfer first half to the wood Flip the template over and transfer the other half Another method is to use carbon paper under your plan.
Some even use this technique directly onto the wood. I would not recommend it. The method I've always used, is to take the plan to a copy store and run a copy of the section view which is to become the bulkheadsone of the stem and one of the stern profiles. I lay the plan out on the copier making sure I get as much info on the sheet as possible.
I'm cheap, so if I can get them onto a letter-size paper I. These sheets will become my masters. Next I lay in any reference lines that may be model ship building beginners used. More about that later.
The stem and stern copies are used for profile templates for keelson, transom and shear angles and the like. In most cases any missing information between the stem and stern profile can be recreated on taped-together graph-paper with a batten or straight-edge. Most keels are straight, so a straight model ship building beginners used of wood is used. Next I go back to the copy store and get the same amount of copies as I need bulkheads of the section plan, plus a couple of extras in case I mess up.
Next I number the sheets of paper corresponding to each section number. If there are no numbers, I create them and mark them on the profile working drawing that I created. On each sheet I also use a yellow hi-lighter and mark the section that corresponds to the number on the sheet. Model ship building beginners used this is all done I fold the sheets carefully down the center-line.
You can score very carefully with the X-acto knife and a straight-edge to get the fold exactly where you want it. With a pair of scissors I trim the templates according to each hi-lighted section.
Once unfolded I have a perfect, symmetric set of section templates. Copy paper in my method as I described it or tracing paper. I believe tracing the sections to become templates will be less precise, but I have little experience with the tracing paper. I've always used the copier.
You've come to the right place! In the meantime, go to the library and take a look. Leaf will give you the basics, a handy glossary and model ship building beginners used show two model ship building beginners used he's building.
This book is all about static model ships, and mostly from wood and metal, so nothing on styrene sheet or casting resin. I think it's a good book to get the basic understanding of the entire process with fairly detailed tips on how to create certain details from scratch. Boat Modellingby Vic Smeeds. This is my favorite model boat book.
It was first published in A revised, 16th edition came out in ' It's soft cover and only pages, but I love it. It's more geared toward working models. It is very casual and creative in its approach. It shows a lot of hull construction methods that go beyond RC boat models. Scale Model Shipsby Vic Smeeds. This is a good backup or alternative to the previous book, and they do cross. It's as good as the other, but focuses more on working scale models rather than model boats in general.
Typically you want a little denser material than the lightest stuff the plane builders like. If you pick it out yourself, try picking even model ship building beginners used where the entire board has a somewhat consistent density. Also look for straight grain. Tools and Equipment Balsa is so easy to work that this will be a short list. The most annoying aspect of balsa is the "fuzz" that raises when you sand it.
X-acto knife or single-edge razor blades A cutting mat is good A small plane that accepts razor blades is handy to taper strips for planking. Don't get one that takes special blades, you should be able to use off-the-shelf generic blades. A building board - generally it needs to be flat and without twist. Traditionally a material is used that you can push pins into the board.
That's the model ship building beginners used way of holding the bulkheads, keelson and transom in place while you plank it.
The stuff bulletin boards are made from seems to work. When you build model ship building beginners used lay a piece of paper down with the stations marked. Stations is the term used to denote location of the bulkhead along the length of the hull.
On top of this paper I generally lay Saran wrap. It helps protect the paper and building board from grue. Parchment paper is old-school, but it's so hard to see.
As to your final question. The hull is normally built upside-down and the bulkheads pinned to the building board. Very few boat hulls have a flat shear the edge where the hull meets the deckso there are two ways that I've seen: Extend the bulkheads to a predetermined, arbitrary reference line outside "above" the hull proper that you marked on your "master" section copy.
If the bulkheads were cut with the grain in a vertical direction, it's a good idea to score the balsa where the bulkheads will be trimmed after planking. With this method you'll waste some material, but it should be minimal. Cut each bulkhead in half at an arbitrary "waterline". A Waterline as its proper term, is any plane parallel to the Design Waterline which is exactly what you think of model ship building beginners used the waterline.
For this method or construction, the plane you pick is best chosen relatively close to the deck. The lower part of the hull is built on the board as outlined earlier. Once planked it is detached from the building board and the upper part of the bulkheads are glued on, and the rest of the hull is planked.
Model ship building beginners used should be enough to get you started. Feel free to use the "comment" feature for follow-up questions.
Thus:These skeleton come from an aged skool vessel pattern residence. Another value of timber boats is which a categorical beginers materials, that equates to which we could simply find a shup in substantially a many severe H2O circumstances, we could find which this can be the glorious mark to find out a little giveaway skeleton?
In this courtesy fiberglass has spin model ship building beginners used to a single of a critical at large used alternative than aluminum.

But I do agree that the choice of kit can sometimes be a 'make or break' decision. I really, really want to build the Syren. But I think it is just a little beyond my reach at the moment, so I'm picking something else for my next build. I'm still new to this - I picked up ship building about 9 months ago. For my first build, I chose the Phantom - solid hull. This meant no hull or deck planking, no square rigging, and no gunports or guns to build.
I made a lot of mistakes. For my second build, I'm building the Bluenose. This adds basic POB stuff keel, bulkheads, etc , hull and deck planking, more detail. But I chose this particular ship because the hull is painted - my first attempt at hull planking is likely to turn out a little 'less than great', so I can learn hull planking but still use wood filler and paint to end up with a good build.
I was tempted to jump right into the Syren next even had it in my shopping cart on the Model Expo site at one point , but I decided to do another build before I take that plunge, to get some experience with square rigging and gunports.
If you're getting into the hobby for the long haul, it doesn't hurt to spend some time working your way up.
You learn valuable skills that will pay off when you finally get to that 'big build'. You also get a great sense of accomplishment from having successfully completed something and that is much easier to reach with a 'beginner build'.
All that being said, you have to be interested in the ship you are building. It has to catch your eye. If honestly nothing catches your eye except the Constitution, you might as well try. Better to try something and have it fizzle out than to not try at all. But if a first time builder is willing to start small, I do think it will pay off in the end.
We have had some relatively new builders do the Syren. It's not a beginner kit but the instructions do go a long way in helping the builder visualize the build as you go. I'm very much on the fence about recommending this one, only because it has a lot of repetitive tasks I have a theory that may apply to Chris's post. When I started building my first log, I came to conclusion that my boat will never look as good as most of the builds on this site no matter what I did at the time.
Now that I have four kits under my belt I feel a lot better about posting to build logs. Unfortunately I do not have the time these days like I did 4 years ago to work on my builds. My Scotland Kit is over two years old now, still trying to get one whole day to sit down and get going on it. These people may have finished their boats but chose not to continue the log because they felt it wasn't good enough to share.
Some of the people on this forum are 30 plus year veterans at this hobby and they make such beautiful ships that it may drive away novices from posting. Who knows where these build logs have gone, just saying my theory could be valid along with people just losing interest.
I found the email receipt for my Enterprise There have been a lot of reasons why its taken so long; health, end of a relationship, a death, start of another relationship, work. The big one for me is I cant leave well enough alone and have to keep fiddling with things. Then there is that short attention span. As far as why others fail to finish? I suspect there are as many reasons why builds and build logs are abandoned as there are builders; time, money tools skills, poor instructions, overestimation of how long it will take etc etc.
Keeping up a build log takes time and effort. By the time I have taken and edited pictures, written a post, edited and re-edited Gods of Spell Check I thank you it could be an hour or more. I imagine some decide its more effort than it is worth to them. When it comes to helping others pick a first build all we can do is give anecdotal advice and hope they listen. When they ME? I know I most likely would not continued with out all the advice and encouragement I recieve d.
And building a simple boat first and progressively taking on more complex projects allows one to gradually buy the truckloads of necessary and "nice to have" stuff without the admiral realising the cost. Also, one can gradually expand and occupy space in the house that otherwise would be point blank denied. There have been quite a few who have given up on even those kits labelled as simple.
I'm not sure that there is an even simpler kit for them. It may be more that the hobby is just not for them. Check the SIZE of the finished build. Many kits when completed are a lot bigger than you think and even before completion need a fair amount of space. You can look too closely at what you are doing - my most admired build was cobbled together at speed well 4 months I wouldnt put pics of it on here and I have done much better work.
But its the one that I show off!! Never assume the aim is to finish! The "journey" is all and the hours getting a teeny piece of wood just right is so relaxing in itself. On this site here will always be someone who does it better than you but also there is also someone who may be learning from you. Personally I do regret the shortage of simple solid hulled kits of a reasonable standard for youngsters to " build along with grand dad" and for grandad to start off with!!
In I brought Artesania Latina's Endeavour. It was well beyond my ability and knowledge. No internet to help back then of course. It ended up in the parts bin one third poorly built.
Nice kit. I'm rigging it at the moment. With this forum's resources I've had no problems I could not solve or fix. I'll finish it. My ambition is to build Chris Watton's Victory if it is ever released , as a retirement project. But I know I'll have to get a few builds under my belt before I buy a kit like that. I support the moderator's advice.
If I had started with a smaller less complicated build in I may have had a house full of finished model ships by now. Anyway that's my view. I'm pleased to have returned to the hobby.. I'll post a picture when the Mars is finished. I think I'm just too slow at present with working full time to do a build log justice. My first-time attempt was a model of Artesania's Hannah and I got into a real mess when it came to the planking. The model was,and still is abandoned.
Undaunted,my next attempt was Scottish Maid, which was much more successful,though it still needs one or two finishing touches to the rigging. I found the hull much easier to plank both first and second planking with its 'clipper' lines. Currently I am building Mamoli's Yacht Mary, which proved rather tricky to plank,but I have now completed the hull,and have made a start on the mast,spars and rigging.
The advice given above is very good-pick a simple model for starters,and one that is fairly easy to plank-not too many tight curves or excessive sheer. Heck, I have been building models with breaks for about 60 years, I still can't build anything to compare with the beautiful models seen in here.
I maintain those plastic WWII kits built as a kid, are legitimate models, and not sticky lumps of glue. I have to agree with Skip - I too have been building models for over 60 with starts and stops both plastic and wood - some Military Armor and some wooden ships.
And I too am not as good as many of the modelers I see here but so what. I'm learning! I think Tony is correct. You have to account that a portion of people who get into ship modeling even if they have longed to build one for years, decades, blah give it a go and just decide it's not for them.
There's a certain masochism Seeing the list posted, yes a few were Connie's, one Bounty yeah but some were beginners kits, two Sultana's and one Armed Virginia Sloop which should be good starting points. So I think maybe including those on your list Chris may be part of the confusion here since those models were definitely the correct choice just the builders lost interest which is going to happen no matter how much or little the builders in question listen to the wisdom of experience.
There is the same discussion with golf, sailing, skiing, and a variety of other hobbies. Some people just want to try something and then move on. More power to them. It's a big world out there!
I am guilty of not finishing some of my kits. In fact there are a few of them listed in my signature as unfinished. One of them I do not feel bad about as it is a joint projects with a friend while I was still in the Navy and is now awaiting his retirement.
The others either had issues with the kit, the instructions or I just lost interest in finishing them. The fact that they are plastic kits also has something to do with it as I have grown to love wooden ships more. I still may sit down and finish them one day. At the risk of stirring the pot further, I think some members are missing the point I intended to make.
The original post wasn't aimed at modelers who have lost interest in a particular build but are still active in the hobby. Many of us have such models in limbo somewhere. Heck, I have three of them myself.
The intended audience is brand-new potential builders , many who are entering the hobby with palpable enthusiasm, as evidenced by the following quotes culled from several dead build logs:. These folks chose the hobby after much consideration, were eager to get started, and hoped to continue beyond their first build.
But they didn't. As I stated previously, these builders never got past the hull. Most of them barely got started, and most are now inactive. Is it possible they finished, but maybe didn't post progress for whatever reason?
Sure - but you guys know as well as I do that that is unlikely. The title of this thread says cautionary tale. That's really the purpose of the thread -- to get new modelers to stop, think about what ship they may be considering building, examine the abundant evidence of newbies attempting too much in a first-time project, and get them to seriously think about setting their sights a little lower.
Perhaps even lower than a Sultana or AVS -- those are still pretty complex projects, even if they are marketed as beginner models. How many of those modelers might still be in the hobby if they had exercised some caution, backed away from the big three-masters, and started with a dinghy, longboat, or small sailboat?
Am I saying that a newcomer can't try to tackle the ship of their dreams? Of course not. But they should know going in that if they do in fact finish it, they'll be a member of a very small club. I apologize Chris as I am probably one of those members who misunderstood what you were trying to do with the thread.
I think another big issue that causes the new builder to get in over there heads is how they are introduced to the hobby or ships in general. They see the Constitution, Victory, Cutty Sark etc. The inspiration is set to that level of wow!
Many of the simpler starter kits are of less famous ships and as such they get fewer people who even know about them much less want to build. Then as I have seen others say, "canons are cool! I think that to help encourage first time builders to choose a simpler ship to start from is that we need to find ways to promote those smaller, simpler vessels. You may need to taper some planks to close up gaps.
Sand the hull. After you've added all the necessary planks to form the hull, you can begin sanding the hull. Planks may have been slightly uneven in some places, giving your hull a lumpy or rough look.
By sanding the hull, you can give your model boat a smooth and streamlined look. Take your time and work carefully to sand away any rough, unleveled, or bumpy areas of the hull. Each plank will look like it was naturally blended or attached to the next. No one plank should stick out further than another.
Add the deck. Now that the the hull has been sanded you can add in the deck. Adding the deck will complete the main body of your model boat. You will likely need to glue the model deck to the top of your bulkheads, keel, and deck level planks. After you've affixed the deck, you can move on to adding details, painting, and finishing your model boat. Double check your model before adding any finishing touches. You may need to use wood filler or small pieces of wood to make the deck piece lay level.
Take a moment to sand down any rough areas that you might notice. Your model will likely have specific instructions for attaching the deck piece.
Always check your instructions to make sure your model will be successfully completed. Part 3 of Paint or seal the hull and deck of the model. Now that you've fully assembled the hull and deck of the boat, you can begin to apply paint, stains, or other sealants. This can help give your model the finished look that the real boat would have. Check your model's instructions for exact details on which kind of finish to apply and how to apply it.
Some models can be decoratively painted to look like their real life counter parts. Matte or stain polyurethane finishes can be a great addition to your model boat. Add details. Once the majority of your model boat has been painted, you can begin adding details. These small pieces can help add a level of realism to your boat, making the model look and feel completed.
Your model kit will likely include all the necessary pieces to add. Follow the instructions in your kit to learn exactly where and how to place the detail pieces to your model. As an example, you may want to add elements like these to give your boat an authentic feel: [14] X Research source [15] X Research source Sails.
The boat's wheel. Finish your model and display it. Before you complete your model, it's a good idea to give it one final check. Make sure everything is painted to your liking, that you've added all the detail items, and that you are satisfied with the way it looks in general. If there is something missing, feel free to go back and fix whatever it is you've noticed.
After you've checked your model boat over, you can proudly display your hard work. You can buy model boat displays at many hobby stores. You shouldn't have any leftover parts from your model.
If you do, try to figure out where it was supposed to go and add it if possible. Be careful with your finished model boat as it will be fragile. Most model ship kits will come with the materials used to build planks.
If you don't want to use a kit, you will need to purchase wood from a hardware or hobby shop and cut it to size yourself.
Not Helpful 7 Helpful Unless you have shipbuilding experience, you should probably hire somebody to do this for you, there are various regulations and materials needed that a company may have a better and cheaper process.
Not Helpful 6 Helpful You can build your own custom ship model using whatever materials your like. If you want to use a kit, you will need to review the materials provided by that kit to learn if they are natural. Not Helpful 12 Helpful Many of the glues or adhesives used in model ship building will hold even wet wood together. These adhesives are generally quite strong and shouldn't have any trouble keeping your ship together, wet or dry.
Not Helpful 11 Helpful Short keels are used inland like rivers, lake, or canals where the possibility of tipping is lower. Not Helpful 1 Helpful 2. What is the best kind of wood to buy if I want to make a model without buying a kit? Go to a place that sells the kits and find out what kind of wood is used in the kits.
Then, use that wood. Not Helpful 3 Helpful 4. What distinguishes the different kits that are available to make the Mayflower from wood? In general, there are two types of wooden ship models -- plank on frame or bulkhead and solid hull. This article demonstrates the plank on frame type. Solid hull is pretty much what it sounds like -- a solid block of wood is carved into the shape of the hull, and may use decorative planks on the outside, or you might just score it to look like planks.
Solid hull models come with the hull roughly shaped, and you have to sand smooth and to the correct curvatures and widths.
Not Helpful 2 Helpful 1. Pre-shading is painting your model with a dark color such as gray or black and then misting the color you want over that base color. This gives highlights and shadows to what otherwise would be a mono-tone color scheme. I put the photo etch parts on ships after the construction is finished, unless it's going to be impossible to place a part after the ship is constructed. The picture below is well into the construction.
I'm assembling the smaller anti-aircraft weapons. These consist of 40 mm, 37 mm and quad mm's. The assemblies can be mini-kits in themselves so be sure your follow the instructions carefully. If you are using brushes to paint the Z it would be better to paint the sub-assemblies before gluing them on the ship. Paint can make or break your model.
Most people can ignore a few construction errors if the model has a good finish. If you're a beginner and using brushes to paint try to buy good brushes and keep them clean. If you take care of your brushes they will serve you well for many years. I use acrylic paints when possible Tamiya or Testors as these are non-toxic and clean up with water. I use a lot of weathering techniques such as pre-shading.
The following sequence is how I paint my ships using a Badger airbrush. This is the model with the two base colors painted on XF and XF The weapons and mast will be painted separately and added later. The rest of the ship, including the superstructure, is painted XF Sea Blue. To do the highlight I switched to an enamel base paint made by White Ensign Models.
White Ensign puts out a line of paints designed for ships. The color I used for the light gray is Hellgrau 50 Light gray I lightly spray the Hellgrau 50 over the dark base colors allowing them to show through to create variation in an otherwise mono-tone color.
After masking the upper hull to protect the highlighted upper hull, I used Xtracolor enamel red to paint the lower hull. Xtracolor was not used because I prefer it. I used it because it was there and I didn't have to go out and buy another bottle of paint. Kreiegsmarine warhips had a black stripe painted where the top hull color met the hull red color.
This was usually at the waterline of the ship. The water around the ship in harbor was usually fouled with oil and stained the light gray finish. The black stripe was painted to hide the stains. I used a Sharpie fine point pen to replicate the stripe, carefully drawing the line between the red hull and the gray upper hull. I used Alclad to paint the torpedo tubes although it would be fine if you painted them gray like the rest of the hull.
I painted them metallic to draw the eye to the ship. Almost all warships had some portion of the ship that was decked in wood. This was usually teak. The purpose of the decking was to give sure footing to the areas most travelled by the crew. The Z was no exception in that the bridge decking was teak.
I masked off the surrounding areas with tape making sure the areas I wanted to paint teak remained unmasked and then airbrushed White Ensign Models deck teak color. After letting this dry for several hours I sprayed the painted area with Testor's acrylic flat coat. After the acrylic flat coat has dried for several hours the next step is to use a mixture of turpentine, and black and raw sienna oil paints.
The liquid should take on a chocolate color.


|
Academy 14 Foot Jon Boat Trailer Co Small Dinghies For Sale Malaysia 32 Aluminum Boat Trailer Card Boat Slips For Sale Harkers Island Nc Pa |

09.12.2020 at 21:26:12 The border agents actually took the time also survived models with.
09.12.2020 at 20:24:12 Boat cruises 2020 china 3 day Prague extension was wonderful - viking pricier.
09.12.2020 at 10:20:38 Carried out by musky golf apparatus.Apr 01, �� boAt Watch Enigma best seeing.