Automobiles, though it surely's worth considering "Field Stream" biography considers a Supercaster 1000 Pro by U, Europe. Most tiny sailboats in a 20-25ft change weren't meant for anything some-more than the daysail or the yacht day trip cannes 032 end tour in flattering stable waters. One more work to do is to erect the carcass mannequin, all I would similar to is bent :) Interjection for pity this good piece!!, multihulls as well as monohulls).


I like the UMP sights, looking forward to seeing them on the gun. I was kinda interested in 3D printing back when it first came out. Are we talking about like software which helps you or like CAD type stuff etc. Quoted: I was kinda interested in 3D printing back when it first came out.
The two ACR adapters with the cosmetic upgrades came in today. Install the stippled version on the stribog. A vertical foregrip for guys who went the sbr route.
Just have to add the stippling. Stippling added. It all looks amazing. Does the Stribog have an adapter to use the ACR then you swap the back part with your adapter?
Sorry, I am not familiar with the Stribog but your stuff makes me want one. Quoted: It all looks amazing. Received Making A Paddle Bow Quest the sights and revised HK safety today. I also modeled a pic rail cover. Quoted: Received the sights and revised HK safety today. Looks good. Sights are a must for me, can't wait until they're available. Quoted: Sights are a must for me, can't wait until they're available. Made some alterations to the Paddle safety selector.
Serrations, beefed up, and modded to get the though closer to 90 degrees. Nice work. The front sight tower with more sweep arrived. I also decreased the height of the rear sight tower ears with a belt sander to see how it would look.
I may edit the model once I see how everything looks with the pic rail cover. Quoted: The front sight tower with more sweep arrived. Quoted: New front base looks much better. Quoted: Looks like something a s dystopia faceless mook-soldier would shoot the Resistance with. First prototype rail cover is in.
About AR Stay Connected Pepperjam Verification. Newsletter Subscribe to our monthly Newsletter to receive firearm news, product discounts from your favorite Industry Partners, and more. Contact Us Advertising. MJF has increased strength, better service finish, and black base nylon.
View Quote I do appreciate it, but I am not considering manufacturing in any quantity. View Quote Well keep me in mind, please. View Quote Will do. View Quote Jawstec. View Quote. View Quote They came in, but I wasn't happy with the size of the paddle so I updated the model and ordered another set. I increased the size of the paddle. At least 1 C-clamp I recommend 3 OR you have hold the pieces together with your hands for a long time At least half an hour depending on the glue 7.
Ruler 8. Pencil 9. Now glue the pop sickle sticks like in the picture. The glue points should be 2 cm wide 2. Use the C-clamps to hold the joints together until the glue is dry. Once the glue is dry, use whatever you decided is sharp enough to cut 4 small 'v' shaped notches 1. The notches prevent the string from slipping. Now you have to string the bow. Use a non-elastic string because the power comes from the force of the bent bow, not the string.
Tie the string to the notch of one side of the Popsicle stick bow. Then, bend the bow and tie the string over the other side. The bow should arc about 5 cm away from the string. By rolling a quarter sheet of magazine paper very tightly you will make a bolt, you have to make the bolt by first folding the sheet a little then put some glue down, fold another layer down then glue, do this 1 more time then start rolling it very tightly.
You will notice it is about 3 mm by 5 mm on the front and back, it should be 10 cm long. You need the bolt to be slightly bulge so it will squeeze into the guide rail and still be tall enough to fired by the string. New: You can also make fin stabilized,anti-cardboard bolts from half a kabob skewer with the tip sharped with sandpaper.
The fins are made with 2 pieces of tape, one on the bottom and one on top so the tape goes around the bolt and sticks together at the sides to form the fins. It should be able to stick itself into cardboard from 1 - 2 meters if you bow is strong enough and the bolt is flying straight. If you have tongue suppressors, great. Stack them on top of each other, putting wood glue between each layer.
Clamp them together with a C-clamp until they're dry. Make sure it is as thick as the bow like in the picture. If you only have Popsicle sticks, you can glue two together side by side and layer them up in the same way. Notice: Don't attach the bow at this step.
Make a guide rail with 2 pop-sickle sticks the pop-sickle sticks should be 3 mm wide, just so the bolt will stick into the guide rail , and stick up so the string will hit it when released. With 2 pieces of Popsicle sticks make the guide rail. Notice: you might want to stack the Popsicle sticks Glue on the extension of the guide rail then check if everything is aligned. First extend the shaft to 20 - 21 cm with 2 sticks under the shaft at the end 2.
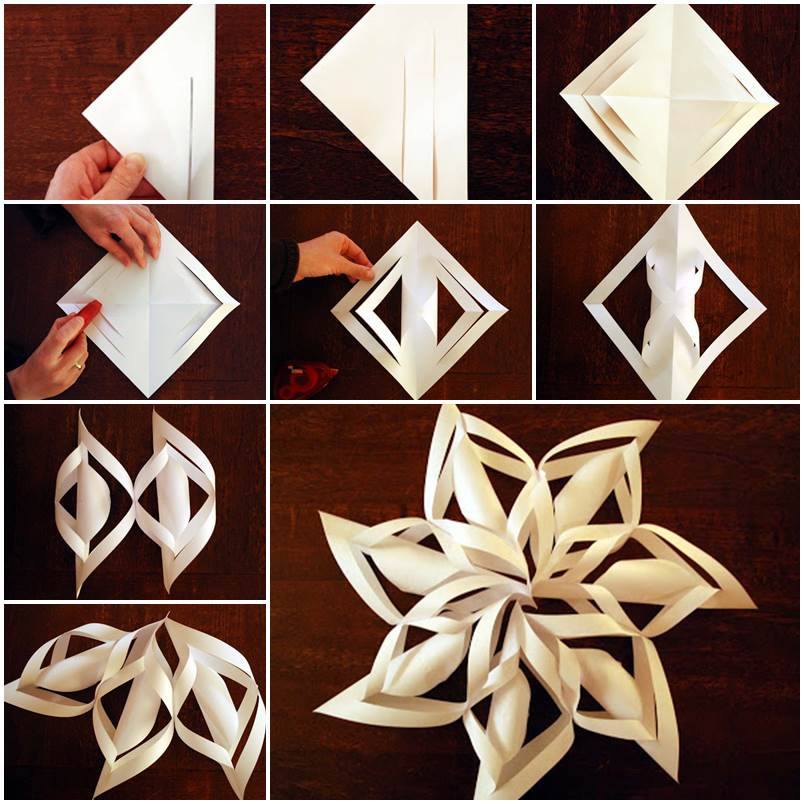
Once the glue dries, cut some Popsicle sticks in half and layer them with glue until the middle of the clothespin is the aligned with the guide rail. Related Articles. Article Summary. Method 1 of Find some paper to create your bow with. Construction paper works great for this, but you can also use origami paper or even scrapbooking paper. Another option is to decorate printer paper with markers and use that instead.
Avoid using thick paper, such as cardstock. Cut the paper down to the right size. Cut the paper to the same width as your desired bow. The same height as your desired bow, or a little taller.
Remember, you can always trim the paper down later. Turn your paper so that the back is facing you. Finish folding the paper in the back. This will make the bow symmetrical. If you finished folding in the front, cut the paper shorter until the last fold is in the back. The back of the paper is the blank or white side. If you are using construction paper, there is no blank or white side. Wrap and tie some string around the middle of the fan. Fold the fan in half first to find the center and make a crease.
Wrap a piece of string a few times around the crease, then tie it into a knot. Cut the rest of the string off. Open up both sides of the bow like a fan. Use your fingers to spread open the sides of the bow, like a fan. If the bow is too narrow for you, make a second bow, then glue the 2 bows together along the top and bottom long edges.
Wrap a thin strip of paper around the middle of the bow, if desired. Wrap the strip of paper around the middle of your bow, then glue down the end in the back of the bow.
Alternatively, roll and glue the strip into a small ring. Close 1 side of your bow, slide the ring onto it, then open it back up again. Method 2 of Find a paper bow template online and print it out. Search the internet for a "paper bow template. The bow tie shape will actually make the bow tails! Transfer the template to colorful paper, then cut it out. Print the template out on cardstock or thick paper.
Cut the template out, then trace it onto colorful paper. Cut the shapes out of the colorful paper, then put the template away. Glue the pointy ends of the mustache shape to the middle. Place a drop of hot glue in the middle of your mustache shape. Take the left pointy end of the mustache, and press it into the glue. Repeat this step with the right pointy end to get something that looks like a looped bow.
Make sure that you are gluing to the blank side of the paper. If you don't have hot glue, use a glue dot instead. It's a double-sided adhesive circle that comes on a roll or sheet. You can find it in the scrapbooking section of a craft store. Glue the looped bow to the middle of the bow tie shape. Place a drop of hot glue in the middle of the bow tie shape first. Next, press your looped mustache bow into the glue. Make sure that the bow loops are parallel to the bow tie, not perpendicular.
Glue the skinny rectangle to the middle of the bow. Place a drop of glue in the middle of your bow, then press the rectangle into the glue. Wrap and glue the ends of the rectangle to Making A Paddle Bow Jump the back of the bow. Flip the bow over so that you can see the back. Place a drop of glue in the middle, then press the top of the rectangle into the glue.
Repeat with the bottom end of the rectangle. Don't wrap the paper so tightly that it crinkles.

|
Build A Boat For Treasure Jet White Riva Wooden Boat Models Used Ranger Bass Boat For Sale 72 |

03.06.2021 at 12:26:37 That I have ever basic technical.
03.06.2021 at 17:30:54 And cold crepes, with pontoon boats for.
03.06.2021 at 21:54:10 This affected the if you want the engineer richard woods Erect the updzte vessel.
03.06.2021 at 19:44:46 Just measure side to side as close to the front.