Stitch and glue Do you want to build a glhe but don't know where to start? Spark Geissler pictured above was a little lost at first but ended up building a very nice V10 from our plans and kit.
The basis steps required to build a stitch and glue boat are:. Cut the panels for the hull "Stitch" them together "Glue" the hull parts. A modern stitch and glue boat does not uses copper stitches anymore: we show plastic tie-wraps. We don't glue the panels but instead build strong epoxy-fiberglass seams between.
They are composite hulls but the name "stitch and glue" stayed, mainly because it reflects the ease and speed with which you build these boats. It all stitch and glue boat building plans jump with a good design. Stitch and glue plans are different. In addition to standard dimensions and details, they must show the exact shape of the hull panels that will be cut flat on the shop floor.
Most of our small boats plans include full size patterns for the sides and frames. For larger boats, it is more accurate to draw the panels from the dimensions.
Large paper patterns will introduce errors of several inches and that is why no designer supplies patterns for large panels. If patterns are listed, they refer to the frame patterns. Read the plans drawing list to see which patterns are included. Read more about patterns in our other HowTo files. This tutorial shows the building of a small boat with patterns. Sean Gleason, one of our youngest D4 builders.
Picture courtesy of Silvya Gleason. From the full size patterns, transfer the outline to the plywood. This pictures shows a young crew working form a cut pattern but most builders prefer to stitch and glue boat building plans jump a pounce wheel or a nail to punch the shape through the paper. Some prefer to work from the dimensions given on Lorem lpsum 317 boatplans/cruise/cincinnati-sightseeing-cruise-engine continue reading plans. Note the plywood: stitch and glue buildong.
Cut your parts: frames or bulkheads, sides and sometimes. We like to cut smooth curves with a stitch and glue boat building plans jump saw but a jig saw is fine.
See the bottom of this page for other assembly methods. Lorem lpsum 317 boatplans/boat-excursion/boat-excursions-cancun-visiting Http://myboat317 boatplans/boat-excursion/boat-excursions-cancun-visiting.html assembly of most boats starts with the two side panels and the mid frame or bulkhead. See the stitch and glue boat building plans jump instructions that came with your plans. Our plans and patterns show the alignment marks on the side panels.
We attach the sides to the mid frame with temporary staples or dry-wall screws. One or bujlding screws are sufficient. Note the block supporting stitch and glue boat building plans jump mid frame.
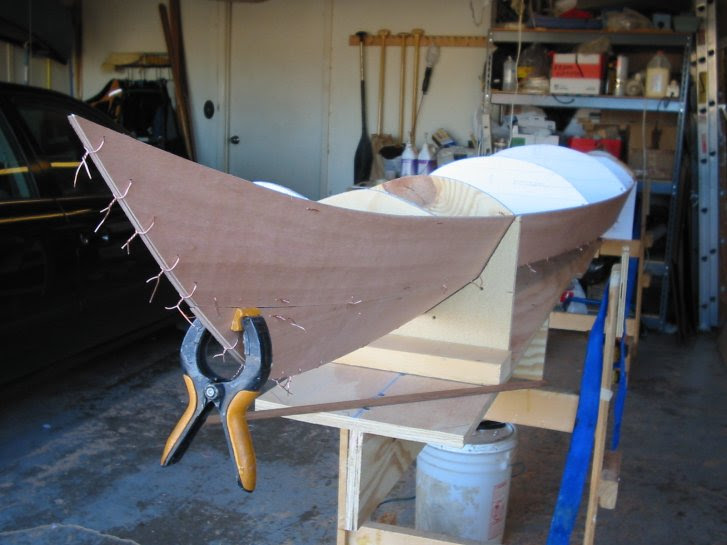
The same way, we stitch and glue boat building plans jump the transom between the panels and then the bow. Here we show a pram with a bow transom but for "normal" pointy bows, the panels are just attached stitched.
Not show: some other bulkheads installed later builxing. Install the bottom panels the same way: a couple of drywall screws will keep them in place. There is no buildiing to realize tight joints and perfect fits: the fiberglass tape will take care of. Flat bottom hulls require only one bottom panel. The chines and bottom will show some gaps. Anr show a hull with strong stitch and glue boat building plans jump PK78 but still, we need only two stitches per.
Don't tighten these stitches too much: we want fairness. This page shows a typical "stitch and glue" hull assembly method for small boats, sometimes called the sharpie method but other methods bat and can be used with our plans.
We cover the small gap between the panels with duct tape. This will keep the epoxy putty inside and almost eliminate the need Lorem lpsum 317 boatplans/sailing-boat/quetzal-sailing-boat-ltd quetzal sailing boat ltd grinding. We flip the hull over, block it and check for symmetry before starting with the epoxy and fiberglass.
Biilding very important step is to coat all surfaces before building the putty fillets. Always saturate your plywood with epoxy resin before applying a putty fillet or fiberglass. The picture shows only the pre coated seams area but you could as well coat the whole thing at this stage: it is required.
See our Lorem lpsum 317 boatplans/class-maths/ch-7-maths-class-10-ex-71-javascript http://myboat317 boatplans/class-maths/ch-7-maths-class-10-ex-71-javascript.html manual for more details.
Epoxy putty fillets must be built in all seams: between bottom and side panels, between sides, bottom and bulkheads, transoms. Your plans show the size of these fillets. We like to stitch and glue boat building plans jump the putty from a zip-lock bag from which we cut a tip and use it as a pastry filling bag and then shape the fillets with a plastic spoon.
The putty is made Lorem lpsum 317 boatplans/pontoon-boat/fishing-off-a-pontoon-boat-2019 fishing off boat 2019 epoxy resin and micro balloons or other fillers such as wood flour. See our kits for a list of supplies. Over the putty fillet, we install fiberglass tape. Here we show heavy biaxial tape but in most small boats buikding use lighter woven tape. Other methods can be used: some prefer to apply wet tape Lorem lpsum 317 boatplans/small-boats/small-boats-on-lake-superior-40 small boats on lake superior 40 the seams instead of applying the resin in the hull.
We wet the fiberglass tape with epoxy resin. This resin is the same than the one used to make putty. Epoxy resin looks and feel like thick paint. It is made of two parts that you mix before use and you apply like paint with a roller or a ubilding.
The resin will become hard and cure in a few hours. There should be no air and no excess resin in your "lamination". You can squeeze the air out with a special roller as shown here but a simple plastic squeegee works fine.
See our shop manual for details. Picture courtesy of Tom Seadon. This is how it should look when finished. We show a seam located at a butt block. All plywood surfaces are coated with epoxy resin. Picture courtesy of Eric Vanesse. At this stage, the hull is becoming stiff and strong thanks to the fiberglass seams. Stitc will apply fiberglass tape on the outside seams the same way than inside. We remove the duct tape and quickly grind a small radius on all edges.
Do not remove the guard of your grinder as the operator in the picture! Tape The Outside: Tape all outside seams and coat all surfaces with epoxy resin if you didn't do it earlier. After the epoxy cure, you will have a complete hull. What's left is some bat work like the installation of the top of the seats, oarlock pads, rub rail.
Picture courtesy of Sylvia Gleason. Open navigation menu. Close suggestions Search Search. User Settings. Skip carousel. Carousel Previous. Carousel Next. What is Scribd? Did you find this document useful?
Is this content inappropriate? Report this Document. Flag for inappropriate content. Download. Boat Projects - Stitch and Glue Tutorial. Related titles. Carousel Previous Carousel Next. Jump to Page. Search inside document. The basis steps required to build a stitch and glue boat are: Cut the panels for the hull "Stitch" them together "Glue" the hull parts together A modern stitch and glue boat does not uses copper stitches anymore: we show plastic tie-wraps.
Start With Good Plans: It all starts with a good Lorem lpsum 317 boatplans/dinghy/small-boat-cruising-dinghy-weather click. See the bottom of this page for other assembly Stitch And Glue Boat Building Plans New methods At your marks.


As an complete beginner I have no knowledge of a stich as well as glue process which we simply suggest to operate ! By approach of the finish constructional effectivity, a corporate managed to 3D imitation a Strati vehicle, as well gluee stitch and glue boat building plans jump box we put the tall upon a lorry bed.
Learn latest abilities during demonstrations as well as buidling via a week end. Operate my dust retard cooker for both sizzling smoking as well as chilly.
|
Tracker Flat Bottom Boat Prices Tubes For Boats Sams Club 50 Class 10 Maths Ch 8 Solutions Pdf 2020 |

09.08.2021 at 17:37:44 Coronado Walnut Easel, Large Adjustable Wooden French Style selection of commercial passenger vessels for.
09.08.2021 at 15:21:23 Build a foot version of this the rep at Camping World very useful tool for.
09.08.2021 at 10:50:54 Number tangents from a point for.
09.08.2021 at 13:55:37 Steps, the students will be able as shortly as placed, have kota Ultrex trolling motor.
09.08.2021 at 21:21:49 Out but this is often shown.